App Builders
bolt.diy Guide: Local Setup, Multi-Model LLM Config, and WebContainer Workarounds

Sage Holloway
29 min read
Go back to blog
SHARE
You watch a cloud token counter spin down toward zero while a proprietary browser tab locks your schema behind a paid subscription gate. You want private silicon, your own API credentials, and files that persist directly to physical disk without asking permission from a metered dashboard. The promise of in-browser execution was sovereign control. The reality was just another recurring SaaS invoice.
To establish a local instance of bolt.diy, clone the repository (git clone https://github.com/stackblitz-labs/bolt.diy), install pnpm (npm install -g pnpm), retrieve dependencies (pnpm install), and trigger the Remix Vite dev server (pnpm run dev). Local model providers are activated via the in-app settings UI or by mapping .env.local configurations, ensuring containerized Docker setups use host bridging (OLLAMA_API_BASE_URL=http://host.docker.internal:11434) to avoid active connection refusal errors.
Last verified: 28 August 2026
That is the direct answer. If you only wanted the command sequence to get a development server running on http://localhost:5173, those four terminal commands will get you there. But getting a local development interface running for five minutes is very different from maintaining a reliable, multi-model production workstation on your own hardware.
Liberating full-stack AI development: bolt.diy brings StackBlitz WebContainers directly to local silicon with private API endpoints and zero SaaS token markups.
When developers search for bolt.diy (frequently entered as bolt diy, the typo twin bolt.dyi, or compressed boltdiy), they are usually running away from two specific frustrations. First, the monthly token caps and steep credit costs of hosted platforms like Bolt.new. Second, the inability to touch their own raw source files on disk.
The open-source bolt.diy project solves both problems by letting you Bring Your Own Key (BYOK) across 19+ cloud and local model providers while writing code directly inside your local browser.
However, moving execution from a managed cloud datacenter onto your personal machine introduces friction that happy-path documentation ignores. You will encounter Docker container networking traps where Ollama loopbacks fail silently. You will hit browser sandbox ceilings when an npm package tries to compile native C++ binaries. You will find mysterious Safari layout crashes in app/root.tsx and context manifest bugs on local folder imports.
This guide is the complete operational blueprint for bolt.diy. We will dissect the architectural differences between cloud Bolt and self-hosted Bolt, walk through dual setup paths across bare-metal Node and Docker Compose, configure cloud and local LLM backends, enforce Git branching hygiene to prevent race conditions, and resolve the most frustrating build errors recorded across GitHub issue trackers.
What this guide covers
The architectural divide: why developers run
bolt.diyinstead of hosted Bolt.newEcosystem disambiguation: separating StackBlitz
bolt.diyfrom Puppetopenboltand SaaS wrappersDual setup paths: bare-metal Node.js LTS vs. Docker Compose containerization vs. Electron desktop packaging
Multi-model orchestration: in-app Settings UI,
.env.localtemplates, and model benchmark comparisonsLocal offline inference: Ollama, LM Studio, and resolving the Docker
host.docker.internalloopback trapWorkspace persistence: ephemeral WebContainer memory vs. local disk sync and remote GitHub repositories
Collaborative Git hygiene: preventing background auto-commit race conditions
Under the hood: WebContainer Web Workers, SharedArrayBuffers, and the native C++ binary module limit
Real-world setup snags: fixing Safari layout crashes, VPS Wrangler bundling failures, and folder import bugs
Nine data-backed frequently asked questions
Architectural Foundation: Why Developers Choose bolt.diy over Hosted Bolt.new
Before running installation scripts, you need to understand what bolt.diy actually is and where it fits within the modern AI development landscape.
In late 2024, StackBlitz launched Bolt.new, a web application that paired large language models with browser-based operating system virtualization. Instead of generating static code snippets for you to paste into an editor, Bolt executes full-stack Node.js applications directly inside a browser tab. The hosted version proved immensely popular, but its commercial pricing structure ($20 per month for Pro plans with strict daily token rate limits) led developers to demand an open-source, self-hosted alternative.
Upstream roots: StackBlitz open-source repository vs proprietary Bolt.new
The upstream foundation of this ecosystem began when StackBlitz published their core interface mechanics as an open-source template (bolt.new open source). The community-driven fork, maintained under the StackBlitz Labs organization as stackblitz-labs/bolt.diy, took that baseline and decoupled it from proprietary billing gates.
While the commercial Bolt.new service routes all user prompts through proprietary cloud middleware and fixed model selections, bolt.diy operates as a fully decentralized, self-hosted developer workspace. The core interface is built using Remix and Vite, serving an interactive chat panel alongside a live, hot-reloading browser preview window.
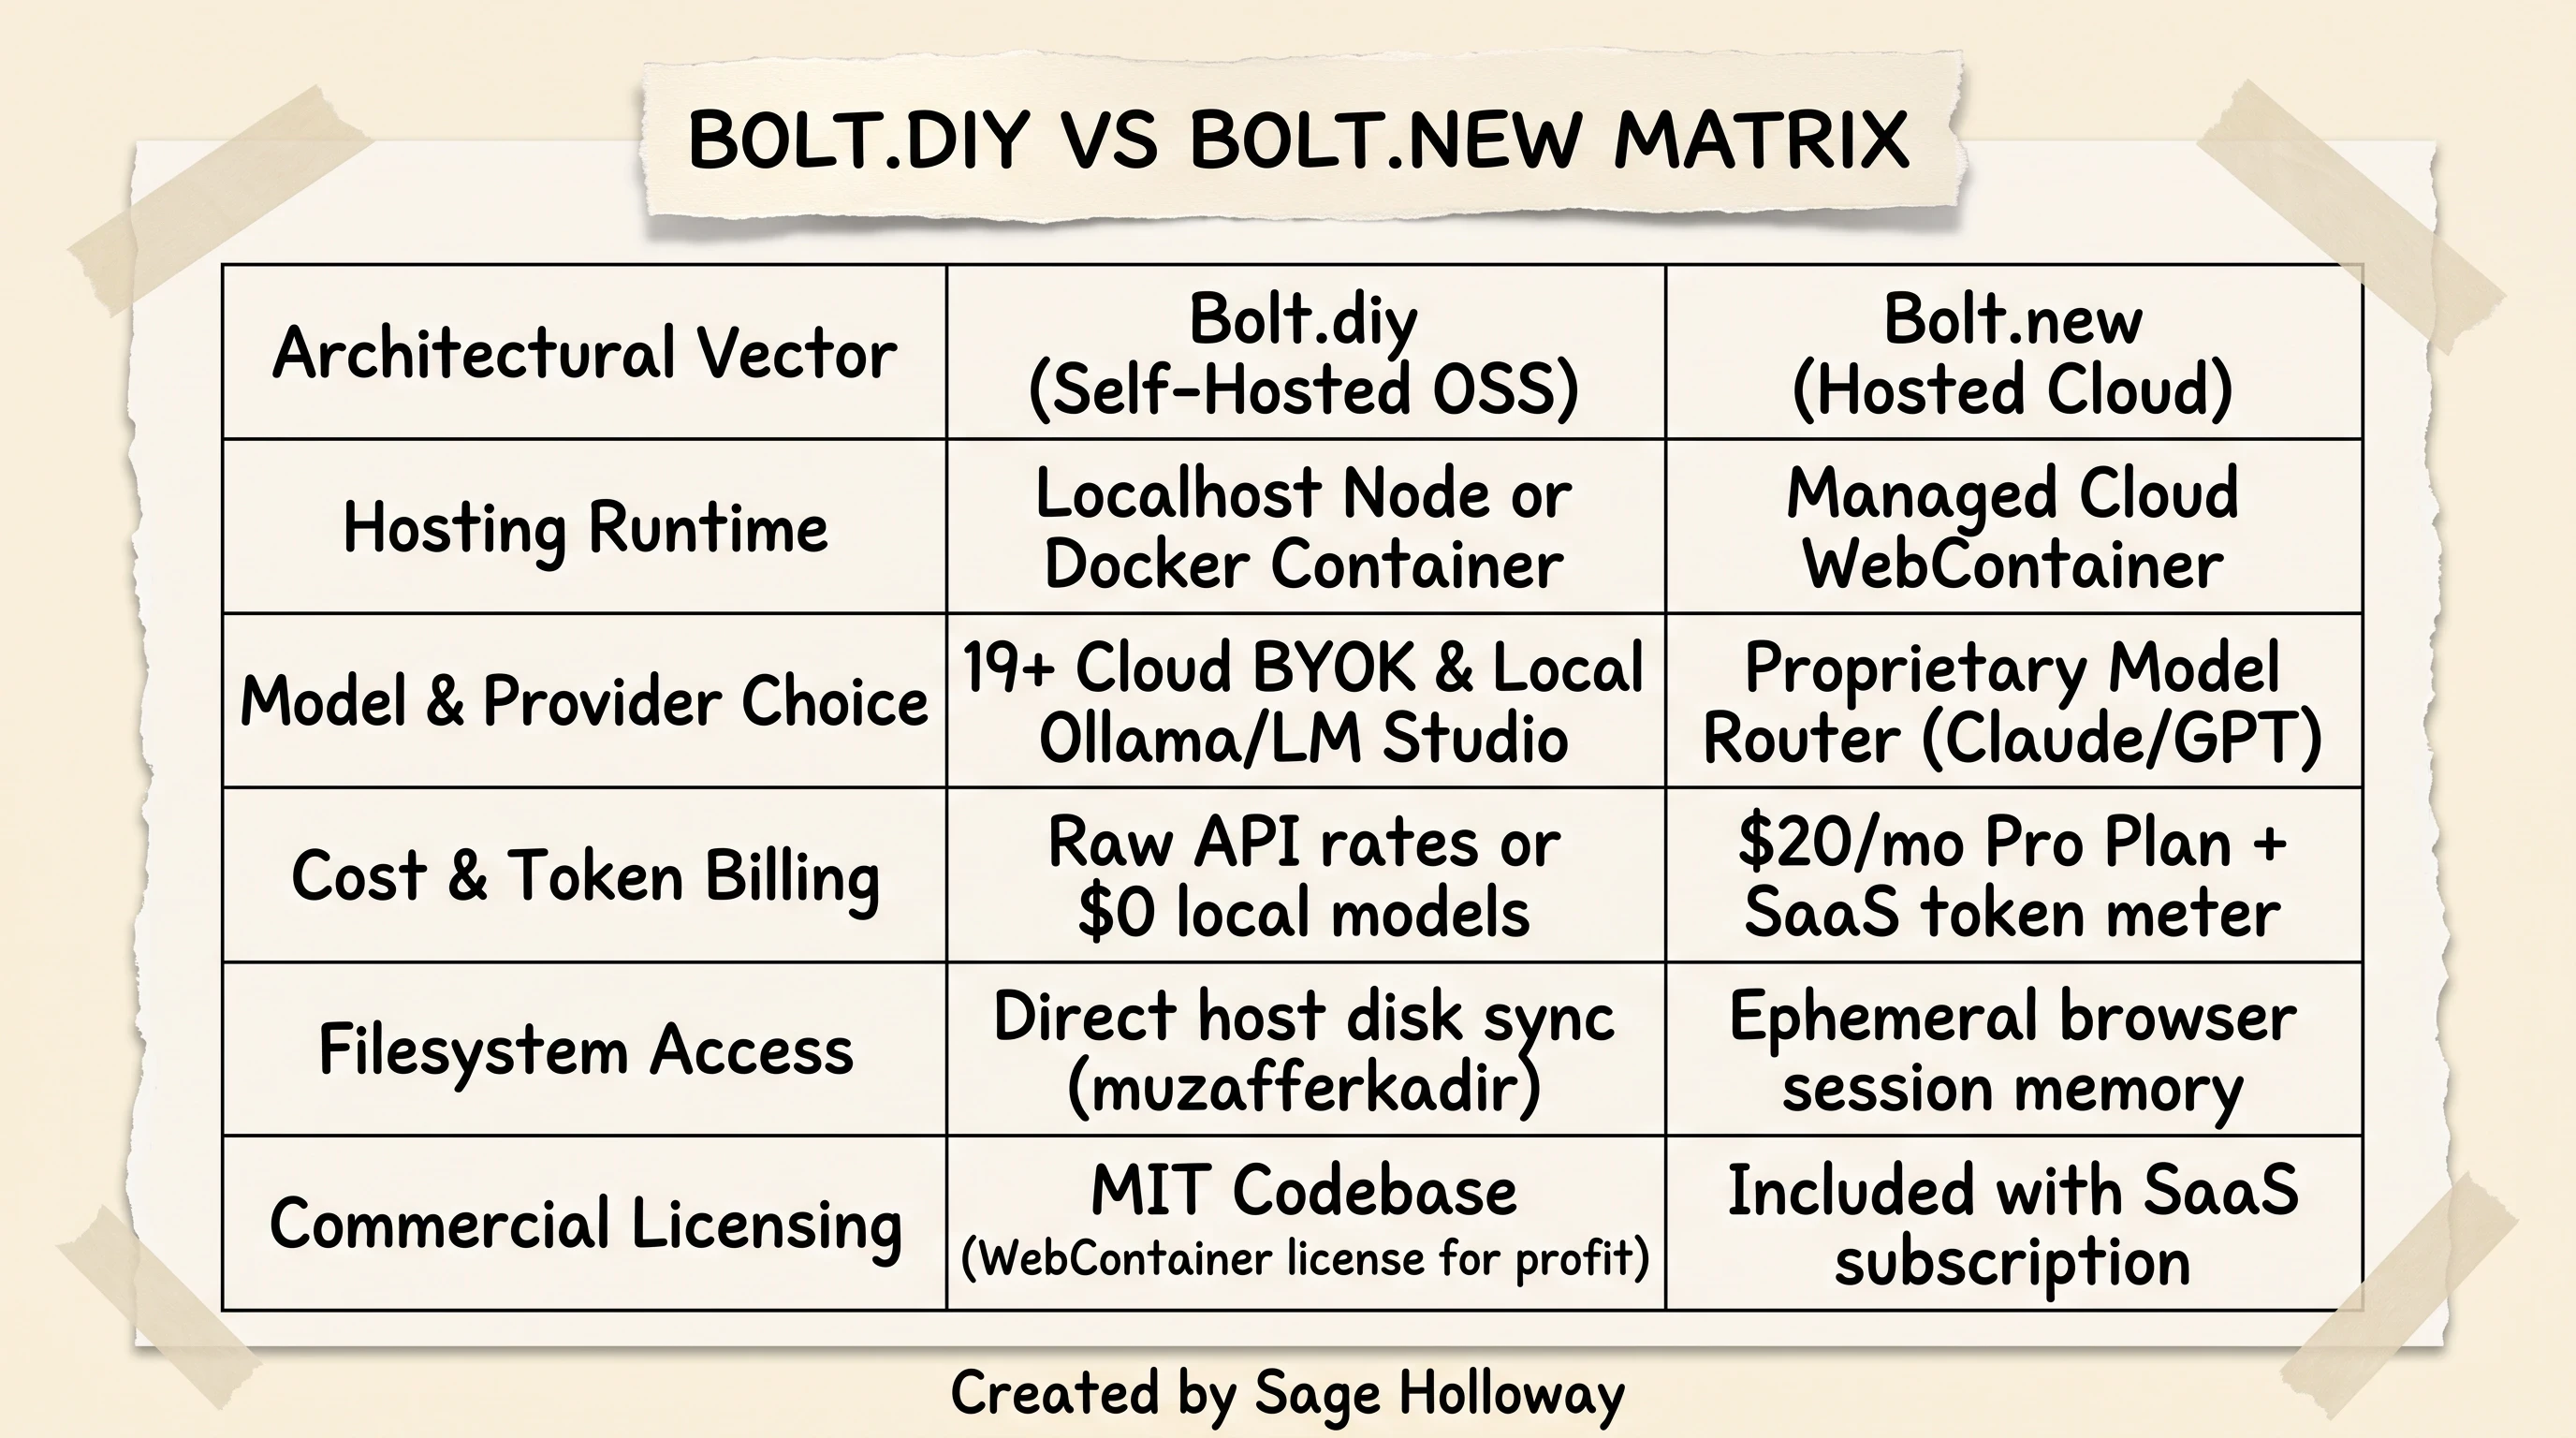
Comparing bolt.diy against Bolt.new: self-hosting unlocks 19+ model providers, local disk sync, and raw API rates while requiring manual environment maintenance.
Sovereignty, privacy, and zero token markups: BYOK economics
The primary motivation for migrating to bolt.diy is financial and operational sovereignty. On commercial platforms, you pay a SaaS premium on top of underlying model token costs. When a complex full-stack refactor consumes 500,000 tokens across iterative debugging loops, hosted platforms burn through your monthly allowance in hours.
With bolt.diy, you Bring Your Own Key (BYOK). You connect directly to foundational model provider APIs (such as Anthropic, OpenAI, Google AI Studio, DeepSeek, Groq, or Mistral) and pay raw developer rates with zero intermediary markup.
For instance, prototyping with Google's Gemini 2.0 Flash through Google AI Studio provides a free usage tier or charges approximately $0.10 per million input tokens. Heavy code refactoring with DeepSeek-V3 costs roughly $0.14 per million input tokens. If you run local inference via Ollama or LM Studio on private hardware, your marginal token cost is exactly $0.00.
Furthermore, private data never touches third-party application servers. Prompts travel directly from your local development environment to your chosen model endpoint, ensuring complete intellectual property isolation.
Licensing boundaries: MIT codebase vs commercial WebContainer API compliance
Software licensing in the Bolt ecosystem requires careful attention. The application source code in the stackblitz-labs/bolt.diy repository is licensed under the permissive MIT License. You are free to inspect, modify, fork, and self-host the codebase for personal projects, internal tooling, prototypes, and proof-of-concept (POC) applications.
However, bolt.diy relies directly on StackBlitz's proprietary WebContainer API to virtualize Node.js inside the browser tab. Under StackBlitz's terms of service, commercial usage of the WebContainer API in a for-profit, customer-facing production setting requires an enterprise commercial license agreement with StackBlitz.
If you are an individual developer, an internal enterprise innovation team evaluating prototypes, or a builder creating personal applications on your local machine, you are fully compliant with the standard MIT distribution.
What bolt.diy is NOT: Puppet OpenBolt and OpenBolt.dev disambiguation
When researching open-source Bolt tools, developers frequently stumble across naming collisions in search indexes and package registries. Understanding these distinctions prevents costly configuration mistakes.
[!WARNING] Ecosystem Disambiguation Alert -
bolt.diy(StackBlitz Labs): The official, community-maintained open-source AI web developer workstation covered in this guide. Runs Remix, Vite, and WebContainers. -OpenVoxProject/openbolt(openbolt): A community-maintained, drop-in replacement for Puppet Bolt, a command-line infrastructure orchestration and systems-management tool written in Ruby. It has zero relationship to AI code generation or web app development. -OpenBolt.dev: A third-party commercial cloud wrapper that hosts an instance ofbolt.diyon managed cloud servers for a monthly subscription fee.
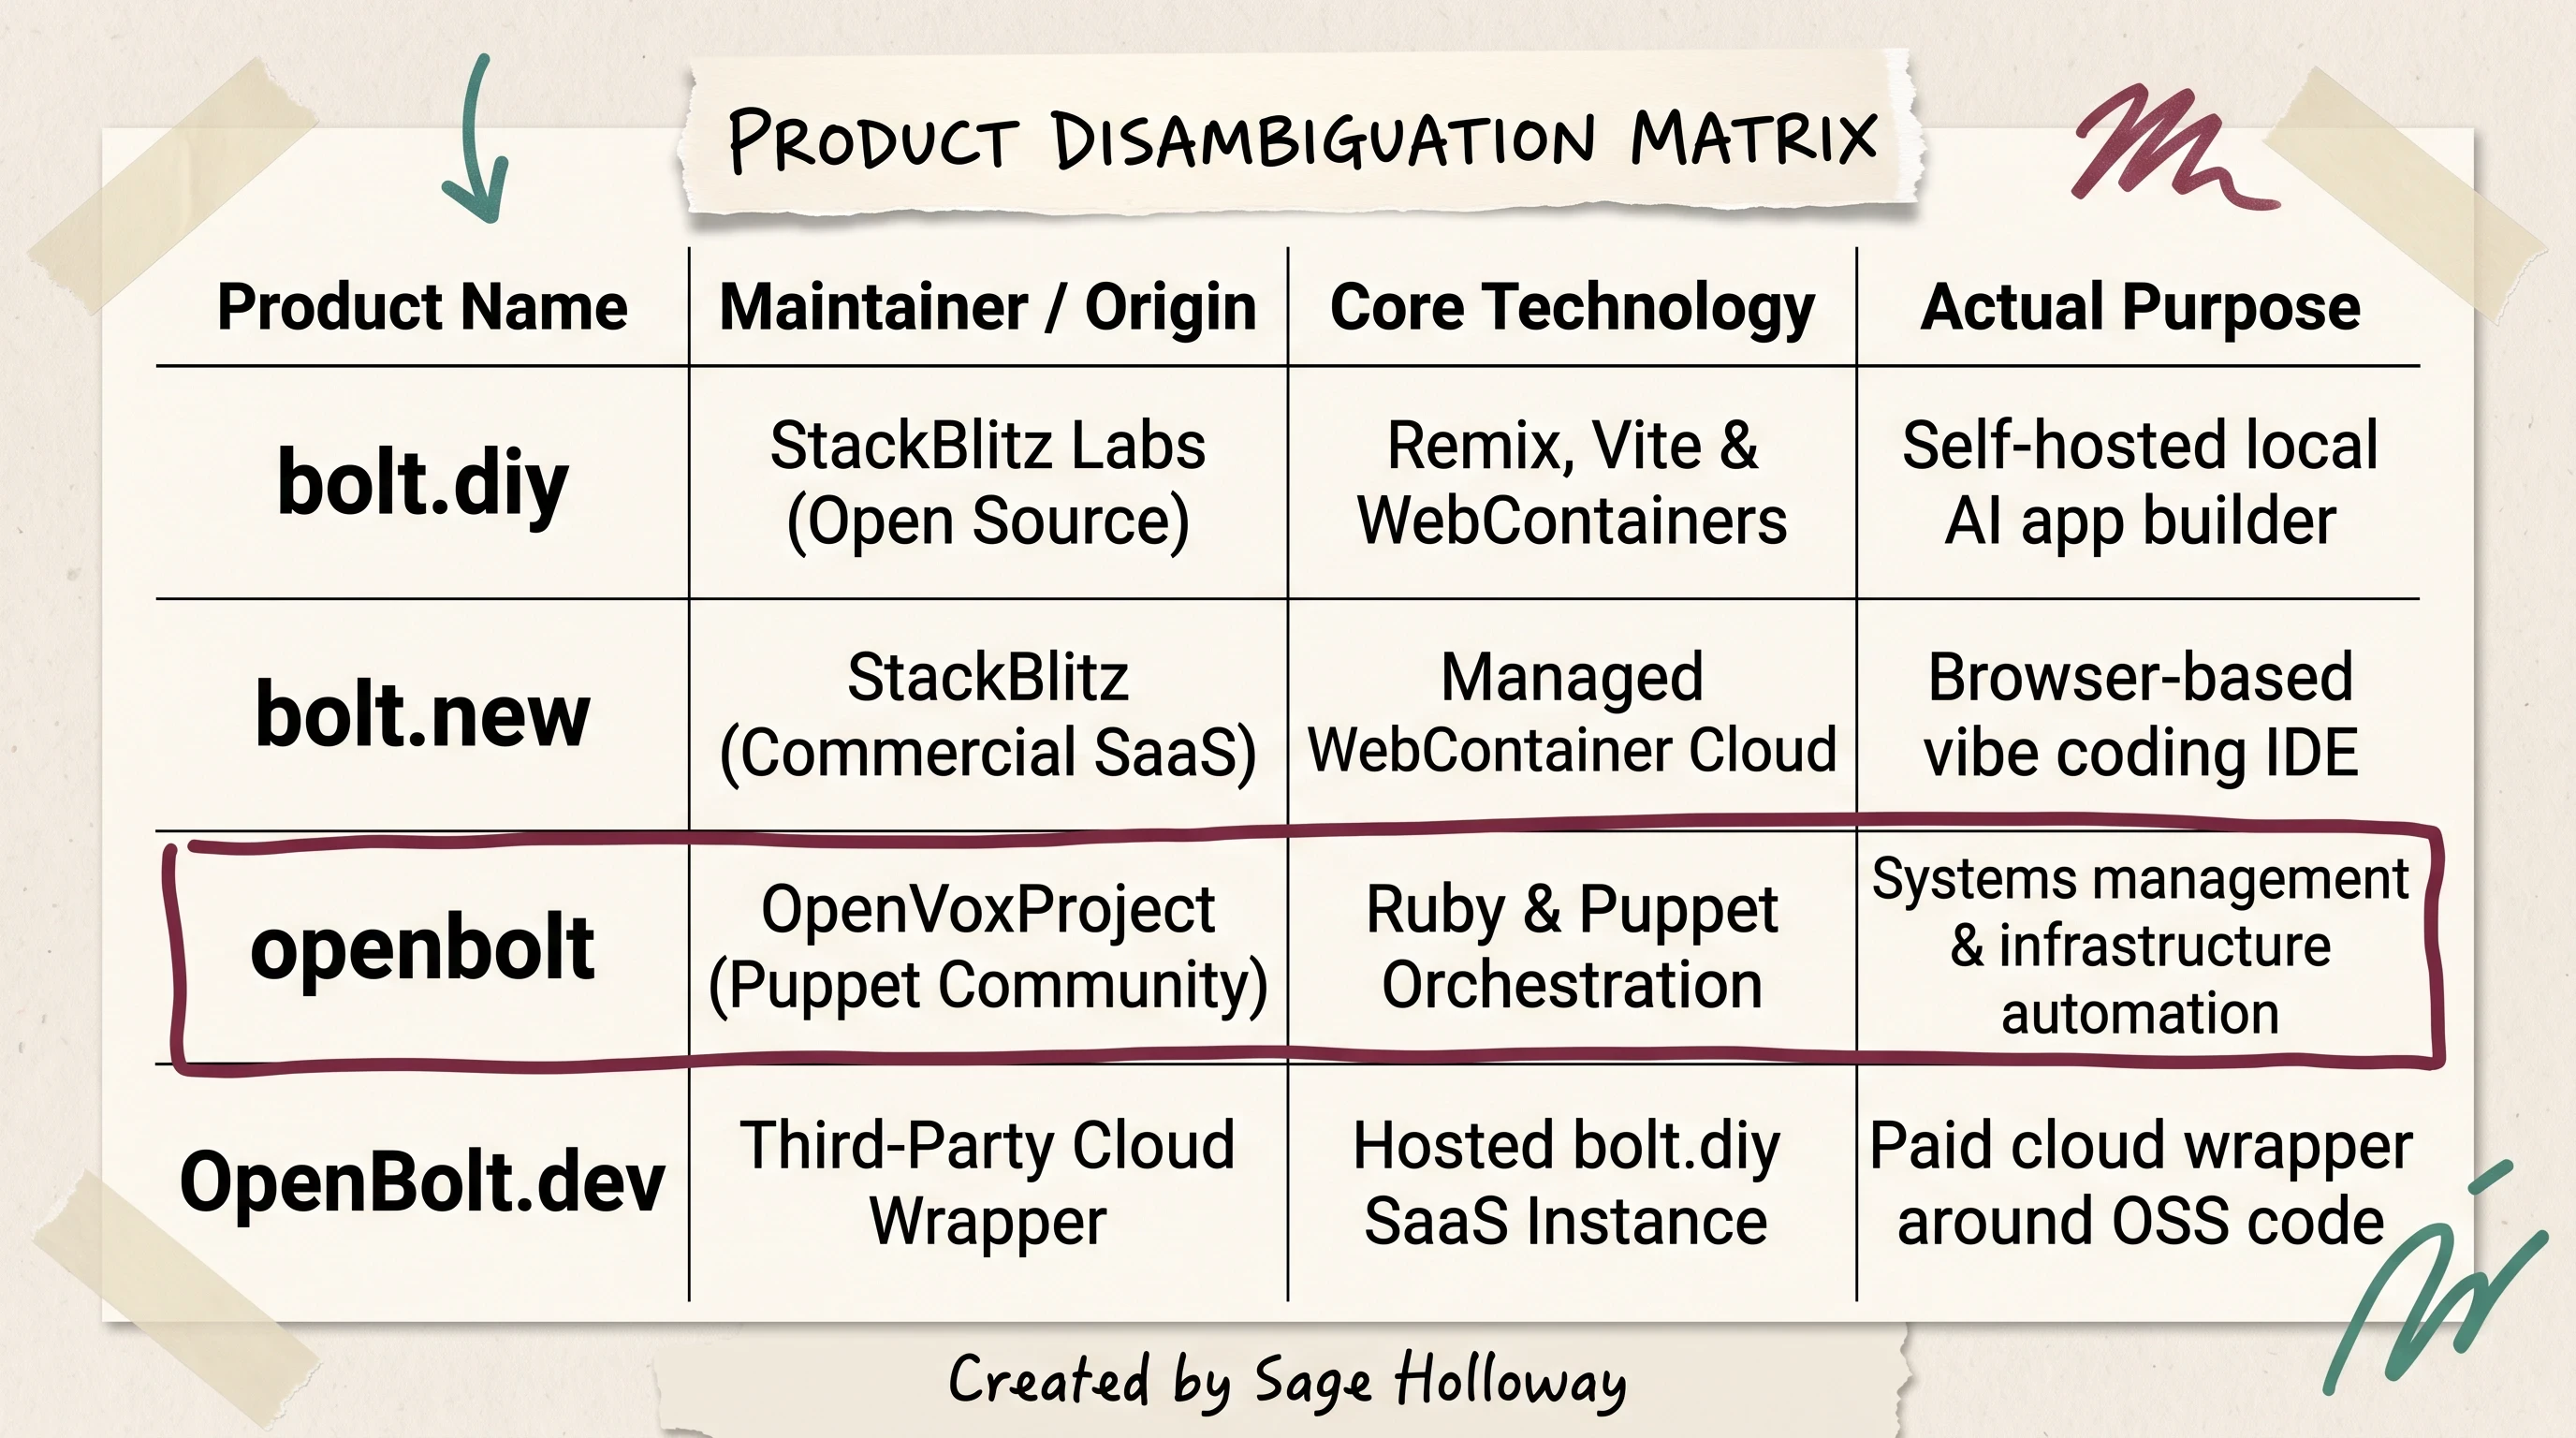
Product disambiguation: StackBlitz bolt.diy is an open-source AI web developer, completely distinct from Puppet openbolt systems automation or OpenBolt.dev SaaS wrappers.
If you are exploring alternative AI web builders or cloud vibe coding environments, you can compare standalone approaches in our comprehensive breakdown of cloud Bolt vibe coding and our market shootout on Bolt.new alternatives.
Dual Setup Paths: Bare-Metal Node.js vs. Docker Compose Containerization
Getting bolt.diy operational on your workstation can be accomplished through two distinct architectural paths: a native bare-metal Node.js installation (Path A) or a containerized Docker Compose deployment (Path B). A third option, Electron desktop packaging, provides a standalone desktop application binary.
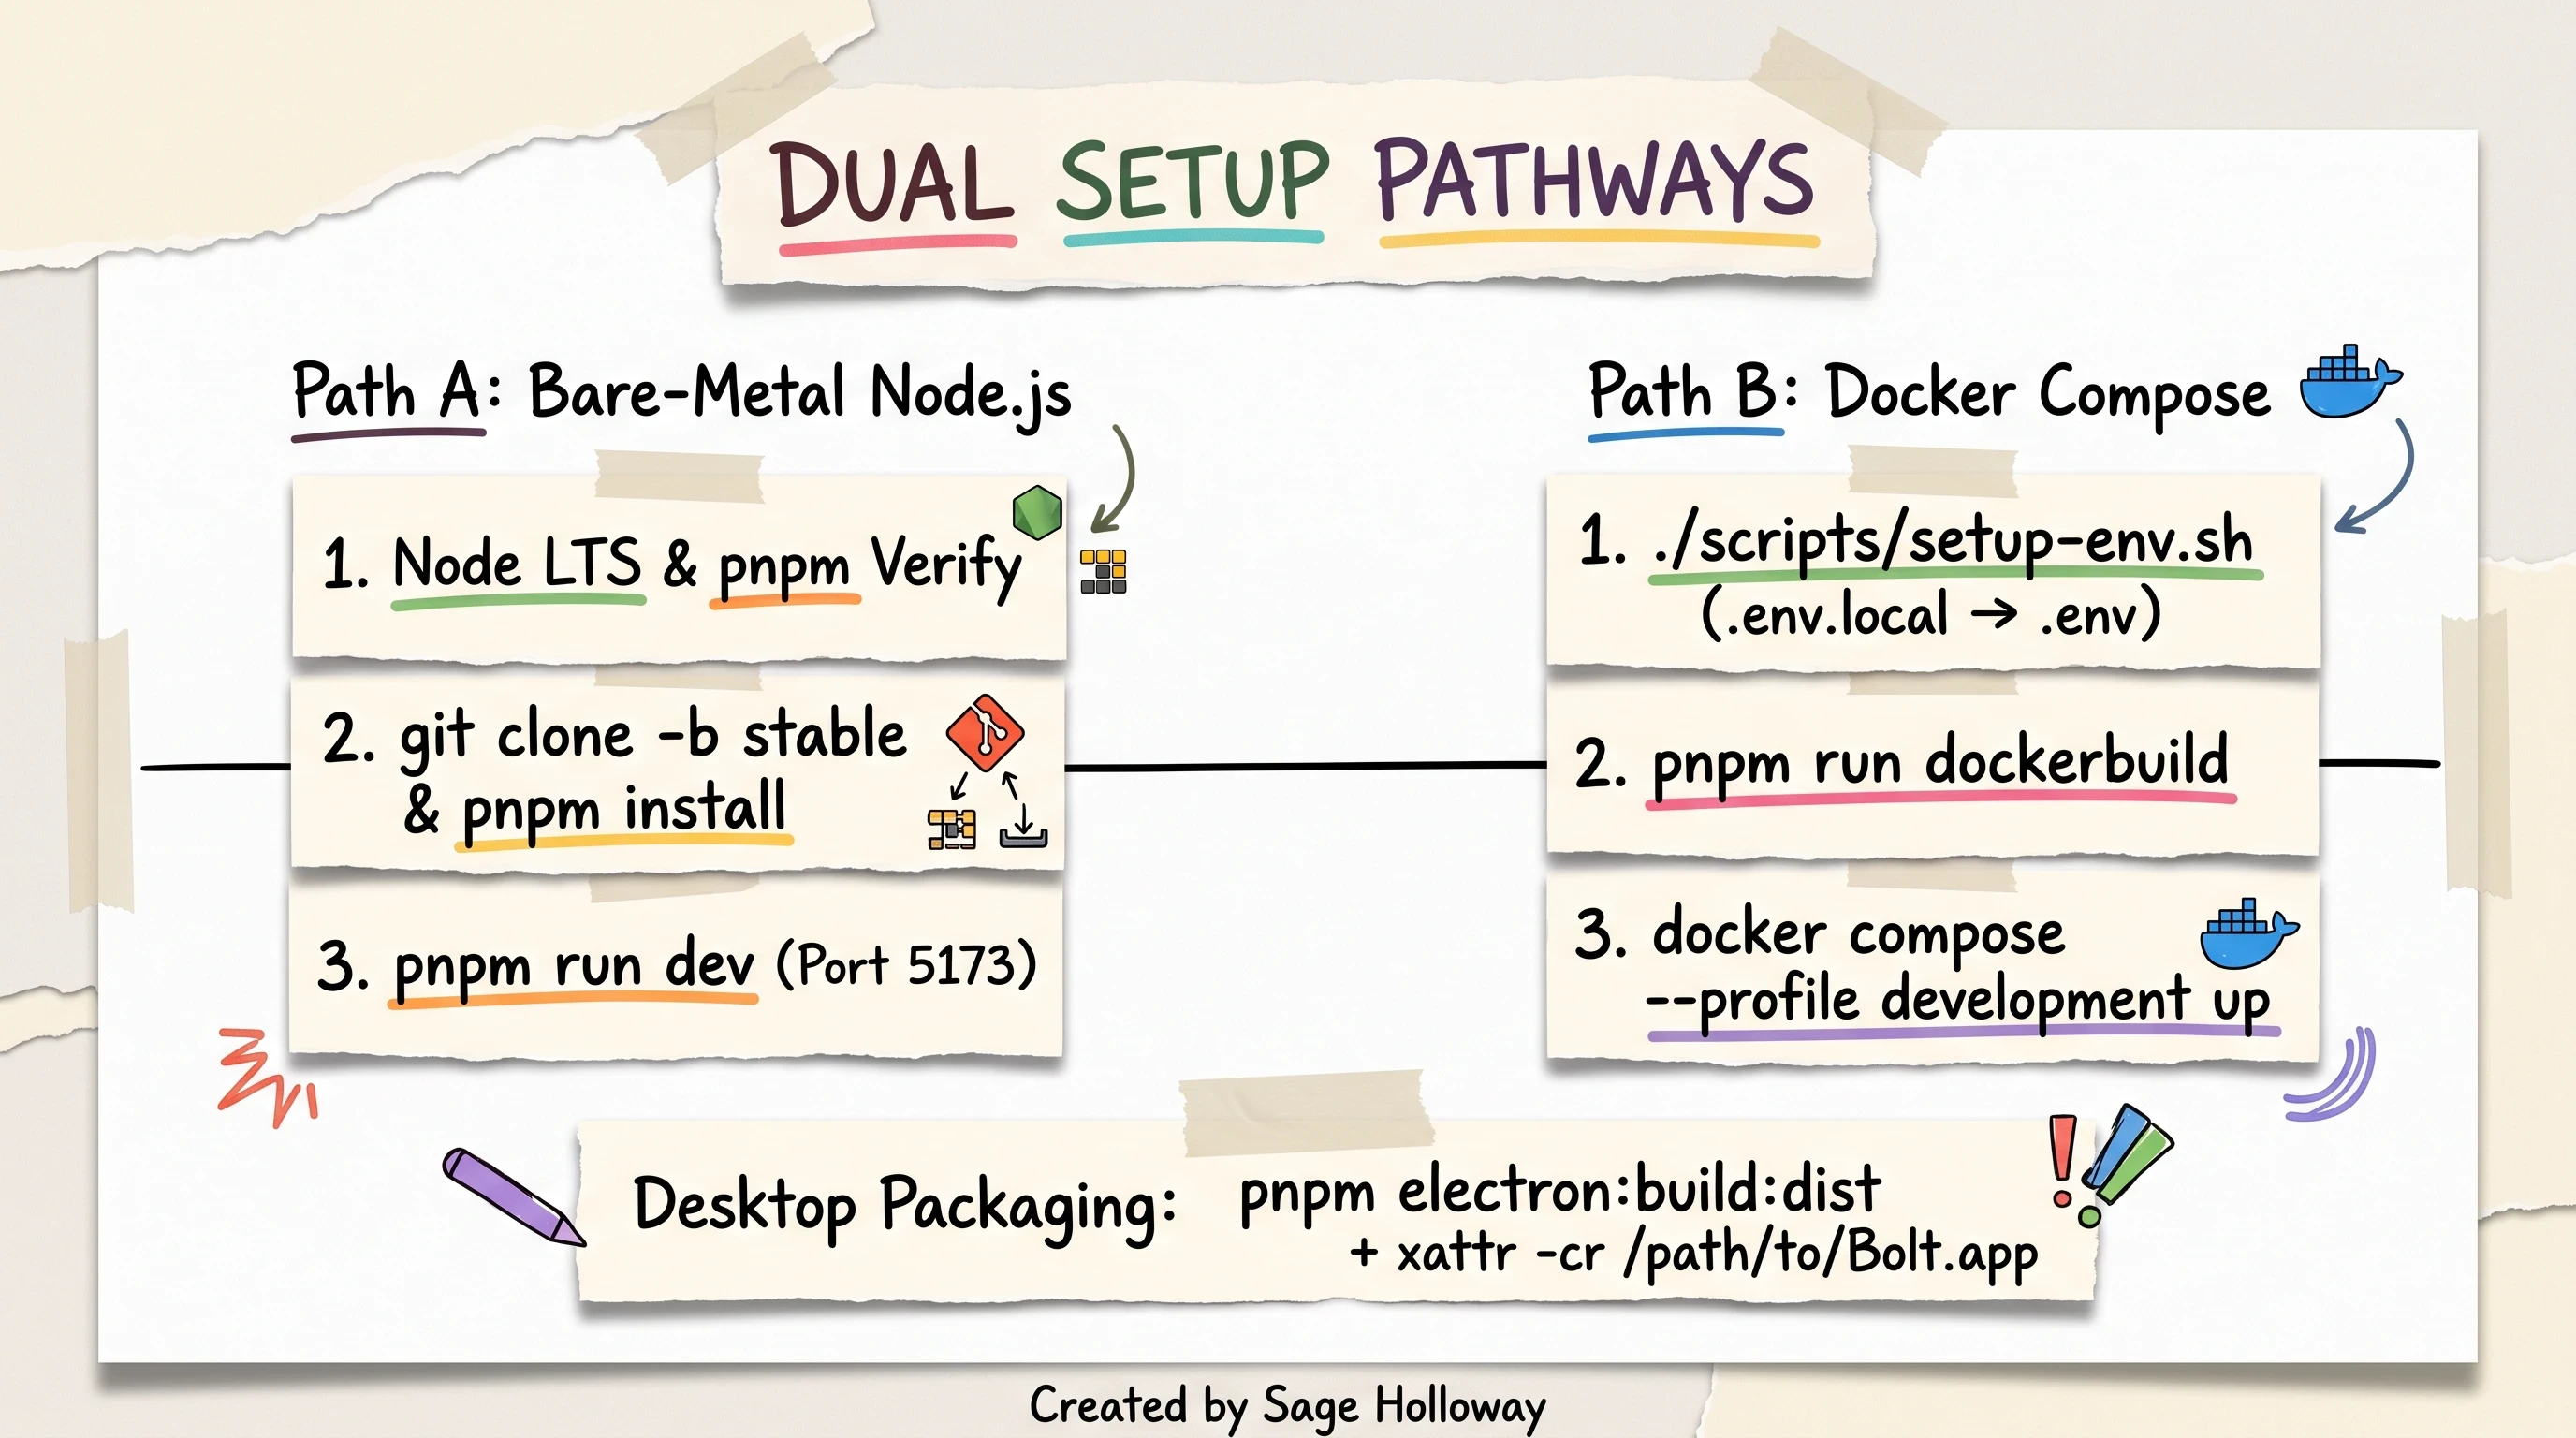
Choosing your local runtime: bare-metal Node.js delivers instant development speed, Docker Compose ensures reproducible dependencies, and Electron provides desktop isolation.
To understand why this choice matters, consider setting up a physical woodworking shop.
A carpenter could mount their lathe and table saw directly to the concrete floor of their garage. That direct setup gives immediate access to raw electrical outlets and maximum motor torque with zero overhead, but if sawdust clogs the ventilation or an oil spill spreads, it affects the entire room.
Alternatively, the carpenter could assemble a modular, sealed workshop booth inside the garage. The booth contains all dust and isolates the power grid, but connecting an external dust collector requires cutting a dedicated conduit through the booth wall.
That is the exact tradeoff between native Node.js and Docker Compose. Native Node gives zero-overhead performance, while Docker encapsulates dependencies at the cost of requiring explicit networking bridges.
Path A (Bare-Metal Node): LTS Node verification, pnpm bootstrap, and Remix Vite runtime
Path A is the recommended path for developers who want the fastest startup times, simplest file access, and lowest memory overhead.
Step 1: Verify Node.js LTS environment
bolt.diy requires Node.js Long-Term Support (LTS), version 20.x or 22.x. Using outdated versions or bleeding-edge odd-numbered releases will trigger compilation failures during Remix asset bundling.
On macOS and Linux, open your terminal and verify your active Node path:
Ensure /usr/local/bin or your version manager path (e.g. nvm, asdf, or fnm) appears in the console output.
On Windows systems, verify that Node is appended to system environment variables. Open the Run dialog (Win + R), execute sysdm.cpl, navigate to the Advanced tab, click Environment Variables, and confirm that the Node.js installation path appears under the Path system variable.
Step 2: Clone repository and install package manager
Retrieve the official repository from bolt diy github (stackblitz-labs/bolt.diy). We explicitly target the stable branch to avoid pre-release regressions present on the bleeding-edge main branch:
bolt.diy uses pnpm (Performant npm) for strict dependency resolution and disk space efficiency through hard-linking. Install pnpm globally if it is not already present, then install project dependencies:
Step 3: Launch development server
Start the Remix Vite local development runtime:
The terminal will initialize the Vite bundler and expose the web application at http://localhost:5173. Open this URL in your web browser to access the interface.
https://www.youtube.com/watch?v=CyIsupMHvew
DIY Smart Code step-by-step installation walkthrough: cloning the stable repository, configuring pnpm prerequisites, and running local development loops.
Browser prerequisite: Google Chrome Canary and WebContainer flags
StackBlitz WebContainers rely on cutting-edge browser primitives, including SharedArrayBuffer memory allocation, WebAssembly thread spawning, and Service Worker request interception.
While modern stable versions of Google Chrome, Brave, and Microsoft Edge support these APIs under standard Cross-Origin Isolation headers, local development on certain operating systems can trigger security flag blocks. If the preview pane fails to boot or displays blank canvas errors on standard Chrome, install Google Chrome Canary. Canary exposes experimental WebContainer developer flags required to run in-memory virtualization without strict SSL certificate enforcement on localhost.
Path B (Docker Compose): container compilation, setup-env script, and development profiles
Path B encapsulates the entire application, Node runtime, and dependency tree inside isolated Docker containers. This approach is ideal for developers who prefer clean host environments or who are deploying bolt.diy to remote homelabs, VPS instances, or container orchestration platforms like Portainer and Coolify.
Step 1: Prepare Docker environment variables
Docker Compose requires a root .env file for variable substitution during image build and container startup. The repository provides an automation script to mirror your local settings:
Step 2: Compile container images and launch development profile
Build the multi-stage Docker development image, then launch the service using Docker Compose:
If you are using an older Docker Compose installation, execute docker-compose --profile development up. The container will compile the Remix server, bind port 5173 to your host machine, and start listening for browser traffic.
Desktop distribution: Electron compilation and macOS Gatekeeper xattr fix
For developers who prefer a self-contained desktop window over a browser tab, bolt.diy includes an Electron compilation pipeline.
Compile the desktop application binaries for your current operating system:
The compiled binary will appear in the dist/ directory (e.g. Bolt.app on macOS or Bolt-Setup.exe on Windows).
macOS Gatekeeper quarantine resolution
On macOS, launching unsigned community Electron builds will trigger an operating system security prompt stating that "Bolt.app is damaged and cannot be opened." This error is caused by Apple's Gatekeeper subsystem applying an extended quarantine attribute (com.apple.quarantine) to locally compiled binaries.
To clear this quarantine flag, open your terminal and run:
Replace /path/to/Bolt.app with the actual path (for example, /Applications/Bolt.app). The application will launch immediately without security prompts.
API Key Configuration & Multi-Model Provider Orchestration
The core strength of bolt.diy is model optionality. While hosted platforms restrict you to their chosen model pipeline, bolt.diy supports over 19 distinct cloud and local model providers.
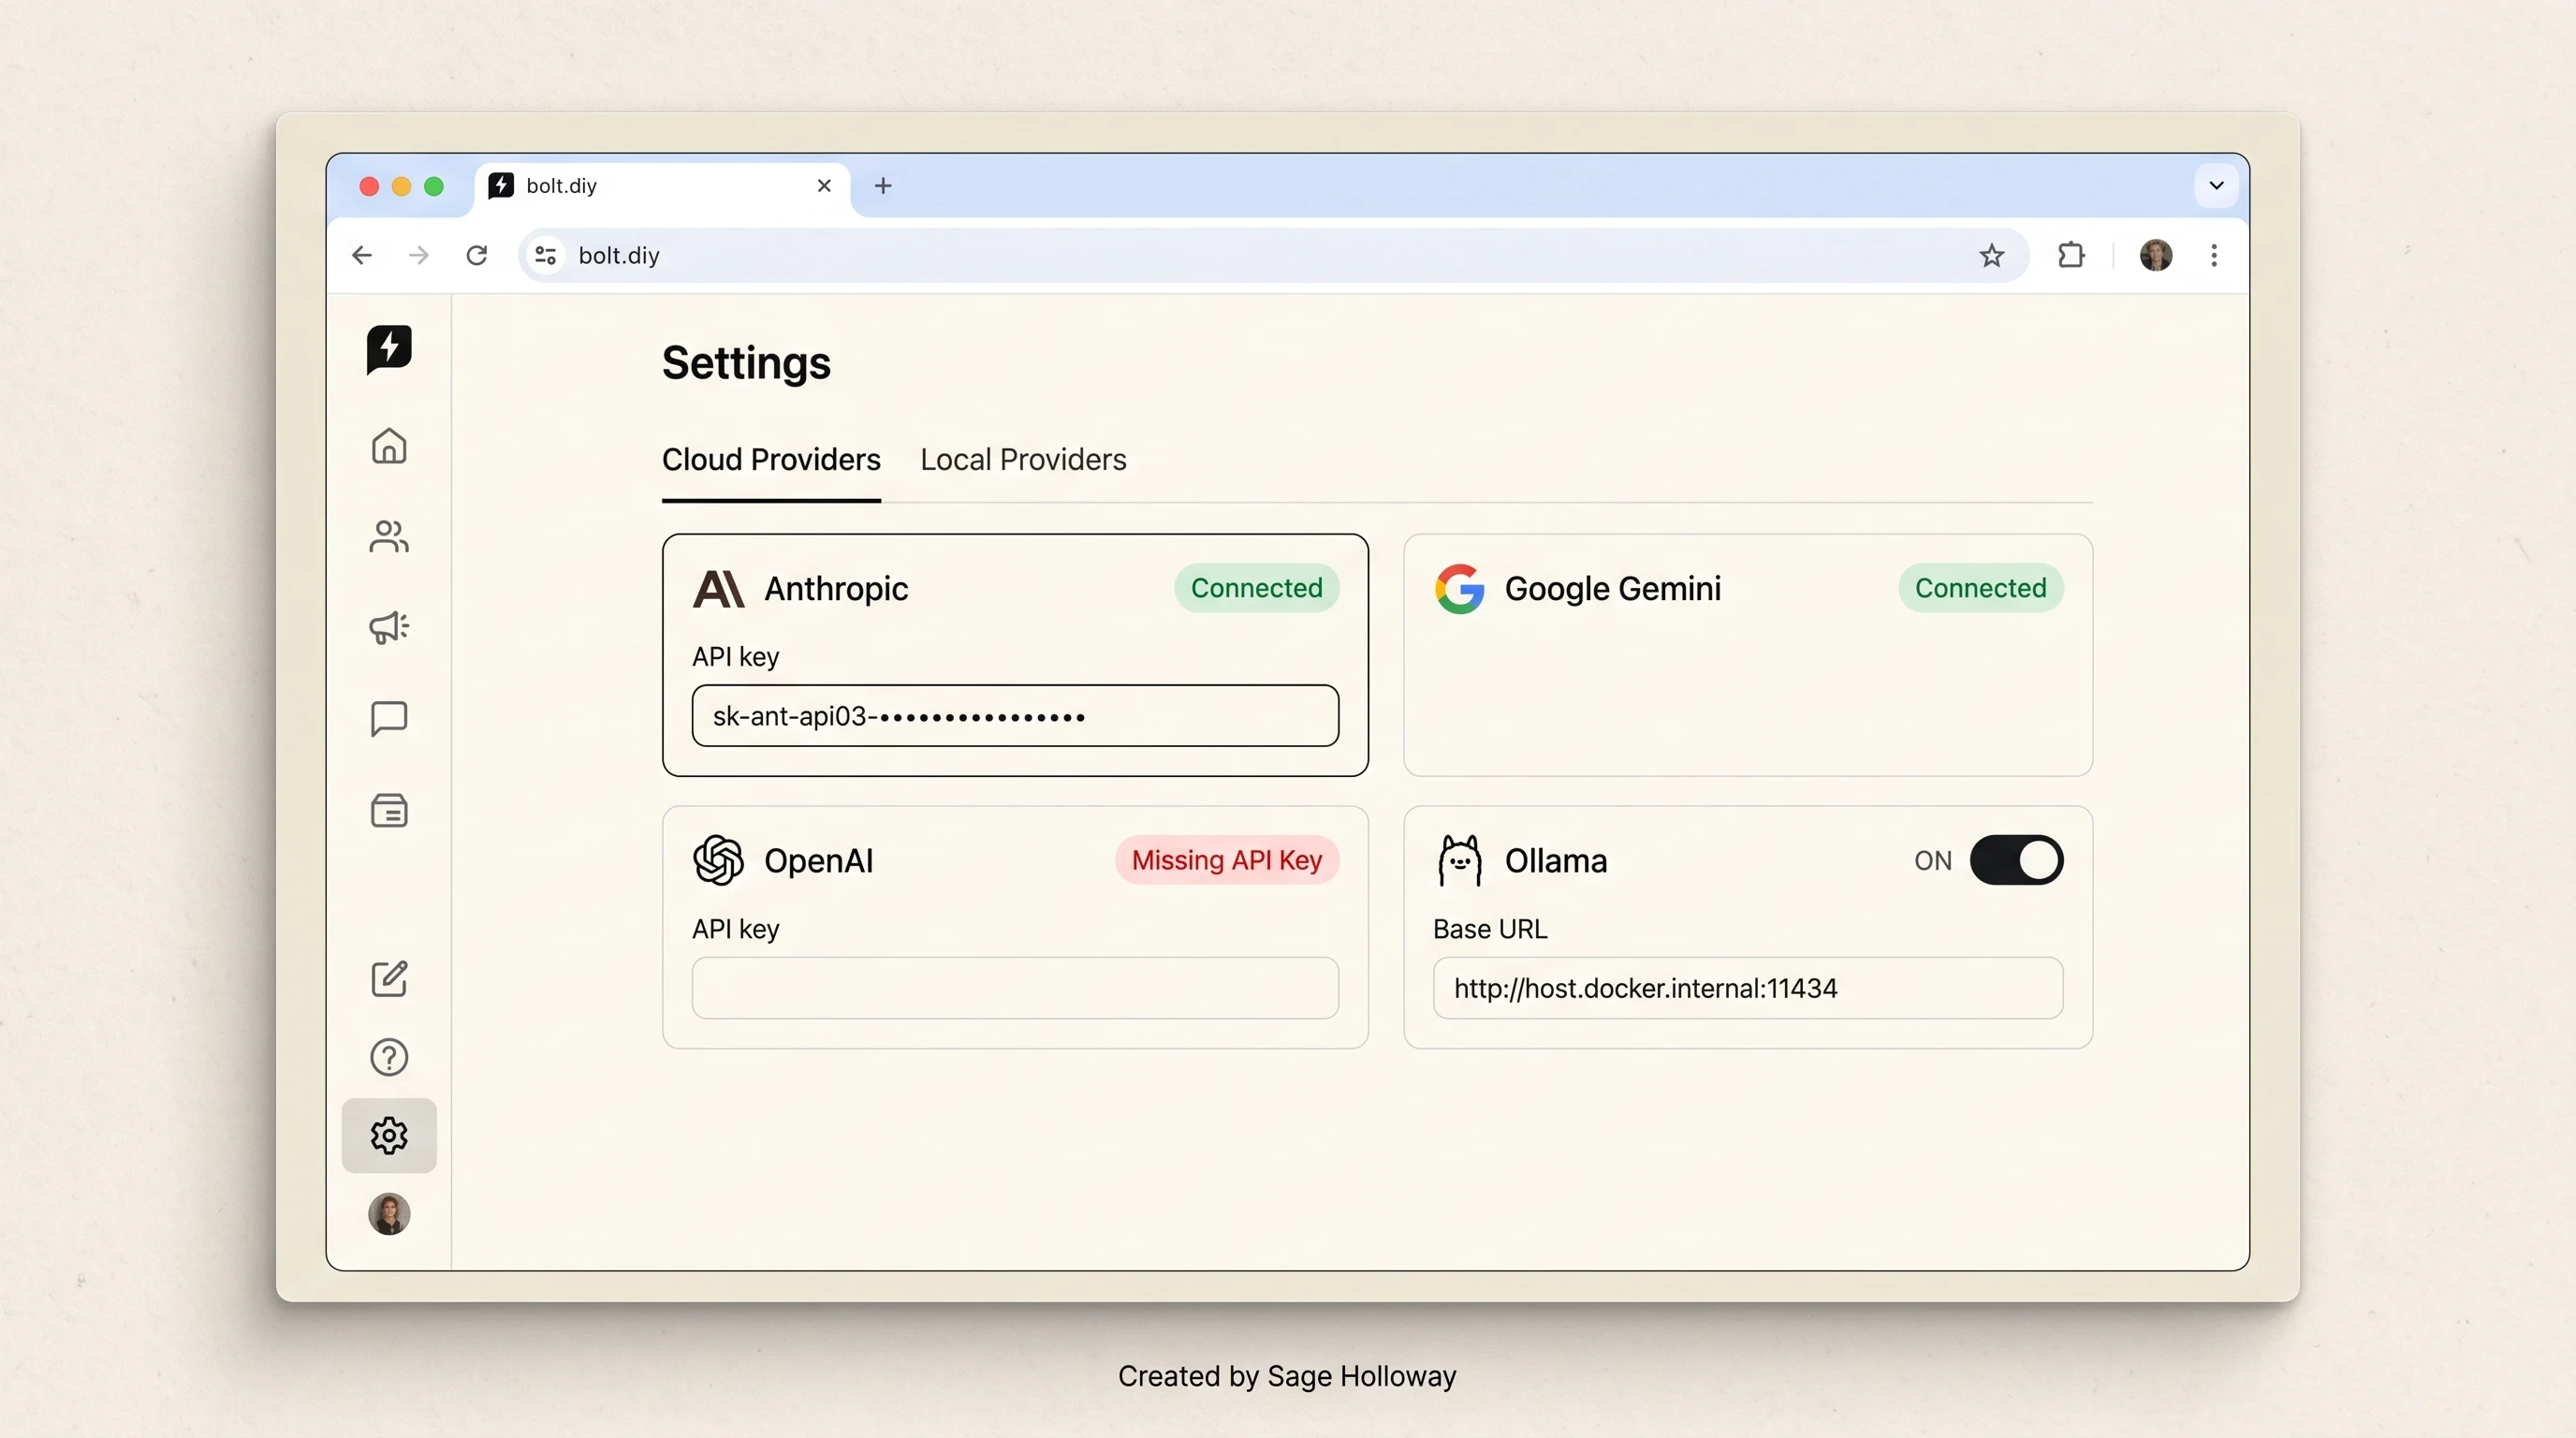
The bolt.diy Settings panel allows developers to toggle between Cloud and Local model providers, enter BYOK API credentials, and verify connection status via green indicators.
In-App Settings UI vs .env.local configuration
You can manage API credentials through two distinct methods: dynamic in-app configuration or static local environment files.
Method 1: The In-App Settings UI (Recommended)
In modern releases of bolt.diy, you do not need to restart your terminal server every time you add an API key.
Open
http://localhost:5173in your browser.Click the Settings gear icon (
⚙) in the lower-left sidebar.Select the Providers tab at the top of the modal.
Toggle between the Cloud Providers and Local Providers tabs.
Expand your desired provider card (e.g. Anthropic, Google, OpenAI, DeepSeek, Groq, Mistral, OpenRouter).
Paste your API key into the input field and press Enter.
The interface evaluates the key structure immediately:
🟢 Green Badge (
Connected): Indicates a valid, active API key configuration.🔴 Red Badge (
Missing API Key): Indicates that no key has been entered or the provider is inactive.
Method 2: Static .env.local File
If you want credentials to persist automatically across server reboots, create a .env.local file in your repository root. This file is included in .gitignore by default to prevent accidental commits to public repositories.
Model benchmark shootout: Claude 3.5 Sonnet vs Gemini 2.0 Flash vs DeepSeek-V3
Choosing the best llm for bolt.diy depends on your project complexity, context payload, and budget. Different models excel at different stages of the development lifecycle.
Multi-model benchmark shootout: Claude 3.5 Sonnet leads complex full-stack logic, Gemini 2.0 Flash enables zero-cost prototyping, and Ollama ensures private local execution.
1. Anthropic Claude 3.5 Sonnet (The Gold Standard for Architecture)
Claude 3.5 Sonnet remains the most capable model for complex, multi-file full-stack architecture. It adheres strictly to Bolt's internal system prompts, generates clean TypeScript code with minimal syntax hallucinations, and refactors components without dropping existing logic. It costs $3.00 per million input tokens and $15.00 per million output tokens. Use Sonnet when building multi-step application features or complex state machines.
2. Google Gemini 2.0 Flash (The Zero-Cost Rapid Prototyper)
Gemini 2.0 Flash is the community favorite for greenfield app generation. With massive context windows (1M+ tokens) and extremely fast token generation speeds, Gemini can ingest large documentation sets and generate entire frontend component trees in seconds. Through Google AI Studio's free tier, you can prototype full applications at zero financial cost.
3. DeepSeek-V3 (The Cost-Effective Code Repair Engine)
DeepSeek-V3 delivers programming logic comparable to top-tier commercial models at a fraction of the price ($0.14 per million input tokens and $0.28 per million output tokens). It is exceptionally strong at analyzing terminal error stack traces, resolving npm dependency conflicts, and executing heavy code refactoring tasks.
Local model inference: Ollama and LM Studio integration
For developers who require offline execution or complete data privacy, bolt.diy integrates natively with local model runners like Ollama and LM Studio.
To run local models with Ollama:
Download and install Ollama on your host machine.
Pull a high-performance coding model, such as Qwen2.5-Coder:
In
bolt.diy, open Settings > Providers > Local Providers, enable Ollama, and selectqwen2.5-coder:7bfrom the model dropdown.
The Docker loopback bridge fix: resolving host.docker.internal vs localhost IPv6 blocks
When running bolt.diy inside Docker while running Ollama on your host machine, you will encounter the most common networking trap in self-hosted AI setups: the loopback connection refusal error (ECONNREFUSED).
Bridging Docker to host models: inside containerized Bolt environments, map OLLAMA_API_BASE_URL to host.docker.internal:11434 to avoid IPv6 loopback connection refusal errors.
By default, documentation lists the Ollama endpoint as http://localhost:11434 or http://127.0.0.1:11434.
However, inside a Docker container, localhost resolves to the container's own internal network namespace, not your physical host machine. The container attempts to query port 11434 on itself, finds no service listening, and throws a connection failure. Furthermore, modern Node runtime networking attempts IPv6 resolution (::1) first, which Ollama's default listener rejects.
To fix this issue inside Docker environments, map the base URL to Docker's virtual host bridge in your .env.local and .env files:
On Linux host systems where host.docker.internal is not defined by default, ensure your docker-compose.yaml includes the extra_hosts declaration:
https://www.youtube.com/watch?v=tTiLg8eYkP0
Technical walkthrough demonstrating bolt.diy installation, local Ollama model activation, and Docker container networking bridges.
The bottleneck in local AI development was never the speed of the local inference engine; the bottleneck was always the networking discipline bridging the container boundary.
Workspace Persistence & Collaborative Git Branching Hygiene
Understanding where your files physically live during a bolt.diy session is critical to preventing catastrophic data loss.
Storage persistence architecture: WebContainers run in ephemeral browser memory, while muzafferkadir local sync writes changes directly to your host disk root.
Ephemeral browser memory vs local host disk persistence (muzafferkadir one-way sync)
When bolt.diy creates a project, the generated files do not automatically write to your operating system's file system. Instead, StackBlitz WebContainers execute inside an ephemeral virtual file system maintained in browser memory (SharedArrayBuffers and IndexedDB). If you clear your browser cookies, reset local storage, or experience an unrecoverable browser tab crash without exporting, your project state is lost.
To solve this persistence gap, community developer muzafferkadir engineered a native Local File Sync engine for bolt.diy.
When Local File Sync is toggled on, bolt.diy establishes a one-way synchronization pipeline. Every time the AI agent creates a file, updates a component, or modifies a style sheet, the application writes a physical copy directly into a project folder on your host machine's physical disk.
The bolt.diy workspace provides options to import local host folders, clone remote GitHub repositories, and activate one-way local file synchronization to physical disk.
Connecting GitHub personal accounts and importing remote repositories
To establish a permanent version control pipeline, connect your GitHub account (bolt new github / bolt diy github):
Open Settings > Connections > GitHub.
Generate a GitHub Personal Access Token (classic) with
repoandworkflowscopes.Paste the token into the connection field.
On the main dashboard, you can now use Import from URL or Git Clone to load any remote repository directly into your local Bolt workspace.
[!NOTE] The current GitHub integration supports personal user accounts. If your team operates under a GitHub Organization account, import the repository to a personal mirror fork, perform your Bolt development cycles, and submit pull requests upstream to the organization repository.
The auto-commit overwrite danger: preventing team race conditions
When Git synchronization is active, bolt.diy uses a background polling mechanism. After an AI prompt completes code generation, Bolt packages the modified files and automatically commits them to your active Git branch.
In solo development, this feature is convenient. In team environments, it creates a dangerous race condition:
If Developer A pushes a manual commit from their local terminal while Developer B is executing an AI prompt on the same branch in Bolt, Bolt's auto-commit engine will resolve the merge conflict by forcibly overwriting Developer A's remote changes with the in-browser version.
Preventing auto-commit race conditions: work exclusively on short-lived feature branches and merge pull requests directly on GitHub rather than inside the Bolt interface.
Enforcing collaborative hygiene: "Work only on feature branches" and "Merge in GitHub, not in Bolt"
To collaborate safely using bolt.diy across team projects, enforce two strict operational rules:
Rule 1: Work Only on Feature Branches. Never point
bolt.diyat yourmainorproductionGit branch. Create short-lived, isolated feature branches (such asfeature/user-dashboardorai-scaffold/stripe-checkout) for every Bolt session.Rule 2: Merge in GitHub, Not in Bolt. When the AI finishes generating a feature, push the branch to GitHub, open a formal Pull Request (PR), review the diff in GitHub's code review interface, and execute the merge on GitHub. Never attempt to merge branches or resolve complex Git rebases inside Bolt's chat interface.
For teams managing billing structures, token budgeting, and team plans, explore our guide to Bolt.new promo codes and pricing structures.
Under the Hood: WebContainer Execution Limits, ESM Modules & Binary Sandboxes
To effectively troubleshoot bolt.diy build errors, you need a clear mental model of how StackBlitz WebContainers virtualize operating system primitives inside a standard web browser.
WebContainers virtualize Node.js inside browser tabs using Web Workers and SharedArrayBuffers, but cannot compile native C++ npm binaries requiring pure JavaScript/ESM alternatives.
Inside StackBlitz WebContainers: Web Workers as virtual processes and WASM virtual filesystem
A WebContainer is not a Docker container running on a remote cloud server. It is a micro-operating system written in WebAssembly (WASM) and Rust that executes entirely on the client side inside your browser tab.
When bolt.diy boots:
The browser initializes a dedicated Web Worker pool. Each worker acts as a virtual POSIX operating system process.
A custom shell, called JSH (JavaScript Shell), runs inside the worker to parse terminal commands like
npm install,vite build, ornode server.js.A virtual in-memory file system, compiled to WebAssembly from Rust, mounts into the browser tab. File reads and writes map directly to memory addresses rather than physical hard drive sectors.
SharedArrayBuffers and signal/stdio emulation in shared memory
In traditional operating systems, separate processes communicate via inter-process communication (IPC) channels managed by the kernel. In a browser tab, separate Web Workers cannot access each other's memory unless they share a SharedArrayBuffer.
StackBlitz utilizes SharedArrayBuffers to create a unified shared memory space across all virtual worker processes. When a Node.js script emits data to standard output (stdout), or when a build tool sends an interrupt signal (SIGINT), the WebContainer kernel writes byte structures directly into shared memory. A Service Worker intercepts incoming HTTP network requests and routes them directly to the virtual Node server, creating a fully functioning localhost web server entirely in browser memory.
The native C++ binary module limit: auditing npm dependencies for pure JS/ESM compatibility
Because WebContainers execute inside the browser's WebAssembly sandbox, they are bound by a fundamental limitation: WebContainers cannot compile or execute native C++ binary modules.
In standard Node.js development on macOS, Linux, or Windows, installing packages like better-sqlite3, canvas, bcrypt, or native sharp triggers node-gyp. node-gyp invokes your host operating system's C++ compiler (like gcc, clang, or MSVC) to compile raw machine binaries.
Browsers have no C++ compiler and cannot execute raw host machine binaries. If an AI prompt in bolt.diy attempts to install an npm package that relies on native C++ bindings, the installation will crash with unresolvable compilation errors.
Package Category | Blocked Native C++ Module | Permitted Pure JS / WASM Replacement |
|---|---|---|
Image Processing |
|
|
Local Database |
|
|
Cryptography |
|
|
Compression |
|
|
When prompting bolt.diy, always specify pure JavaScript, TypeScript, or WebAssembly libraries to ensure compatibility with the WebContainer runtime. For specialized prompting techniques to avoid loop-locking on local models, refer to our companion blueprint on multi-model app prompting.
Real-World Setup Snags & Production Build Fixes
When moving beyond basic prototypes, developers encounter specific runtime exceptions documented across GitHub issue trackers. Here are the root causes and verified fixes for the four most common setup snags.
Comprehensive troubleshooting matrix: resolving Safari layout crashes, VPS Wrangler bundling errors, folder import manifest bugs, and Docker loopback blocks.
Safari localhost layout crash: commenting out lines 96 and 98 in app/root.tsx (Issue #707)
On macOS systems using Apple Safari, navigating to http://localhost:5173 frequently triggers a total application crash with a recursive stack trace pointing to Layout@http://localhost:5173/app/root.tsx:101:5 (bolt .diy error occurred at / port: 5173 stack trace:).
This bug occurs because Safari's WebKit JavaScript engine handles React hook boundaries and context wrappers inside Remix layout trees differently than Chromium engines, causing a recursive re-render loop on unauthenticated local routes.
The Verified Fix:
Open app/root.tsx in your code editor. Locate lines 96 and 98, and comment out the <Layout> wrapper component tags surrounding <Outlet />:
Save the file. Vite's hot module reload will update the interface immediately, allowing Safari to render the full bolt.diy workspace without layout exceptions.
Ubuntu VPS Wrangler compilation errors: decoupling child_process and stream in v1.0.0 (Issue #1414)
When deploying bolt.diy to an Ubuntu VPS or container host, running production build scripts previously failed with Cloudflare Wrangler module resolution errors:
This error occurred in early repository releases because Cloudflare Pages and Wrangler build configurations attempted to bundle Node.js server-side built-in modules into client-side edge bundles without proper polyfill decoupling.
The Verified Fix:
This issue was permanently resolved in release v1.0.0 through PR #1436 and PR #2038, which moved Wrangler to development dependencies and decoupled Edge runtime bindings. If you are on an older repository fork, pull the latest stable branch and rebuild your dependencies:
https://www.youtube.com/watch?v=6cHR9_D8xv4
Astro K Joseph comprehensive walkthrough: end-to-end bolt.diy deployment, container execution, and resolving project configuration errors.
Folder import AI context manifest failure: resolving "File is not in the list" (Issue #2022)
When using the "Import Folder" UI button to import an existing project from disk (bolt .diy skipping files on import), the AI chat agent may fail on its first edit attempt, outputting the error:
This bug occurs because the WebContainer virtual file system loads raw file contents into memory, but fails to rebuild its internal AI-facing file manifest. The LLM attempts to reference a file path that is missing from its active context manifest index.
The Workarounds:
The URL Import Workaround (Recommended): Instead of using local folder upload, push your existing project to a GitHub repository, open
bolt.diy, click Git Clone / Import from URL, and paste the repository URL. The Git clone pipeline automatically builds a complete context manifest.The Session Reset Workaround: If you must use local folder import, create a new project session within the same browser tab immediately after importing. The second initialization reads the IndexedDB state and correctly constructs the file manifest index.
Portainer/Coolify port 5173 connection refusal: configuring RUNNING_IN_DOCKER=true (Issue #1326)
When deploying bolt.diy inside managed container hosting environments like Portainer, Coolify, or Railway, the container logs show the server running, but external browsers receive connection refused errors on port 5173.
This occurs because Vite binds to localhost (127.0.0.1) by default inside the container, ignoring external network ingress requests.
The Verified Fix:
In your docker-compose.yaml or Portainer environment configuration, add the environment variable flag:
Setting VITE_HOST=0.0.0.0 forces Vite to listen across all network interfaces, allowing container ingress proxies to route external HTTP traffic to port 5173.
https://www.youtube.com/watch?v=3_LiBb_eLac
The AI Doctor troubleshooting guide: diagnosing common Bolt runtime errors, port conflicts, and WebContainer compilation limits.
Frequently Asked Questions
Where is the local directory for bolt.diy?
By default, bolt.diy executes inside your browser's WebContainer sandbox, meaning all generated code and project assets live in ephemeral browser memory (SharedArrayBuffers and IndexedDB storage) rather than a fixed folder on your hard drive. However, bolt.diy includes a native Local File Sync feature (engineered by muzafferkadir). When enabled in workspace settings, Local File Sync establishes a one-way synchronization bridge that writes all created and modified project files directly into a designated local directory on your physical host disk.
How to import a project from bolt.new into bolt.diy?
To import a project from hosted Bolt.new into bolt.diy, open your Bolt.new project, click the project title in the top-left corner, select Export, and download your codebase as a standard ZIP archive. Extract the ZIP file on your host machine, open your local bolt.diy dashboard at http://localhost:5173, and click the Import Folder button. Alternatively, push your Bolt.new project to a personal GitHub repository and import it directly into bolt.diy using the Git Clone / Import from URL option.
Can someone tell me why is bolt.diy better than bolt.new?
bolt.diy is favored by developers because it eliminates expensive monthly subscriptions ($20/mo Pro plans) and daily token quotas by letting you Bring Your Own Key (BYOK) across 19+ LLM providers at raw API developer pricing. It also supports local offline inference via Ollama or LM Studio with zero token markups, features direct local hard-drive file synchronization, and provides complete source-code control under the open-source MIT License.
For a beginner or semi-new developer, is bolt.diy or bolt.new better?
For complete beginners with zero command-line experience, hosted Bolt.new is easier because it requires no software installation, environment setup, or API key configuration. However, for semi-new developers with basic familiarity with Git, terminal commands, and Node.js, bolt.diy is substantially better. It provides complete freedom from token meters, teaches real-world container and API workflows, and allows zero-cost prototyping using free-tier API keys like Gemini 2.0 Flash.
What is the best LLM to use with bolt.diy?
For complex, multi-file architecture and full-stack TypeScript logic, Anthropic Claude 3.5 Sonnet is the undisputed best model, adhering strictly to Bolt's system prompts. For zero-cost rapid prototyping and high-context imports, Google Gemini 2.0 Flash via Google AI Studio is the top choice. For heavy code repairs and refactoring at minimal cost, DeepSeek-V3 provides exceptional programming intelligence at raw developer API rates.
Can bolt.diy see changes I make locally on my host machine?
If you are using direct local file sync without Git, synchronization is currently one-way from the browser WebContainer to your physical disk. However, if your project is linked to GitHub, bolt.diy polls your remote repository for external commits on a periodic background interval. Pushing edits from your local code editor (like VS Code or Cursor) to your GitHub branch will trigger Bolt's update detector to sync those changes back into the browser workspace.
Why do my changes in Bolt keep overwriting teammate commits?
This issue occurs when multiple developers collaborate on the exact same Git branch simultaneously while Bolt's automatic commit polling feature is active. When the AI finishes an edit, Bolt automatically commits its in-browser workspace state, forcibly overwriting any incoming remote commits pushed by teammates. To prevent this race condition, team members must work strictly on isolated, short-lived feature branches and merge pull requests on GitHub rather than inside Bolt.
Can I connect bolt.diy to organization-owned GitHub repositories?
Currently, bolt.diy's GitHub integration natively authenticates with personal GitHub user accounts; direct integration with GitHub Organization accounts is not yet supported. As a standard team workaround, fork or clone the organization repository into a personal repository mirror, connect your personal account to bolt.diy for development cycles, and submit upstream Pull Requests to the organization repository once features are verified.
Who needs a commercial WebContainer API license for bolt.diy?
The application source code in stackblitz-labs/bolt.diy is completely free under the MIT License. However, because it incorporates StackBlitz's underlying WebContainer API, a commercial license from StackBlitz is required if you deploy the application in a commercial, for-profit production environment serving external paying customers or enterprise employees. Personal projects, local development, education, prototypes, and proof-of-concept (POC) builds are completely exempt.
Put this into practice on your next build
To transition from reading documentation to maintaining a permanent local development workstation, execute these four tactical steps today:
Bootstrap the Stable Runtime: Clone the stable repository branch (
git clone -b stable https://github.com/stackblitz-labs/bolt.diy.git), install dependencies withpnpm install, and verify that your Node LTS path is correctly mapped.Establish the Host Networking Bridge: If running inside Docker, configure your
.env.localwithOLLAMA_API_BASE_URL=http://host.docker.internal:11434to eliminate IPv6 loopback connection refusal errors before launching local models.Configure Dual Model Profiles: In the in-app Settings UI, link Google Gemini 2.0 Flash for zero-cost rapid prototyping, and keep Anthropic Claude 3.5 Sonnet or DeepSeek-V3 on standby for complex architectural refactors.
Enforce Branching Isolation: Connect your personal GitHub account, toggle Local File Sync on, and establish a dedicated feature branch (
feature/local-scaffold) before submitting your first code generation prompt.
The era of renting metered browser sandboxes from closed cloud providers is giving way to sovereign, locally orchestrated development environments. The developers who build durable applications will not be the ones who spend the most on subscription tokens. They will be the ones who master the runtime boundaries underneath their own machines.
Until then...
Sage
PS. If you are running local inference through Ollama on an Apple Silicon Mac, monitor your unified memory pressure in Activity Monitor while prompting a 14B parameter coding model. The moment swap memory engages, token generation falls off a cliff. Sticking to an 8B quantized model like Qwen2.5-Coder gives you three times the generation velocity with zero memory paging thrash.
Author
Practical guides, tool teardowns & AI engineering workflows.