AI Agents
GPT Computer Use: The Complete 2026 Developer & Architecture Guide to AI Desktop Automation

Sage Holloway
27 min read
Go back to blog
SHARE

Most developers still treat an AI agent like a remote reasoning engine that returns text or JSON objects over an HTTP endpoint. You construct a prompt, wait three seconds, and parse a structured function call that your backend executes against a clean database schema. The moment an agent gains the ability to inspect an arbitrary desktop window, calculate dynamic pixel coordinates, and dispatch synthetic mouse clicks across third-party user interfaces, that clean architectural boundary dissolves. You are no longer integrating an API; you are running an autonomous visual operator inside a live graphical desktop.
To implement GPT computer use, developers initialize the OpenAI Responses API declaring the native computer tool, listen for coordinate-based action payloads (click, type, mousemove), execute them sequentially inside an isolated Docker or Playwright sandbox, and return updated screenshots with original detail to maintain the vision-action loop. For non-programmers, the ChatGPT desktop app provides native OS screen control via permission toggles and allow-list configurations.
Last verified: 28 August 2026 (NotebookLM sources synthesis; no live CLI run on this pack).
Key Architectural Takeaways
The Vision-Action Loop: Computer use operates as a continuous closed loop: capture visual frame, downscale pixels, infer spatial coordinates, execute OS-level mouse and keyboard events, verify updated UI state, and repeat.
Native Weights vs. Execution Harness: GPT-5.4 incorporates native spatial coordinate reasoning directly into model weights (eliminating external vision parsers like OmniParser), but it strictly requires an external client-side harness (Playwright, Docker, or
xdotool) to execute physical hardware inputs.Mandatory Sandbox Isolation: Running desktop automation agents on bare-metal host machines introduces catastrophic data loss and prompt injection risks. Production deployments require containerized Linux virtual displays (
Xvfb :99) or headless Playwright instances with cleared environment variables.The High-DPI Scaling Gap: Unscaled screenshots on macOS Retina displays create an immediate 2x click-offset failure. Production pipelines must downscale screenshots before transmission and dynamically remap returned API coordinates.
Strict Batch Action Halting: If action k of a batched computer call fails, the client harness must halt immediately and return
"Not executed: an earlier computer action in this turn failed."for all subsequent actions to prevent cascading UI corruption.2026 Benchmark Realities: GPT-5.4 achieved 75.0% on OSWorld, surpassing the 72.4% human baseline and establishing desktop automation as a viable production engineering pattern.
To see this closed visual feedback loop in action within thirty seconds, review this architectural primer:
https://www.youtube.com/shorts/UOwzsqm2Zqs Rapid visual primer illustrating the closed vision-action feedback loop powering autonomous computer-use agents.
What Is GPT Computer Use? Deconstructing the Vision-Action Loop Architecture
Imagine a flight training facility operating an advanced full-motion simulator. The trainee sitting in the cockpit does not control the aircraft by altering digital registry values in the flight computer's memory banks. Instead, they look out the windshield at projected terrain, scan mechanical dials and altimeter needles on the instrument panel, grasp the physical control yoke, and adjust the throttle levers by hand. Every single adjustment is a closed sensory loop: visual telemetry from the instrument panel informs motor control, which alters the simulator state, generating a fresh visual readout on the dashboard a split-second later.
That full-motion flight cockpit is the exact mechanical reality of a computer-using agent.
When software engineers search for gpt computer use or investigate how an ai agent takes control of computer interfaces, there is frequent confusion regarding what is actually executing. They wonder whether the model has gained direct access to operating system kernel hooks or whether OpenAI is executing code invisibly on their infrastructure.
The reality is straightforward: GPT computer use is a multimodal visual feedback architecture. Instead of interacting with software through documented REST APIs, GraphQL endpoints, or database drivers, the model interacts with software through the universal interface originally built for human beings: rendered pixels on a screen and synthetic input events on a mouse and keyboard.
From Text Prompting to Visual Screen-Level Grounding
For years, language model integrations relied exclusively on text-based function calling. You defined a JSON schema with strict types, the model emitted arguments matching that schema, and your application code executed the underlying database query or HTTP request. That pattern works reliably whenever clean, documented APIs exist.
The problem arises when software lacks an API entirely. Legacy enterprise desktop applications, internal web portals protected by dynamic single-sign-on flows, desktop creative suites, and complex multi-window workflows have no programmable interface. If an engineer needs an AI agent to automate data entry between a legacy ERP desktop app and a local spreadsheet, traditional tool calling hits an impenetrable wall.
This is where a desktop ai agent changes the foundation. By equipping a frontier vision model with spatial coordinate perception, the model treats the rendered operating system desktop as an interactive canvas. It does not need to know the internal data structures of the application running on screen; it visually perceives buttons, input fields, tables, and dropdown menus, planning physical cursor trajectories exactly as a human operator would. If you want to understand how autonomous software agents evolved toward this visual paradigm, our conceptual breakdown of how an AI agent controls a computer tracks the shift from early heuristic scrapers to multimodal foundation models.
The 6-Stage Vision-Action Feedback Loop
Every production implementation of GPT computer use runs on a continuous six-stage cycle. If any single stage in this sequence breaks or drops coordinate synchronization, the entire automation loop derails.
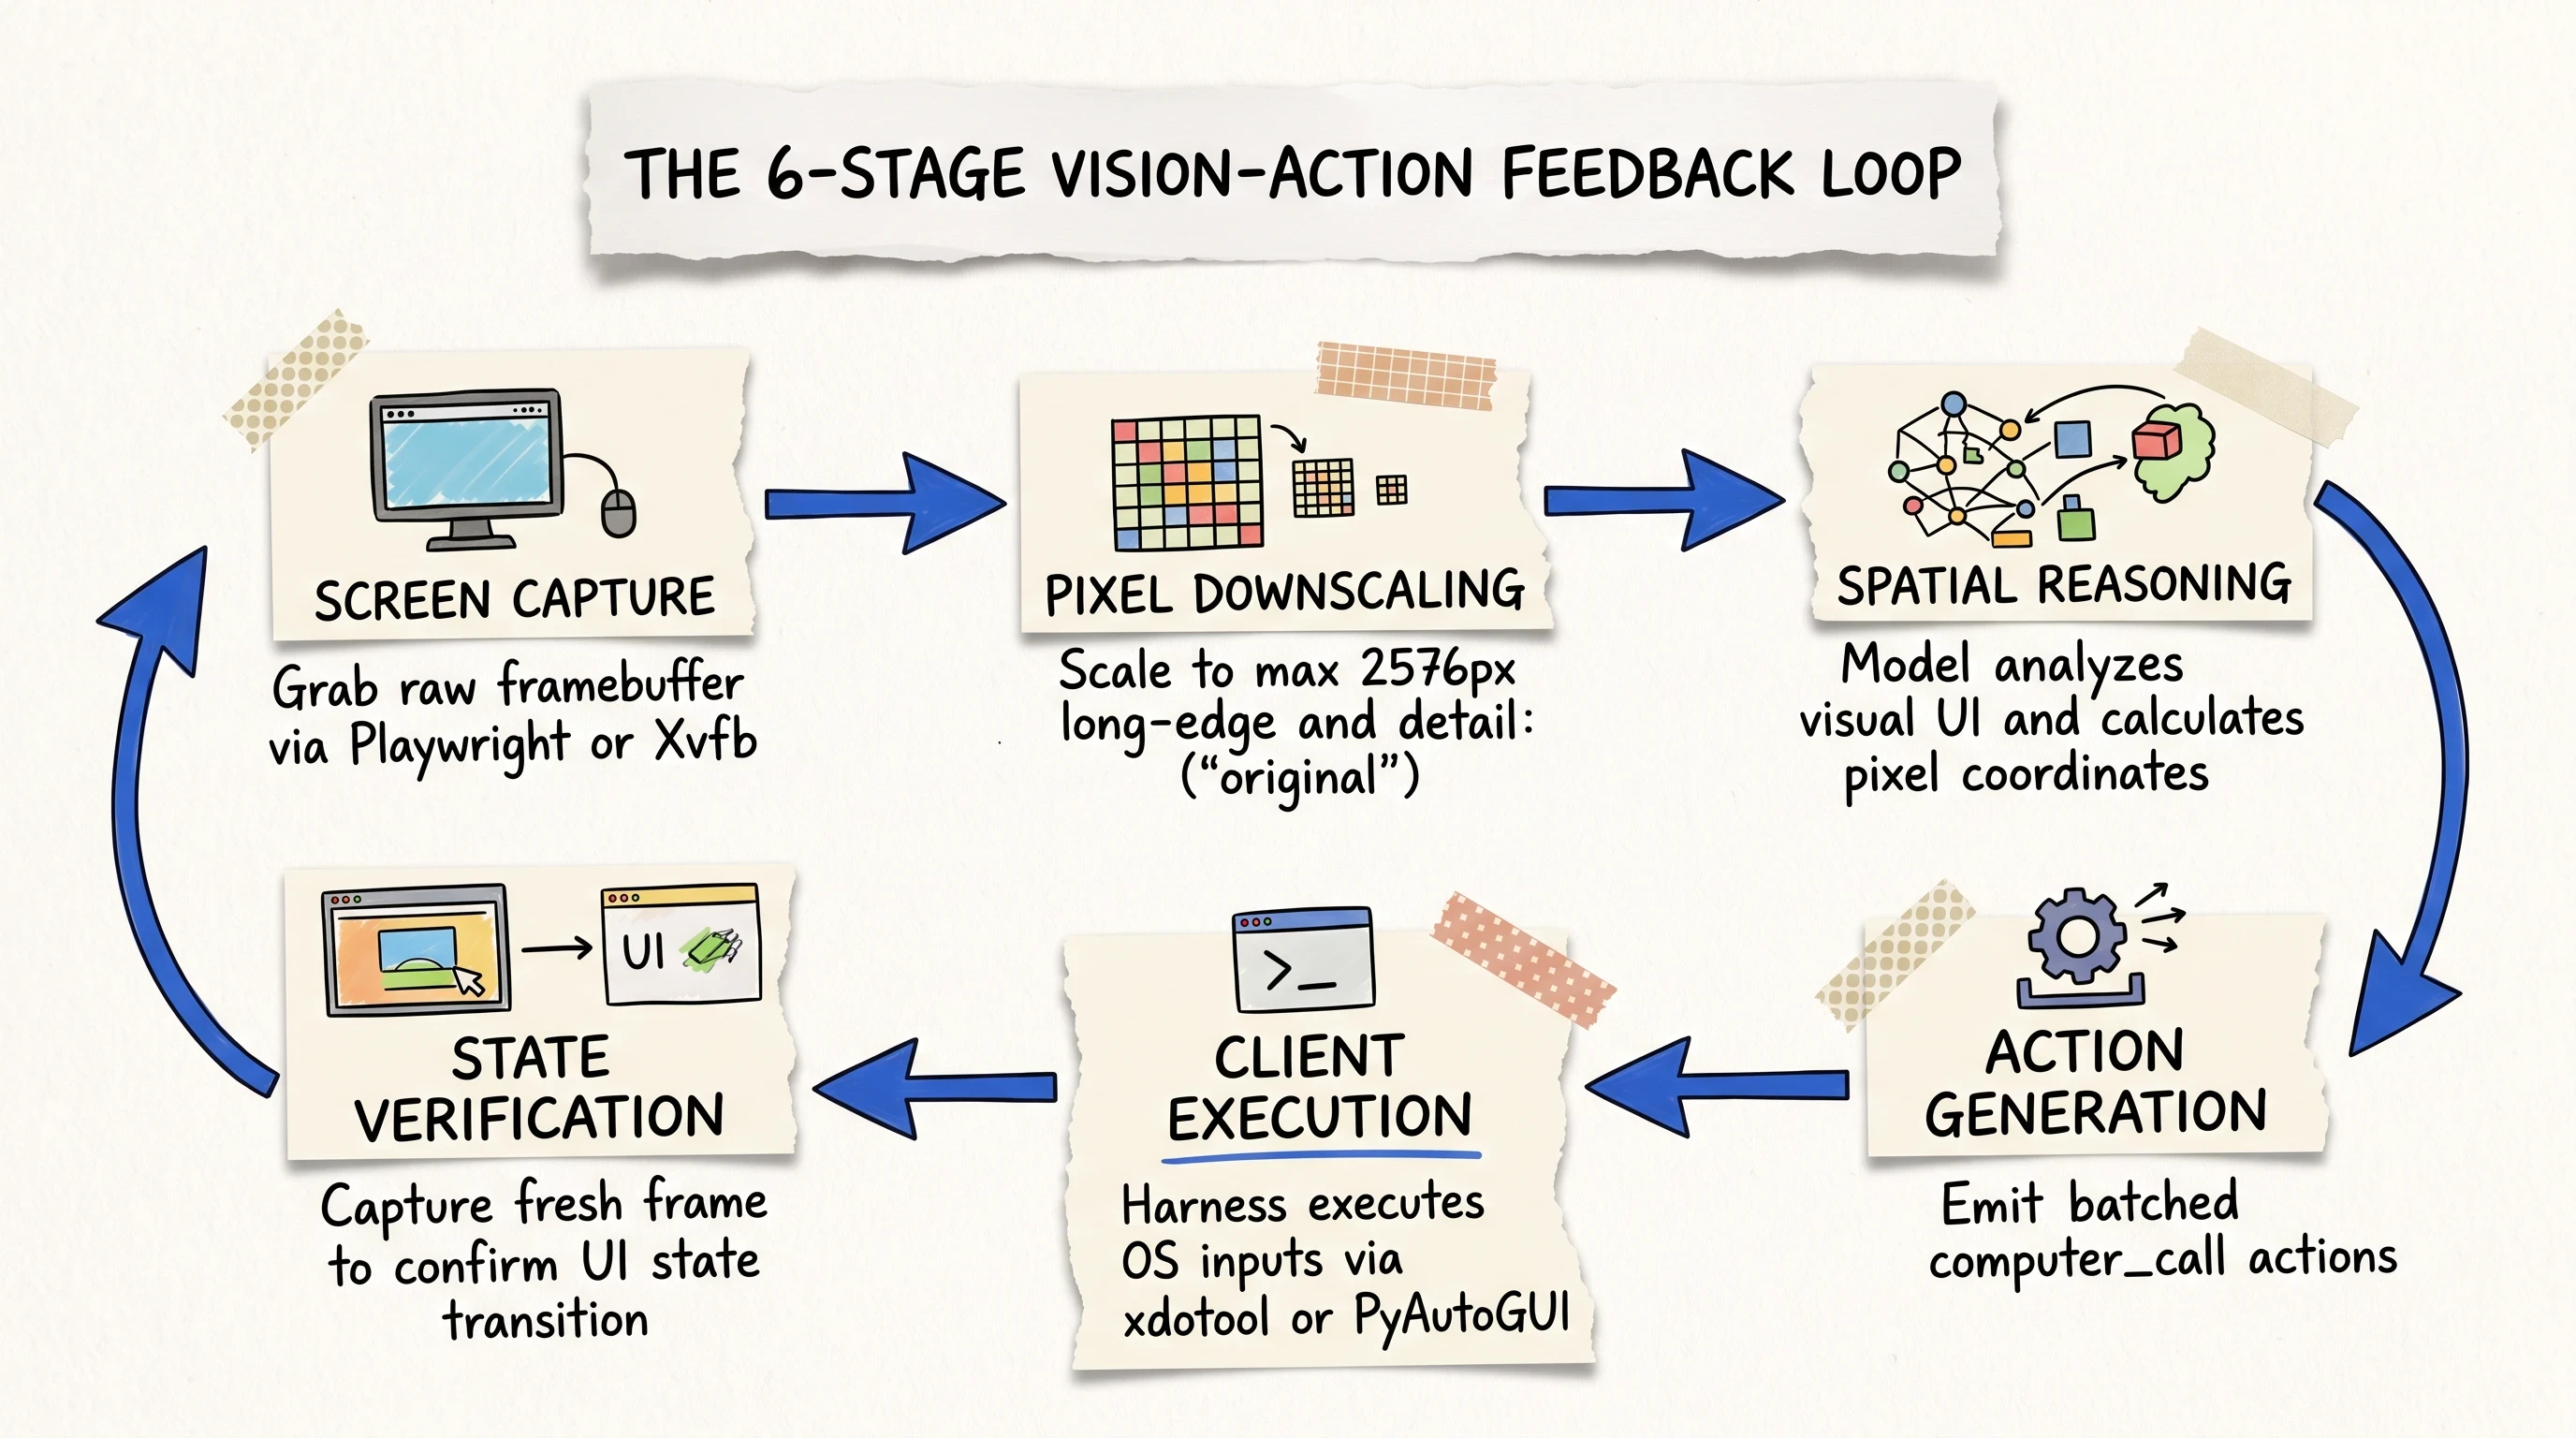
The closed vision-action feedback loop continuously captures visual frame state, plans spatial coordinates, executes OS inputs, and verifies UI changes.
Screen Capture: The client-side harness grabs the raw pixel buffer from the active desktop display or virtual framebuffer (e.g., via Linux Xvfb, Playwright viewport capture, or macOS Quartz Display Services).
Pixel Downscaling & Optimization: The raw frame is formatted as a PNG image, downscaled if necessary to meet model token and resolution constraints (e.g., maximum 2,576 pixels on the long edge), and encoded to base64.
Spatial Perception & Reasoning: The multimodal model analyzes the visual frame, interprets the rendered UI elements, cross-references the user's objective, and determines what atomic action or sequence of actions must occur next.
Action Generation: The model returns a structured JSON payload declaring a
computer_callwith a list of batched operations (e.g., moving the cursor tox: 405, y: 157, executing a left click, and typing a text string).Client-Side Execution: The client harness receives the coordinates and dispatches physical synthetic input events into the operating system using tools like
xdotool, Playwright mouse handlers, or operating system accessibility APIs.State Verification: The harness captures an immediate post-action screenshot and returns it to the model as
computer_call_outputwithdetail: "original". The model examines the new image to verify whether the click triggered the expected UI transition before deciding the next move.
Ecosystem Disambiguation: OpenAI CUA, Claude Cowork, and Local Desktop Agents
Because vendor marketing often blurs technical boundaries, developers frequently conflate different agent architectures under general desktop automation terms. It is essential to distinguish between these tools before writing code:
OpenAI CUA vs. Local OS Agents: OpenAI's original Computer-Using Agent (CUA) and Operator platform run inside isolated, cloud-hosted virtual web browsers. They cannot touch your local filesystem, interact with local native desktop software, or see beyond their cloud browser sandbox. In contrast, local desktop agents run directly on a host or containerized Linux virtual desktop, controlling native desktop windows across macOS, Windows, and Linux.
Claude Code vs. Claude Cowork: In developer forums, users often mix up Anthropic's tooling. Claude Code is a dedicated command-line developer environment optimized for git operations, file edits, and terminal workflows. Claude Cowork is a graphical macOS desktop application designed to control the user interface of local desktop software.
OpenClaw vs. Clawdbot: OpenClaw (originally released under the name Clawdbot) is an open-source community desktop automation framework that bridges local accessibility trees and vision models to automate multi-app desktop workflows.
To observe how these coordinate calculations and real-time mouse movements execute during live software workflows, watch this technical demonstration:
https://www.youtube.com/watch?v=jqx18KgIzAE Real-time screen capture demonstrating visual coordinate execution and UI interaction loops during desktop automation.
As highlighted in community discussions across UXDesign and AI engineering forums, treating an AI model as an end-user UI operator represents a fundamental inversion of software architecture. The software is no longer adapting to an API; the AI is adapting to the visual friction of human interfaces.
Core Infrastructure: Setting Up Sandboxed Docker and Playwright Environments
Before sending a single coordinate payload to an API, you must establish an isolated execution environment. Running an autonomous vision-action loop directly on your daily driver workstation is an invitation to disaster.
Why Local Host Execution Violates Security Boundaries
When an autonomous agent controls system-level input devices, it possesses the same privileges as the user running the process. If a vision model misinterprets an on-screen dialog, clicks an unintended system button, or encounters an adversarial prompt injection on a webpage, it can delete local files, expose browser cookies, or execute arbitrary terminal commands.
Security analyses in AI developer communities emphasize that screen-and-pixel agents are inherently opaque. Unlike structured API calls that pass through strict authorization middleware, a model emitting mouse clicks can click Save As, overwrite configuration files, or trigger system resets. For an in-depth security analysis on credential isolation and hypervisor barriers, read our dedicated breakdown of securing AI agents controlling your computer.
To run desktop automation safely, developers rely on two primary virtualization patterns: isolated Playwright browser contexts for web-only workflows, or containerized Docker virtual desktops for full OS automation.
Option A: Headless Browser Isolation via Playwright
For web-based automation tasks, spinning up an isolated Playwright browser instance provides a lightweight, secure sandbox. By stripping environment variables and enforcing strict sandbox flags, you prevent the browser process from accessing host credentials or local filesystem paths.
Here is the production Playwright harness configuration:
Option B: Full Virtual Linux Desktop via Docker, Xvfb, and xdotool
When an automation workflow requires controlling native desktop software, managing multiple browser windows, or running local scripts, you need a complete virtual operating system. The gold standard pattern is an Ubuntu container running Xvfb (X Virtual Framebuffer), xdotool for synthetic hardware inputs, and x11vnc for optional visual debugging.
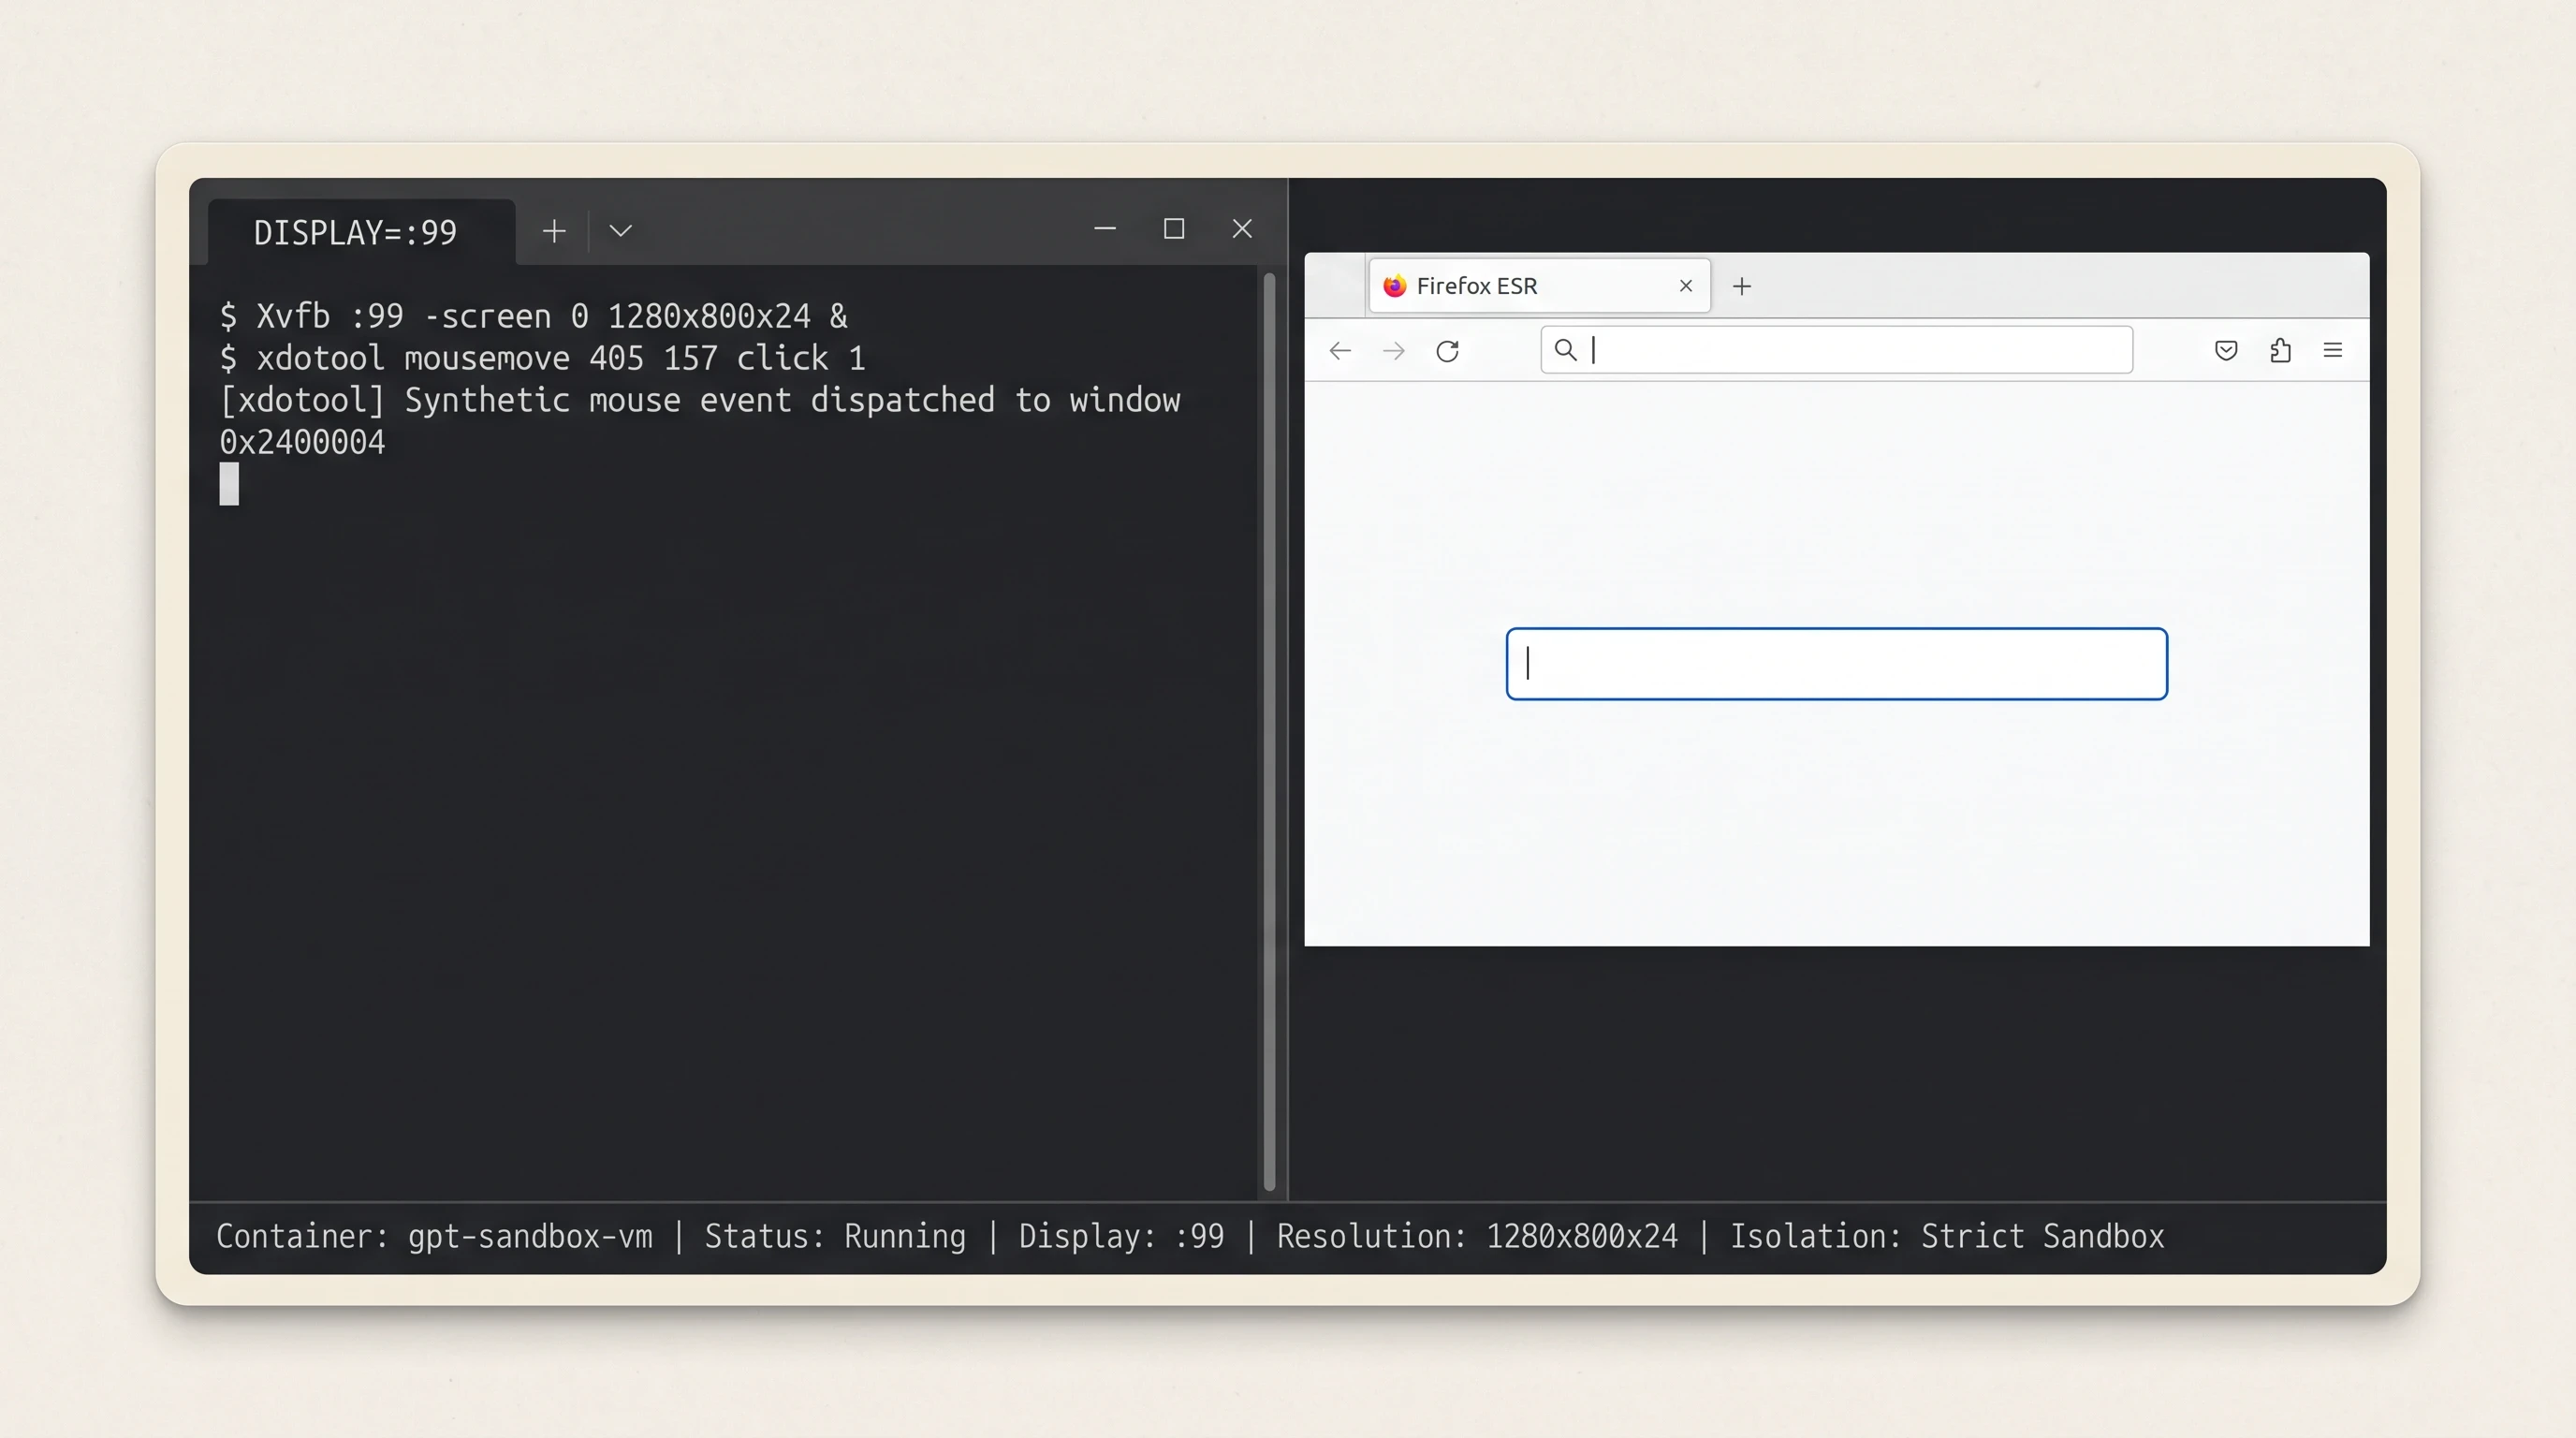
Isolated Linux Docker containers running virtual display framebuffers (Xvfb :99) prevent autonomous agents from altering host machine files.
Here is the complete Dockerfile for the sandboxed desktop environment:
Below is the corresponding entrypoint.sh startup script that initializes the virtual framebuffer on display :99:
Step-by-Step API Implementation: Building the OpenAI Responses Computer Tool Loop
With your Docker or Playwright sandbox running, you can now construct the client-side Python loop that interfaces with the OpenAI Responses API.
Initializing the Responses API with the Native computer Tool
In the OpenAI Responses API, declaring the native computer capability is achieved by passing tools=[{"type": "computer"}] in the request parameters. Unlike standard custom tool declarations that require manual JSON schemas, OpenAI's model weights natively recognize the computer tool definition.
Refer to the official OpenAI Computer Use Guide for base endpoint specifications.
Parsing and Executing Batched computer_call Payloads
When the model decides to interact with the interface, it returns a structured computer_call item containing an array of atomic actions. To reduce network latency and round-trip overhead, the model frequently batches multiple operations together (e.g., moving the mouse, clicking an element, and immediately typing text).
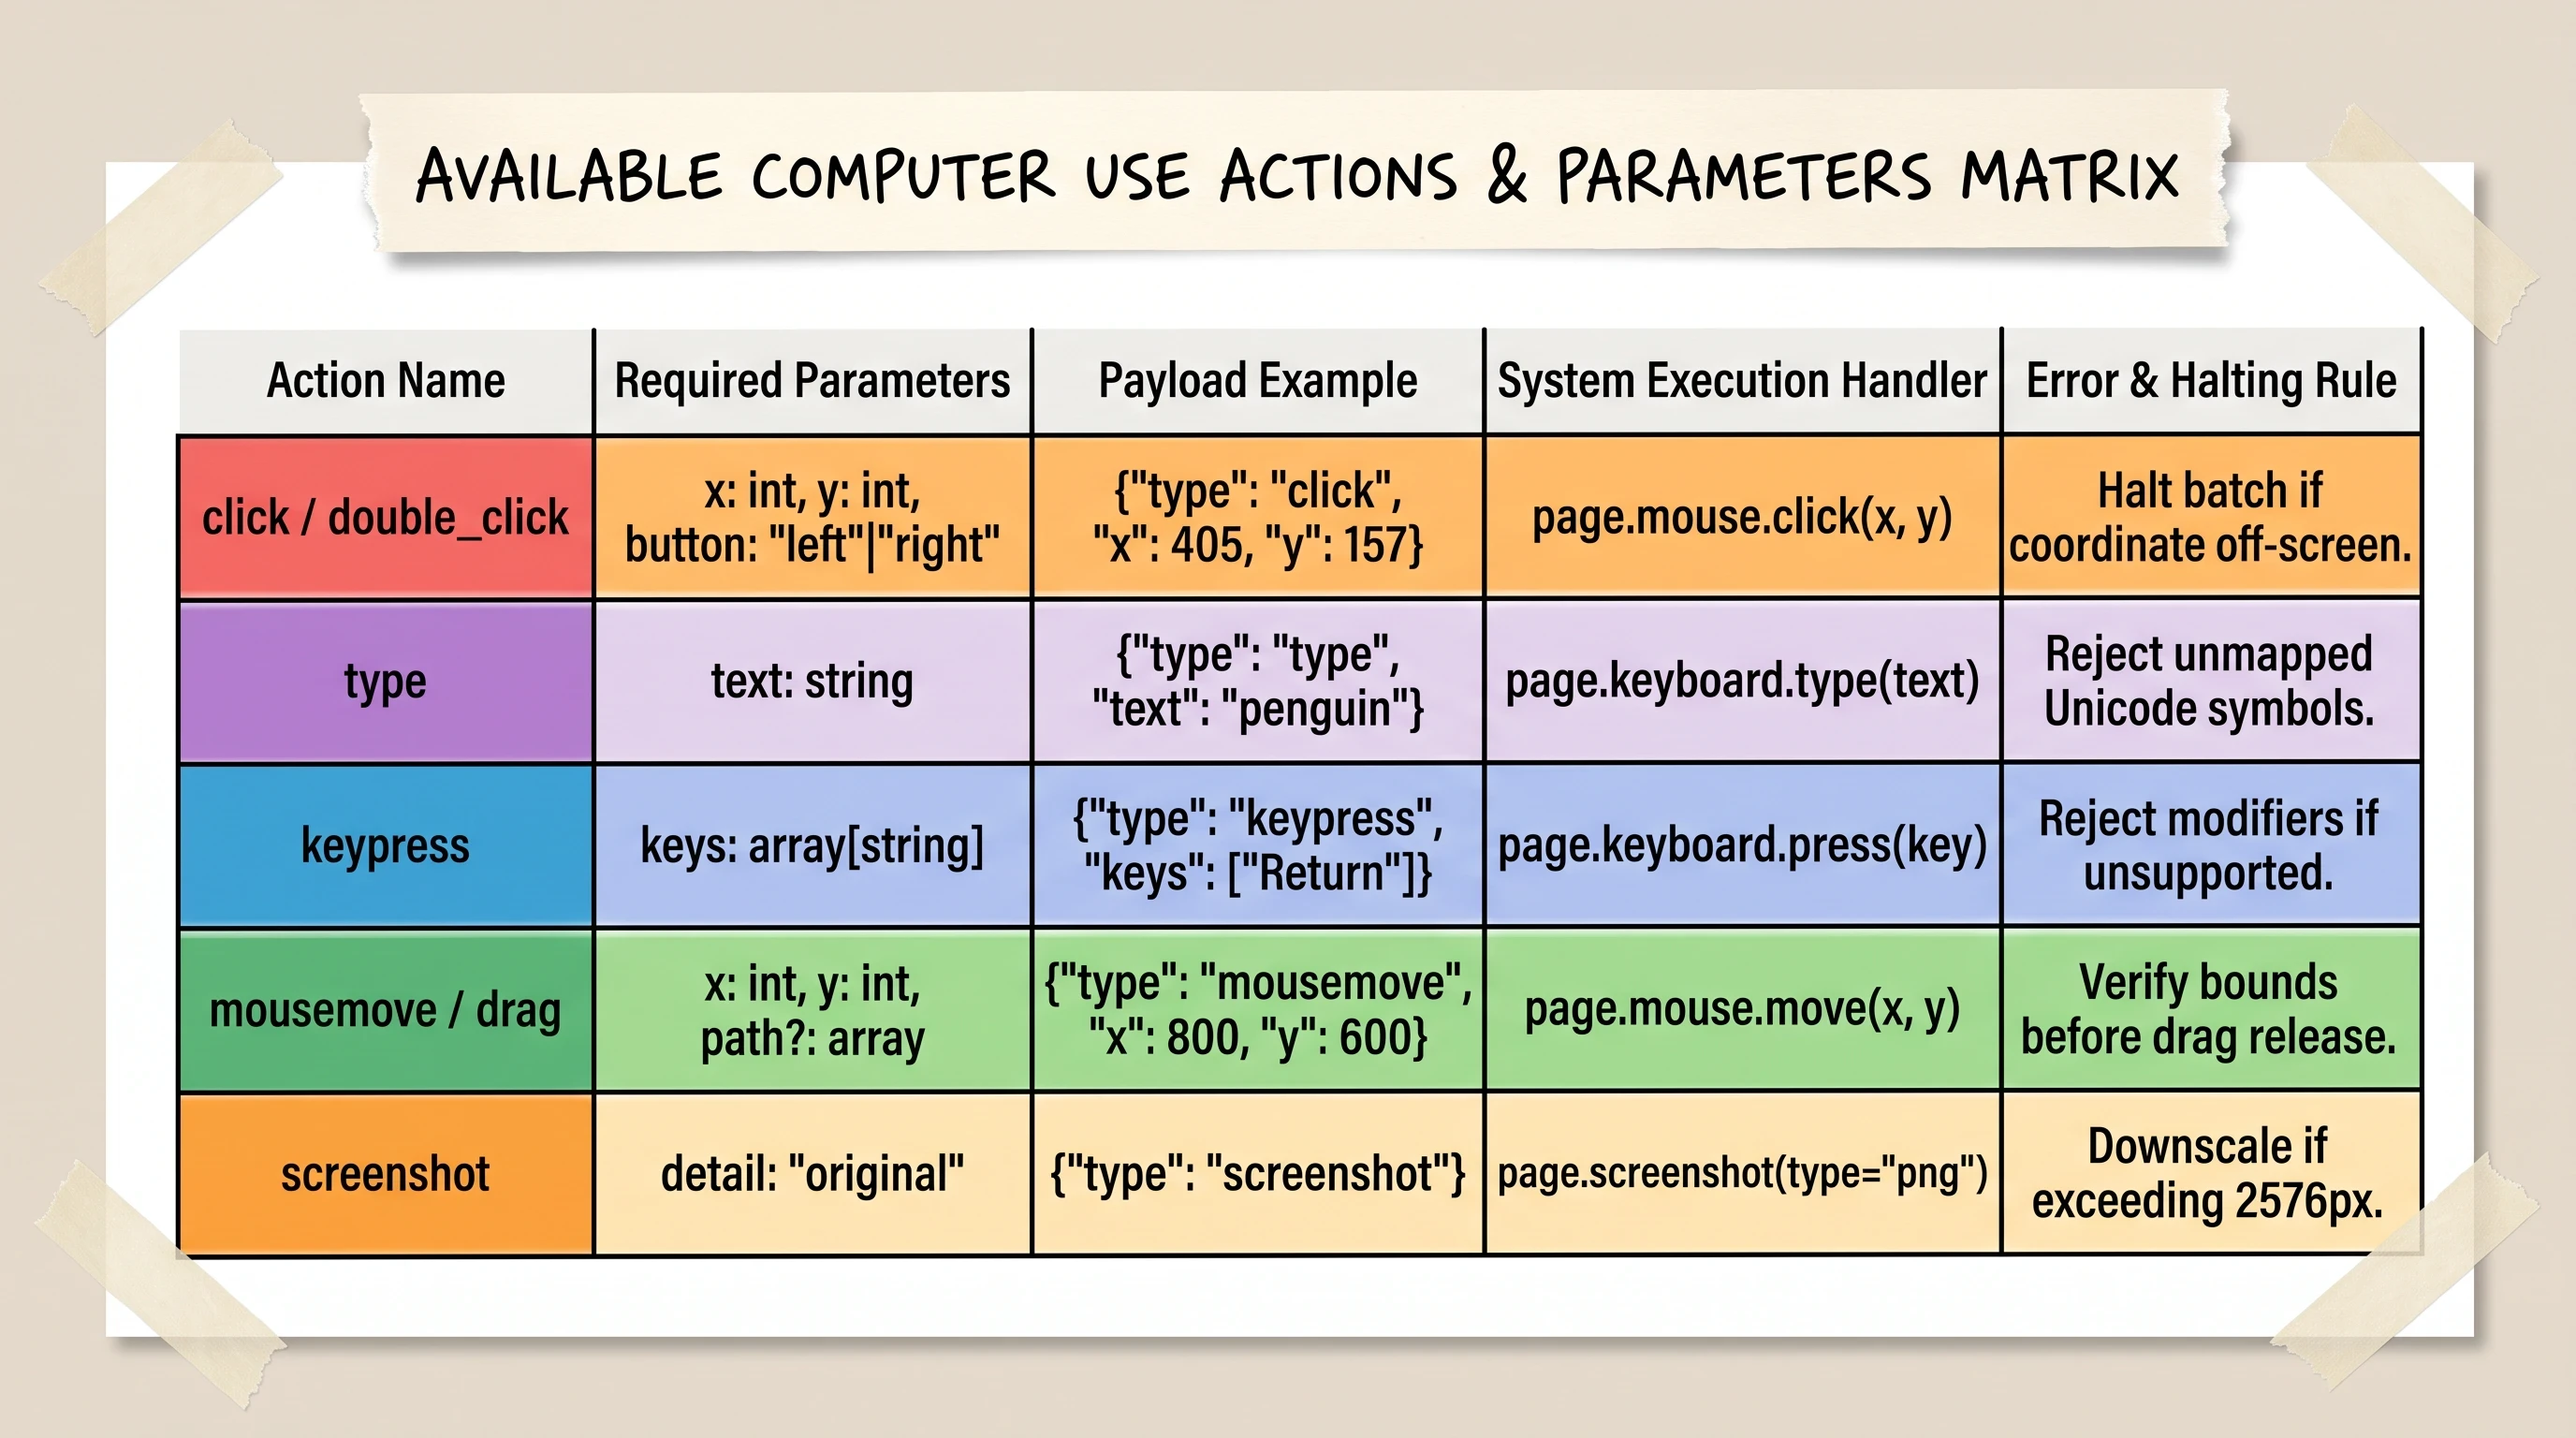
The computer tool accepts batched action arrays including clicks, keyboard typing, cursor movements, and coordinate-bounded drags.
The client harness must iterate over these actions in exact sequential order, dispatching each command into the Playwright or X11 environment:
Capturing Screen Frames and Returning detail: "original" Outputs
Once all actions in the batch finish executing, the client must capture the updated screen state, convert the image to base64, and package it into a computer_call_output object.
Crucially, you must specify detail: "original" in the screenshot payload. If you omit this or specify a lower detail tier, the API will compress and downscale the image, degrading visual grounding and causing click-offset bugs on fine UI elements.
OpenAI Responses API vs. Anthropic computer_toolset_20260801
Developers building multi-model pipelines must account for substantial architectural differences between OpenAI and Anthropic implementations.
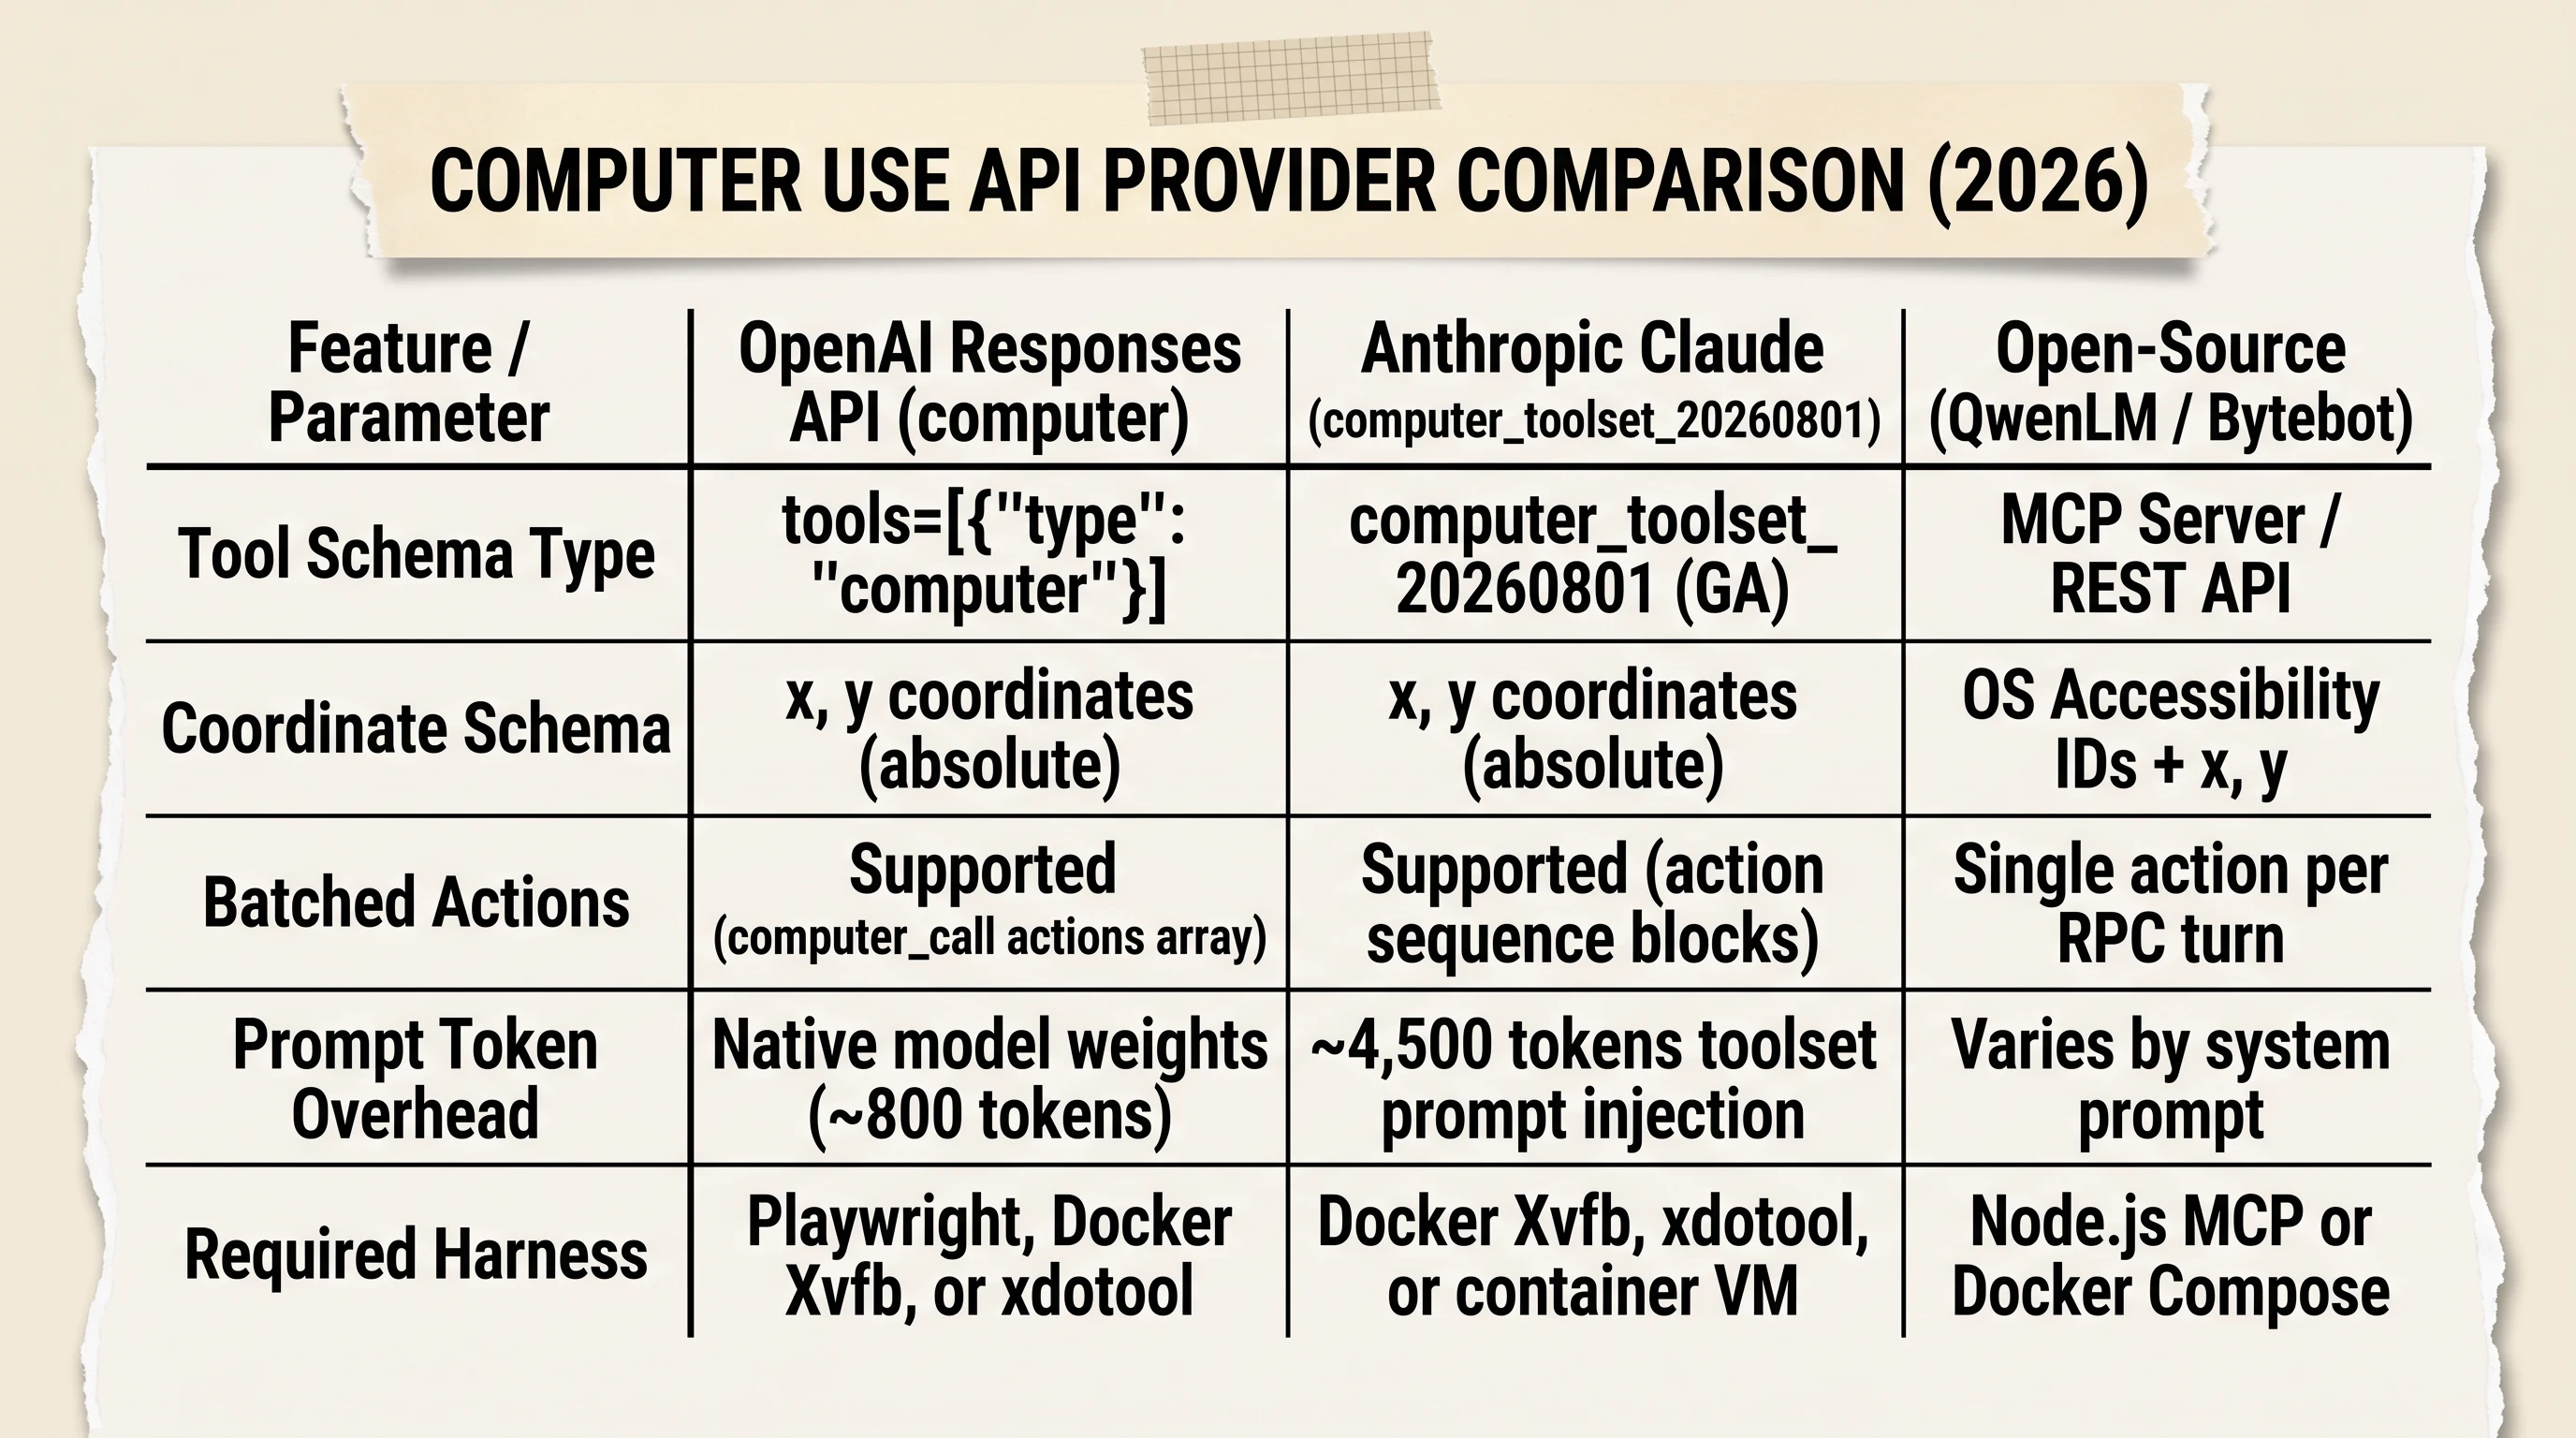
Evaluating OpenAI's native Responses API against Anthropic's GA toolset across coordinate schemas, prompt overhead, and execution harnesses.
In Anthropic's GA computer_toolset_20260801, the tool is declared as a client-side toolset that injects roughly 4,500 input tokens of system prompt instructions explaining how coordinate grids work. In OpenAI's Responses API, coordinate planning is baked directly into the model weights, consuming only about 800 tokens of baseline overhead. If you are comparing commercial implementations across providers to find an ai that can control your computer reliably, understanding these token overhead and coordinate differences determines your production unit economics.
The Desktop Client Route: Configuring ChatGPT Computer Use on macOS and Windows
Not every automation project requires building a custom Python execution harness from scratch. For non-programmers and power users, the official ChatGPT desktop application on macOS and Windows includes native computer use features under the ChatGPT Work and Codex tiers.
macOS System Permissions: Screen Recording and Accessibility Gating
On macOS (Sequoia and Ventura), the operating system's Transparency, Consent, and Control (TCC) framework enforces strict sandboxing around screen reading and hardware input dispatching.
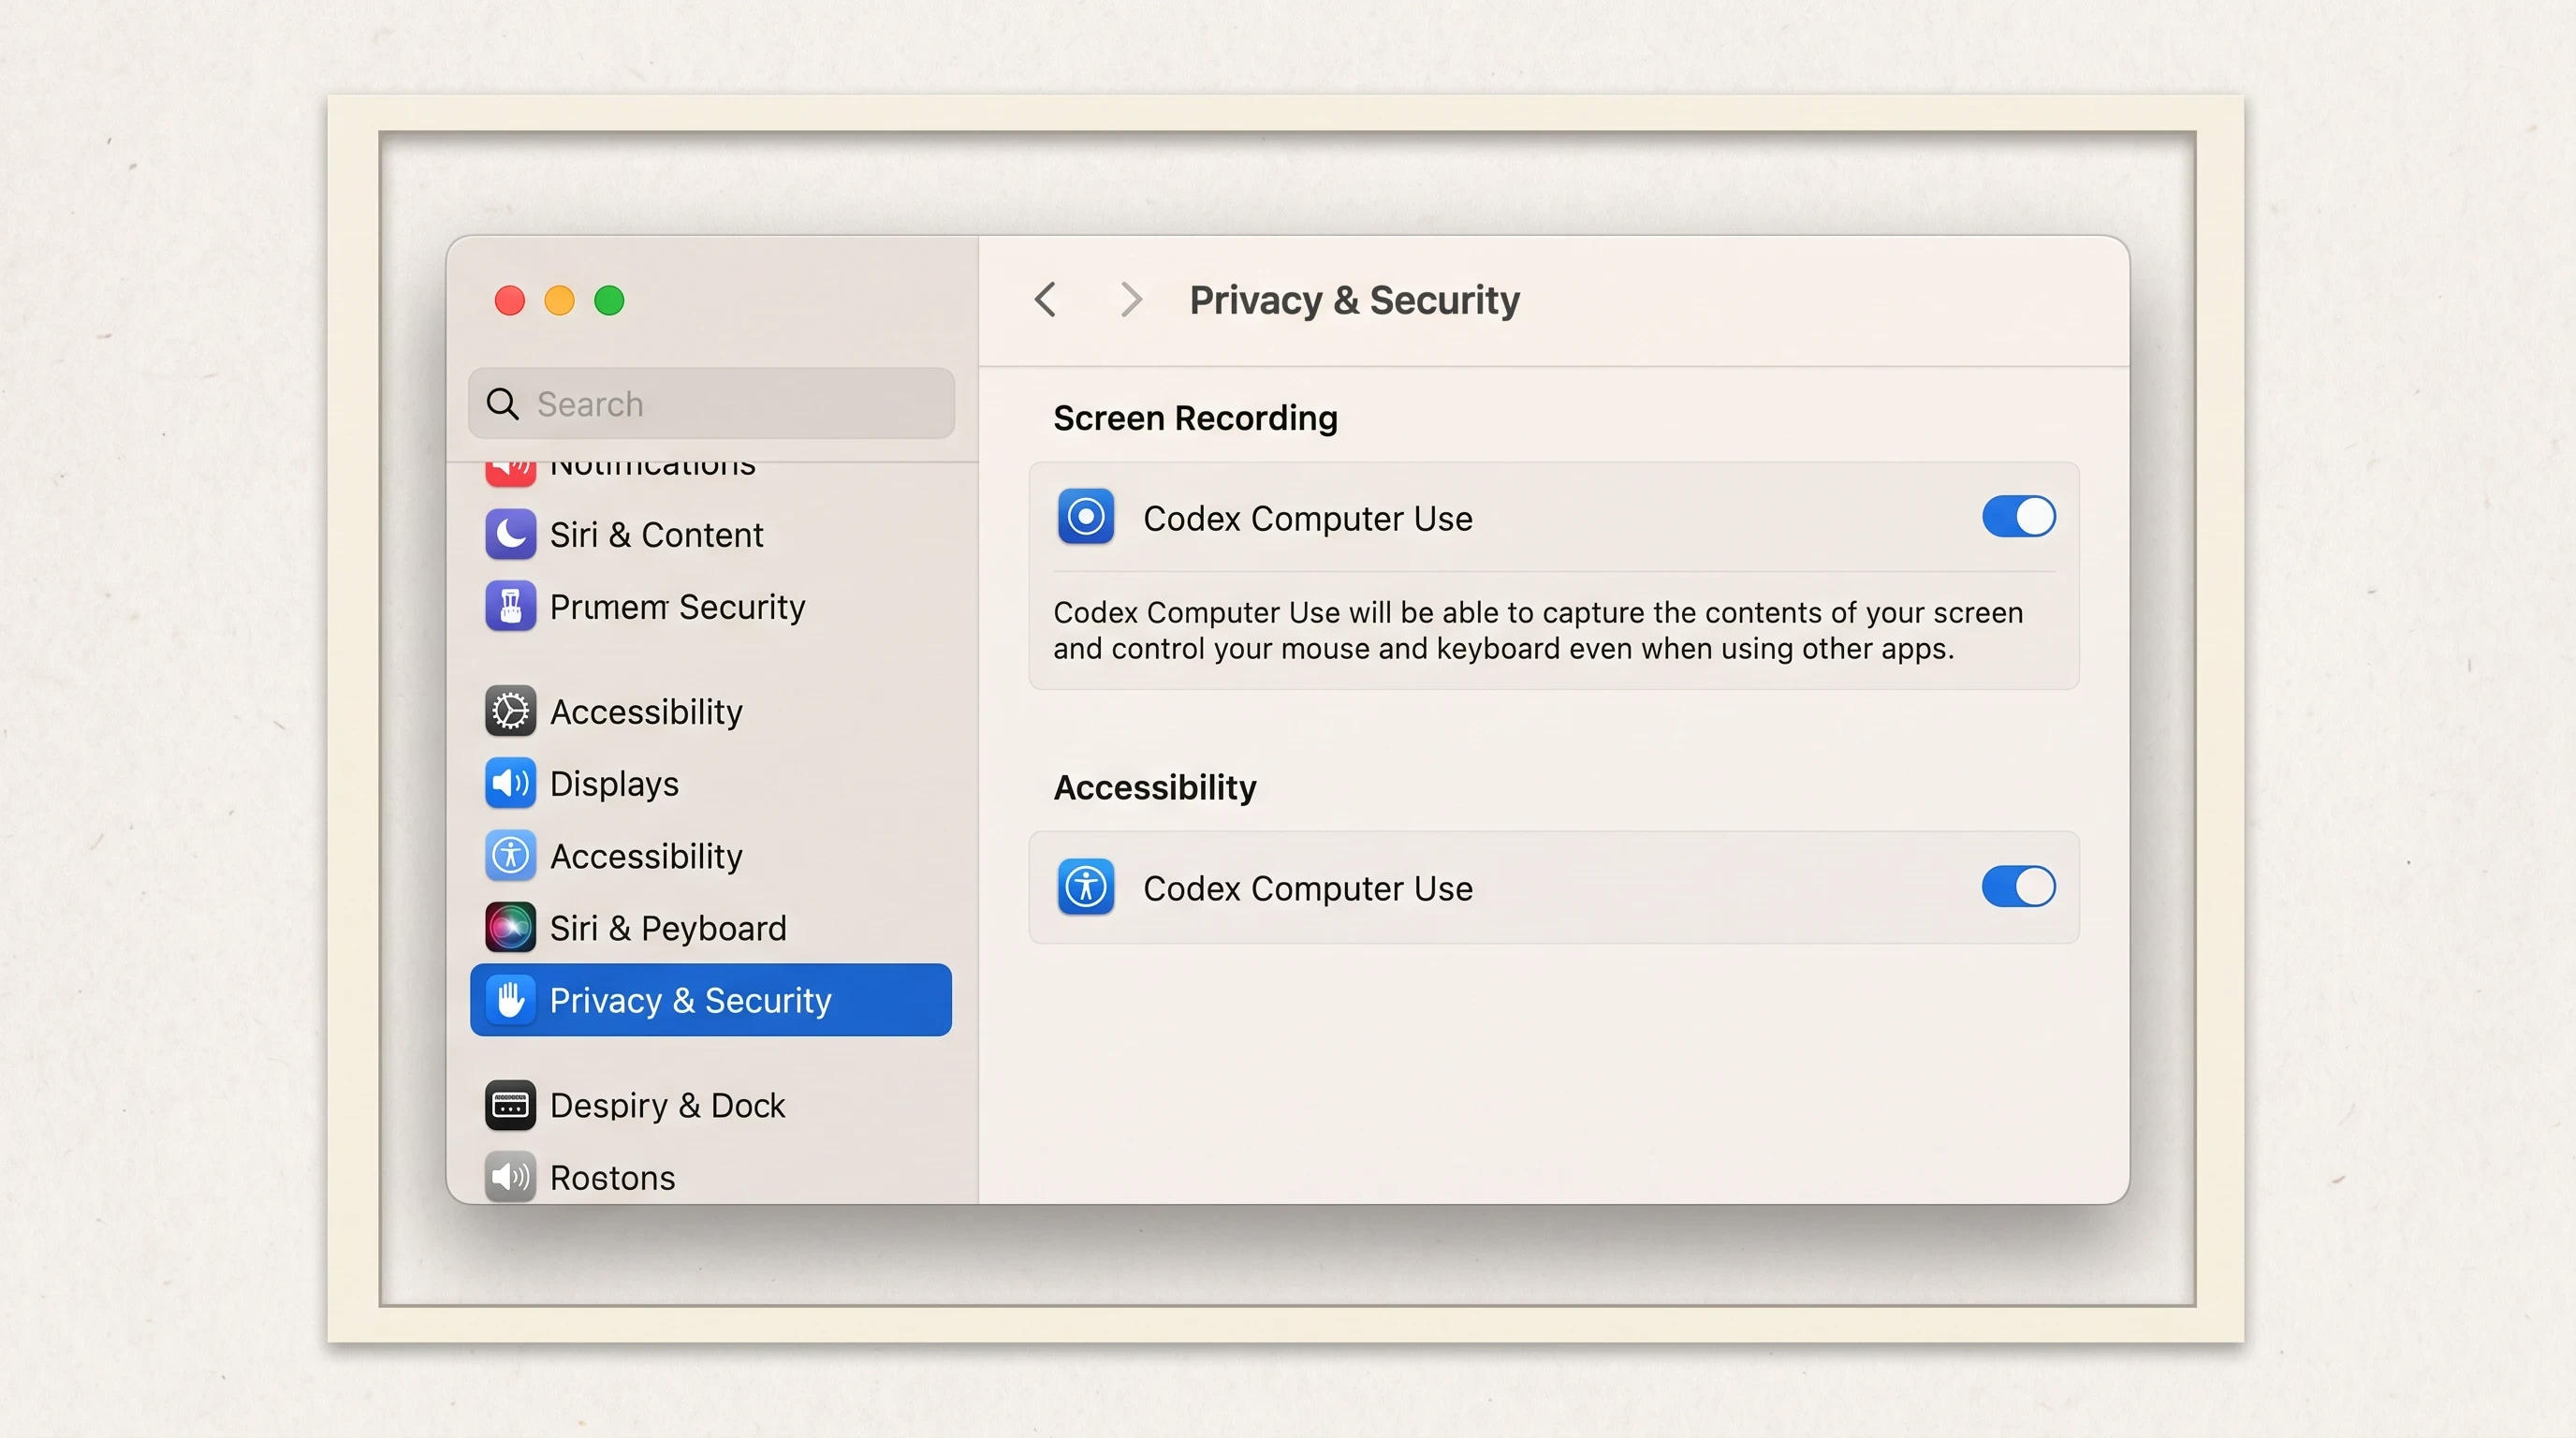
Desktop computer use requires explicit operating system permissions under macOS Privacy & Security before the agent can inspect or control the screen.
To enable computer use in the macOS ChatGPT desktop client:
Open System Settings on your Mac.
Navigate to Privacy & Security > Screen Recording.
Locate Codex Computer Use (or ChatGPT) and switch the toggle to ON.
Navigate to Privacy & Security > Accessibility.
Locate Codex Computer Use and switch the toggle to ON.
Restart the ChatGPT application to apply the operating system permission changes.
If your desktop app fails to detect permissions or hangs during coordinate dispatching, our step-by-step diagnostic guide for resolving when AI agents take control of my computer walks through TCC database resets and display driver fixes.
Windows Application Allow-Lists via $CODEX_HOME/config.toml
On Windows, the ChatGPT desktop client prompts the user with an authorization dialog every time the agent attempts to interact with an application window. For long-running, unattended automation tasks, these repeated popups halt execution.
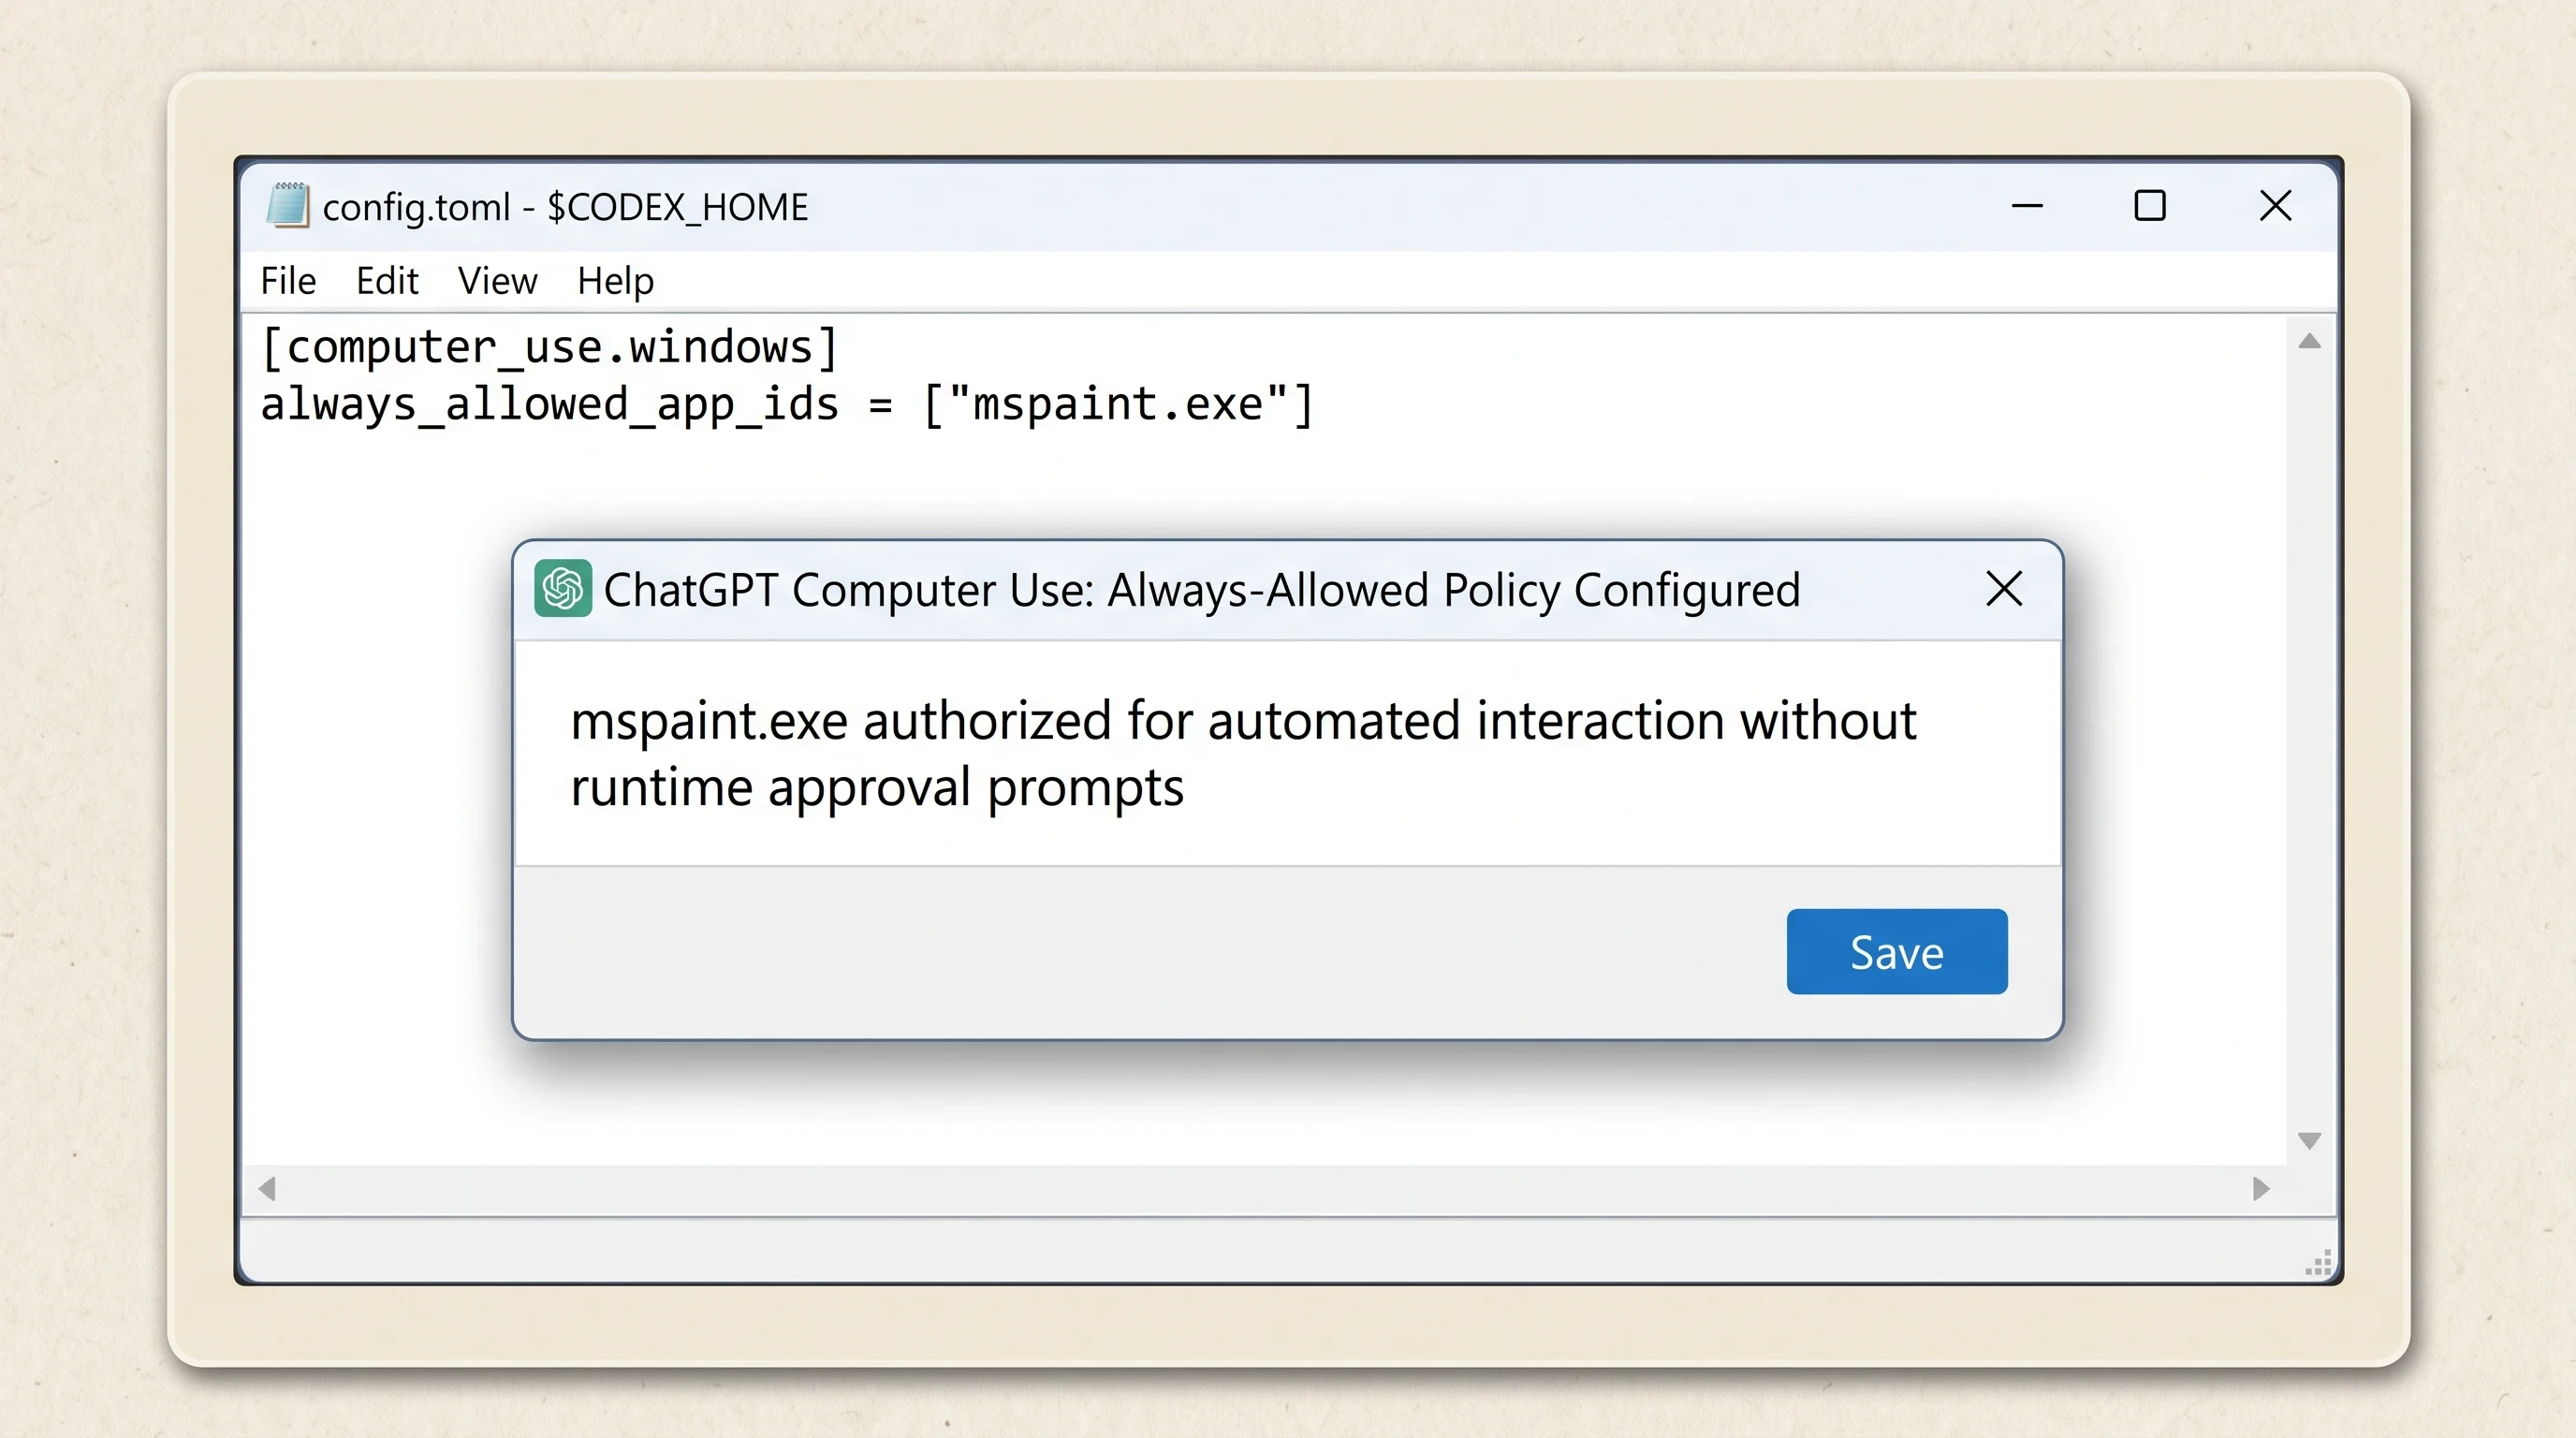
Configuring always_allowed_app_ids in $CODEX_HOME/config.toml authorizes specific applications to run without interrupting workflows for manual approval.
To grant pre-approved access to specific Windows executables, edit your local configuration file located at $CODEX_HOME/config.toml:
Background Task Execution with macOS Locked Use
One of the persistent limitations of traditional GUI automation is that locking your screen or putting your display to sleep terminates the active graphical session, causing headless mouse events to fail.
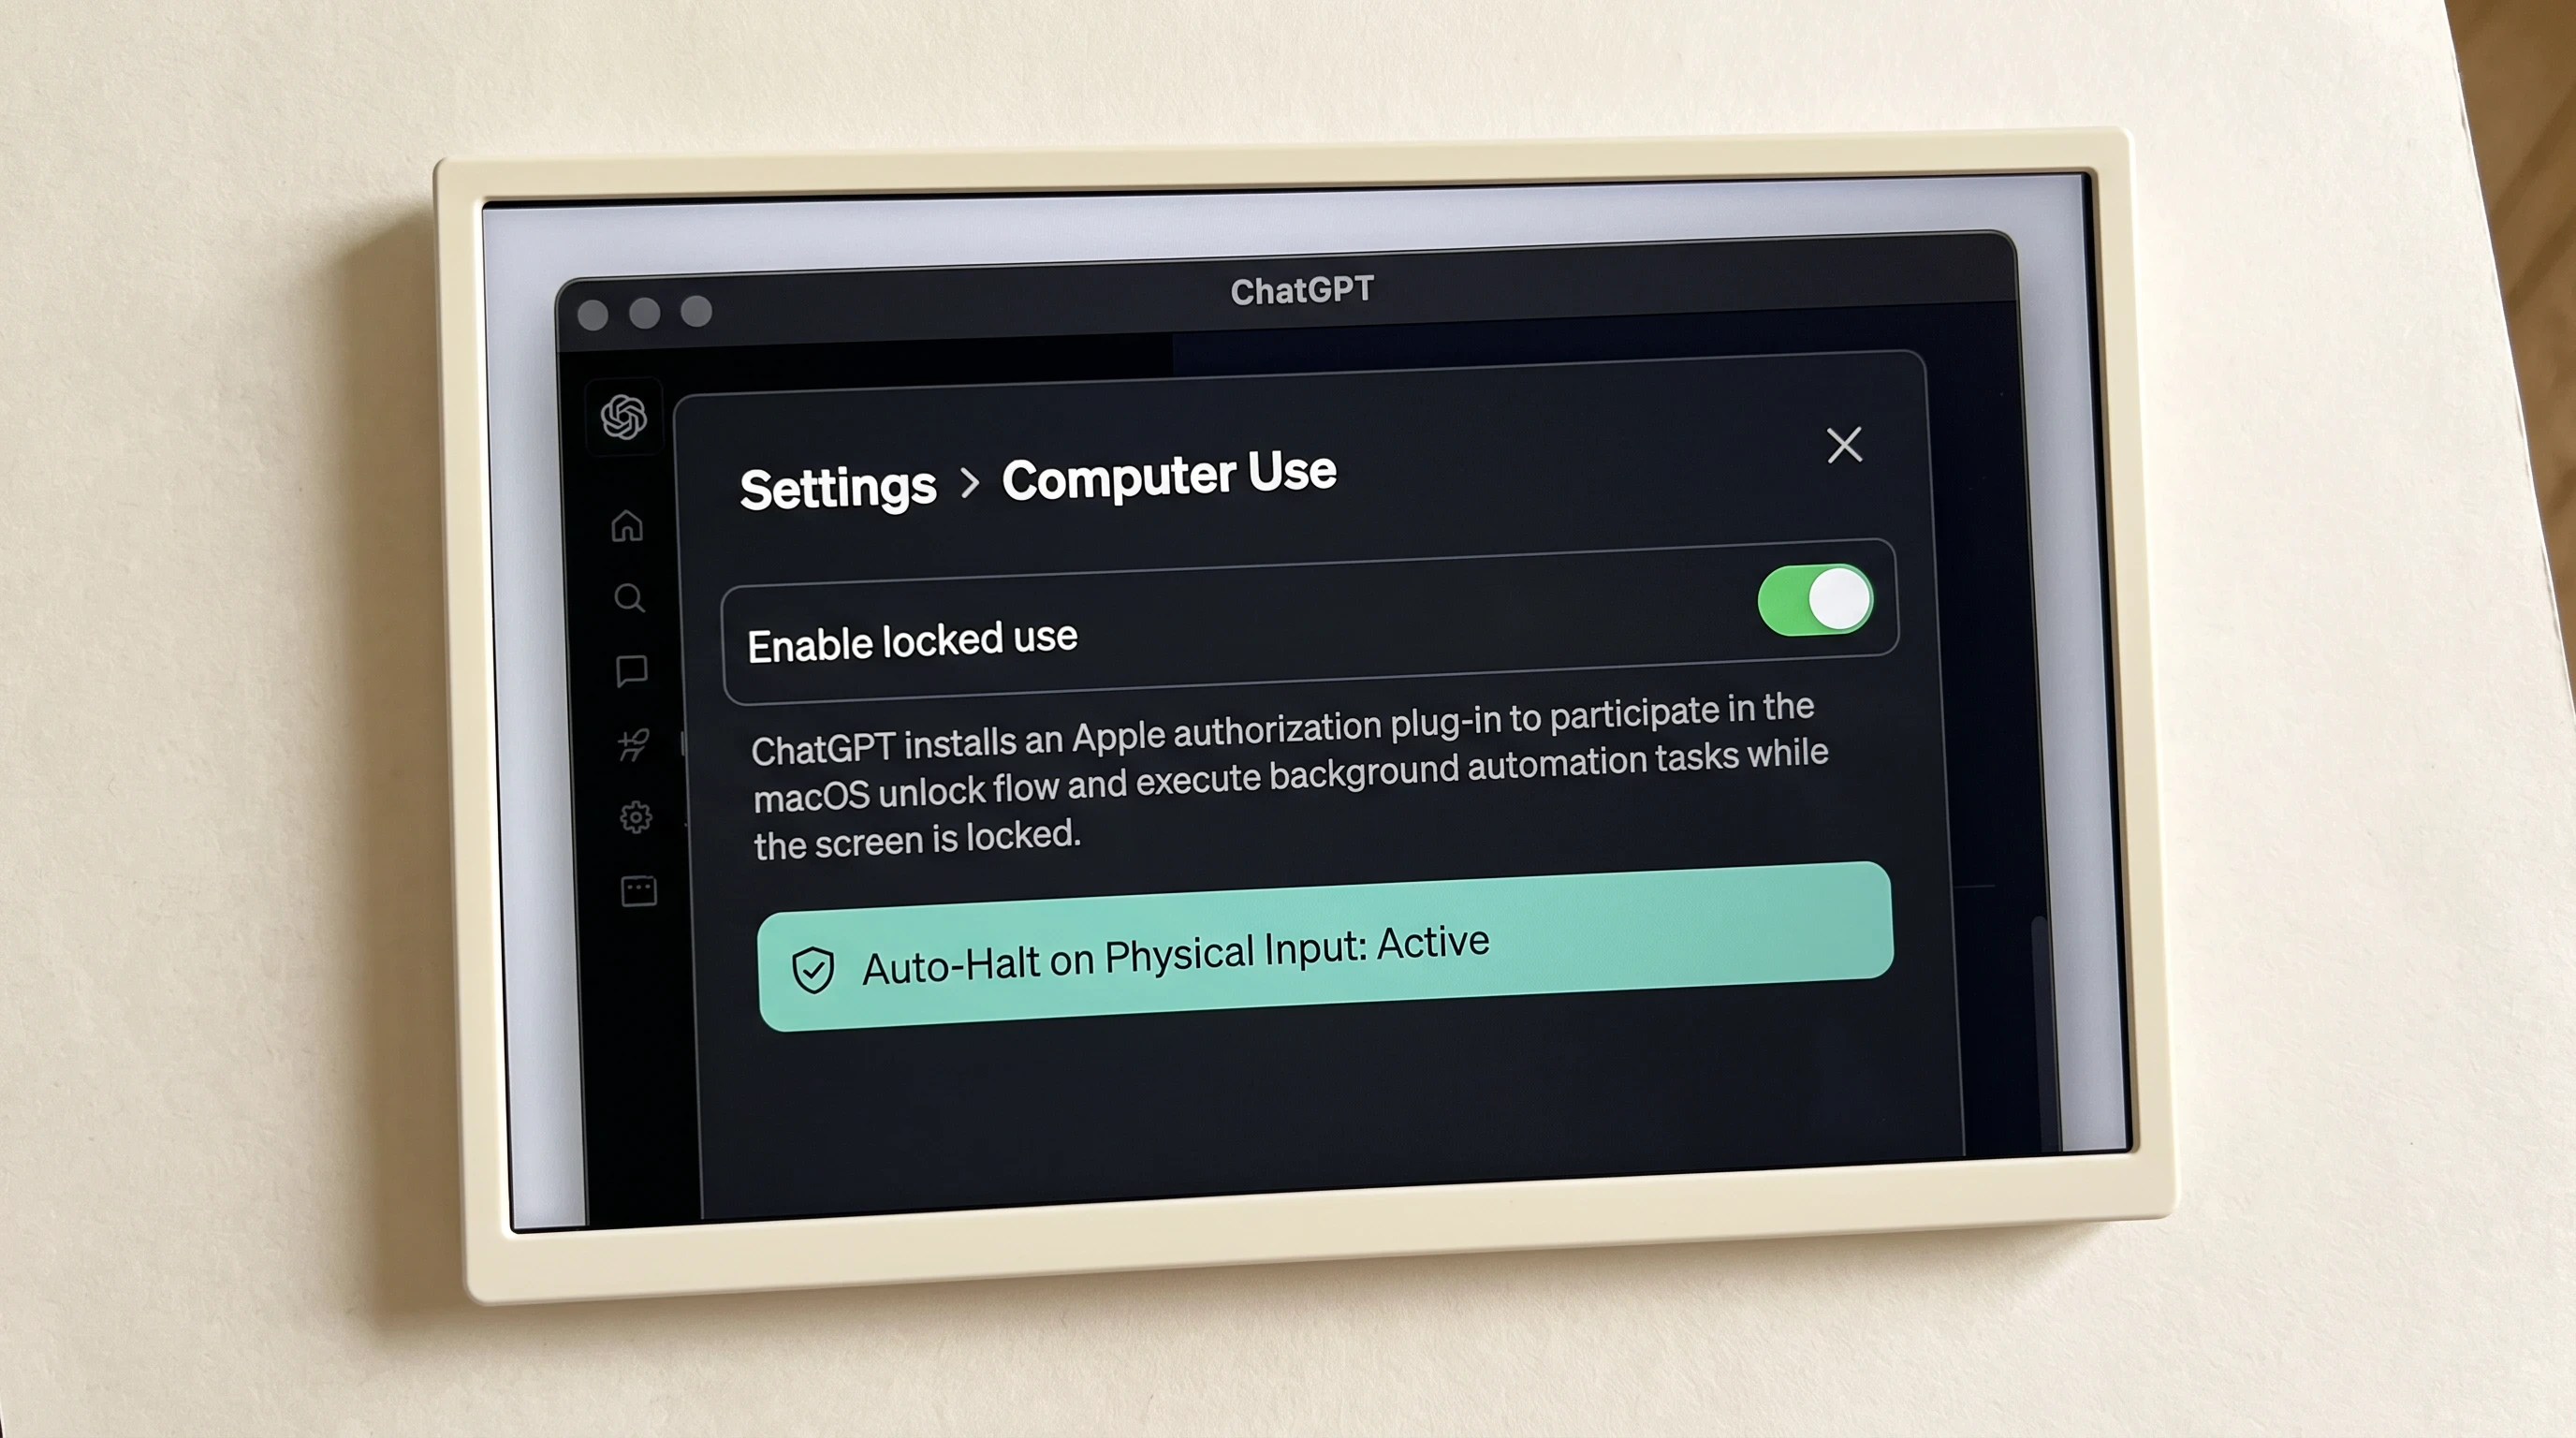
Enabling Locked Use installs an Apple authorization plug-in, allowing long-running agent tasks to execute on headless virtual displays while the Mac is locked.
On macOS, ChatGPT solves this via Locked Use:
In the ChatGPT app, open Settings > Computer Use.
Toggle Enable locked use to ON.
Authenticate with your macOS administrator credentials.
Under the hood, ChatGPT installs a native Apple authorization plug-in. When your physical screen locks, the plug-in creates an off-screen virtual session where the agent continues capturing frames and dispatching events. If you touch your physical keyboard or move your physical mouse, the plug-in immediately intercepts the hardware interrupt, freezes the agent loop, and locks the screen to prevent accidental interference.
Enterprise Governance and Admin Killswitches in requirements.toml
For enterprise IT teams deploying desktop AI agents across hundreds of employee workstations, central governance is mandatory. Administrators can enforce system-wide boundaries by deploying a signed requirements.toml configuration to /etc/codex/requirements.toml (macOS/Linux) or C:\ProgramData\Codex\requirements.toml (Windows).
For organizational deployment standards and security audit frameworks, explore our comprehensive guide on enterprise IT governance for AI agents that control your computer.
Visual DPI & Coordinate Troubleshooting: Mastering Retina 2x Scaling Math and Batch-Action Halting
When developers launch their first custom computer use loop, everything appears functional during testing on a basic 1080p external monitor. The agent correctly locates buttons and types into inputs.
Then, they test the script on a MacBook Pro with a built-in Retina display. Suddenly, every single click lands exactly halfway across the screen from the intended target. The agent attempts to click a search bar at x: 800, y: 300, but the cursor clicks in empty space at x: 400, y: 150.
The spatial intelligence inside the model was never the fragile link. The fragile link is the unhandled coordinate shift when a pixel ratio changes between frames.
The Math of Display Scaling: Handling macOS Retina 2x Pixel Ratios
macOS Retina displays decouple logical points from physical hardware pixels. A 13-inch MacBook Pro display set to a logical resolution of 1280x800 actually renders to a physical hardware buffer of 2560x1600 pixels (a device pixel ratio of 2.0).
When your Python script captures a raw desktop screenshot using standard OS utilities, it captures the full 2560x1600 physical pixel buffer. If you send that unscaled image to the API, the model sees a 2560-pixel-wide canvas and calculates coordinates based on that raw resolution (e.g., emitting a click at x: 810, y: 314).
When your script passes those coordinates to a client library like Playwright or macOS Quartz (which operate in logical points), the cursor moves to 810 logical points, which corresponds to 1620 physical pixels. The click lands completely off-target.
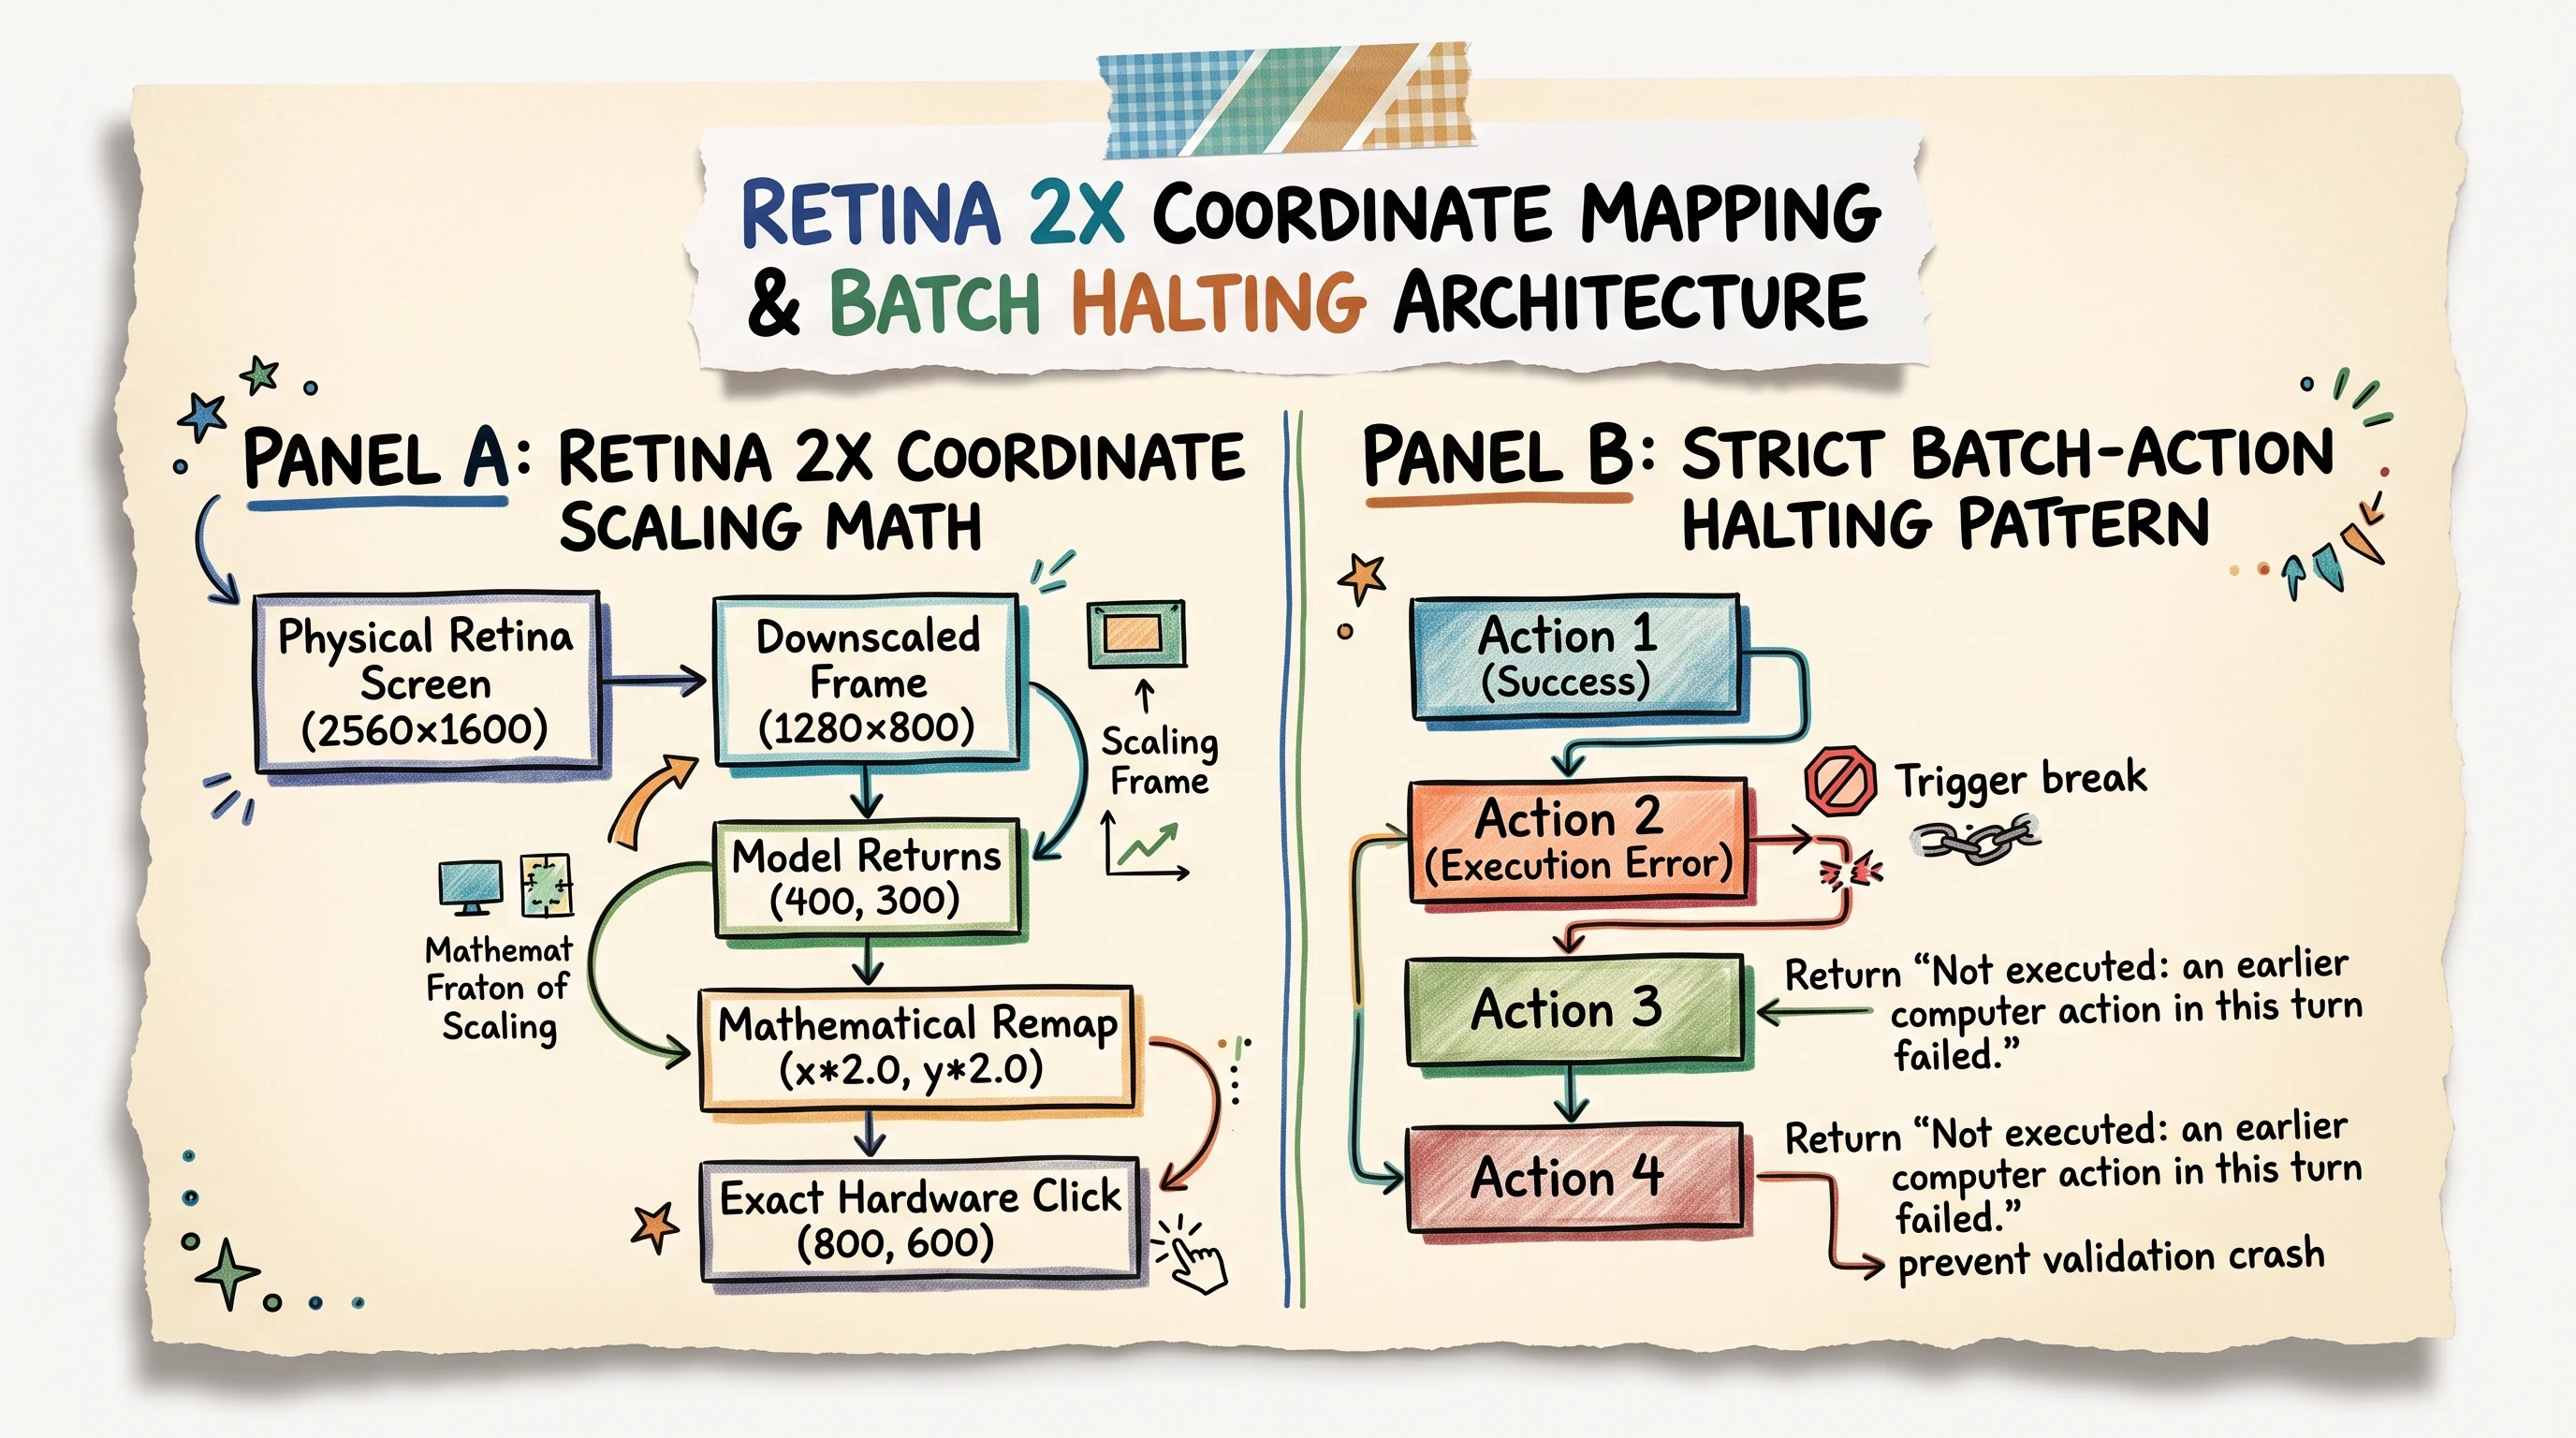
Handling Retina display 2x pixel densities requires mathematical coordinate translation, while mid-batch failures require strict halting fallbacks to prevent validation crashes.
Dynamic Screenshot Downscaling and Coordinate Upscaling Formulas
To achieve pixel-perfect accuracy across all displays, your client harness must implement two mathematical transformations:
Downscaling Factor ($S_d$): Scale the physical screenshot down so its longest edge fits within the model's visual token limit ($L_{max} = 2576 ext{px}$) while accounting for device pixel ratio ($R$).
Coordinate Upscaling Factor ($S_u$): Multiply the model's returned API coordinates by the exact inverse scaling ratio before dispatching hardware events.
$$ ext{Scale Ratio } S = \min\left(1.0, rac{L_{max}}{\max( ext{Width}, ext{Height})} ight)$$
$$ ext{Physical Click Coordinate } X_{local} = rac{X_{api}}{S imes R}$$
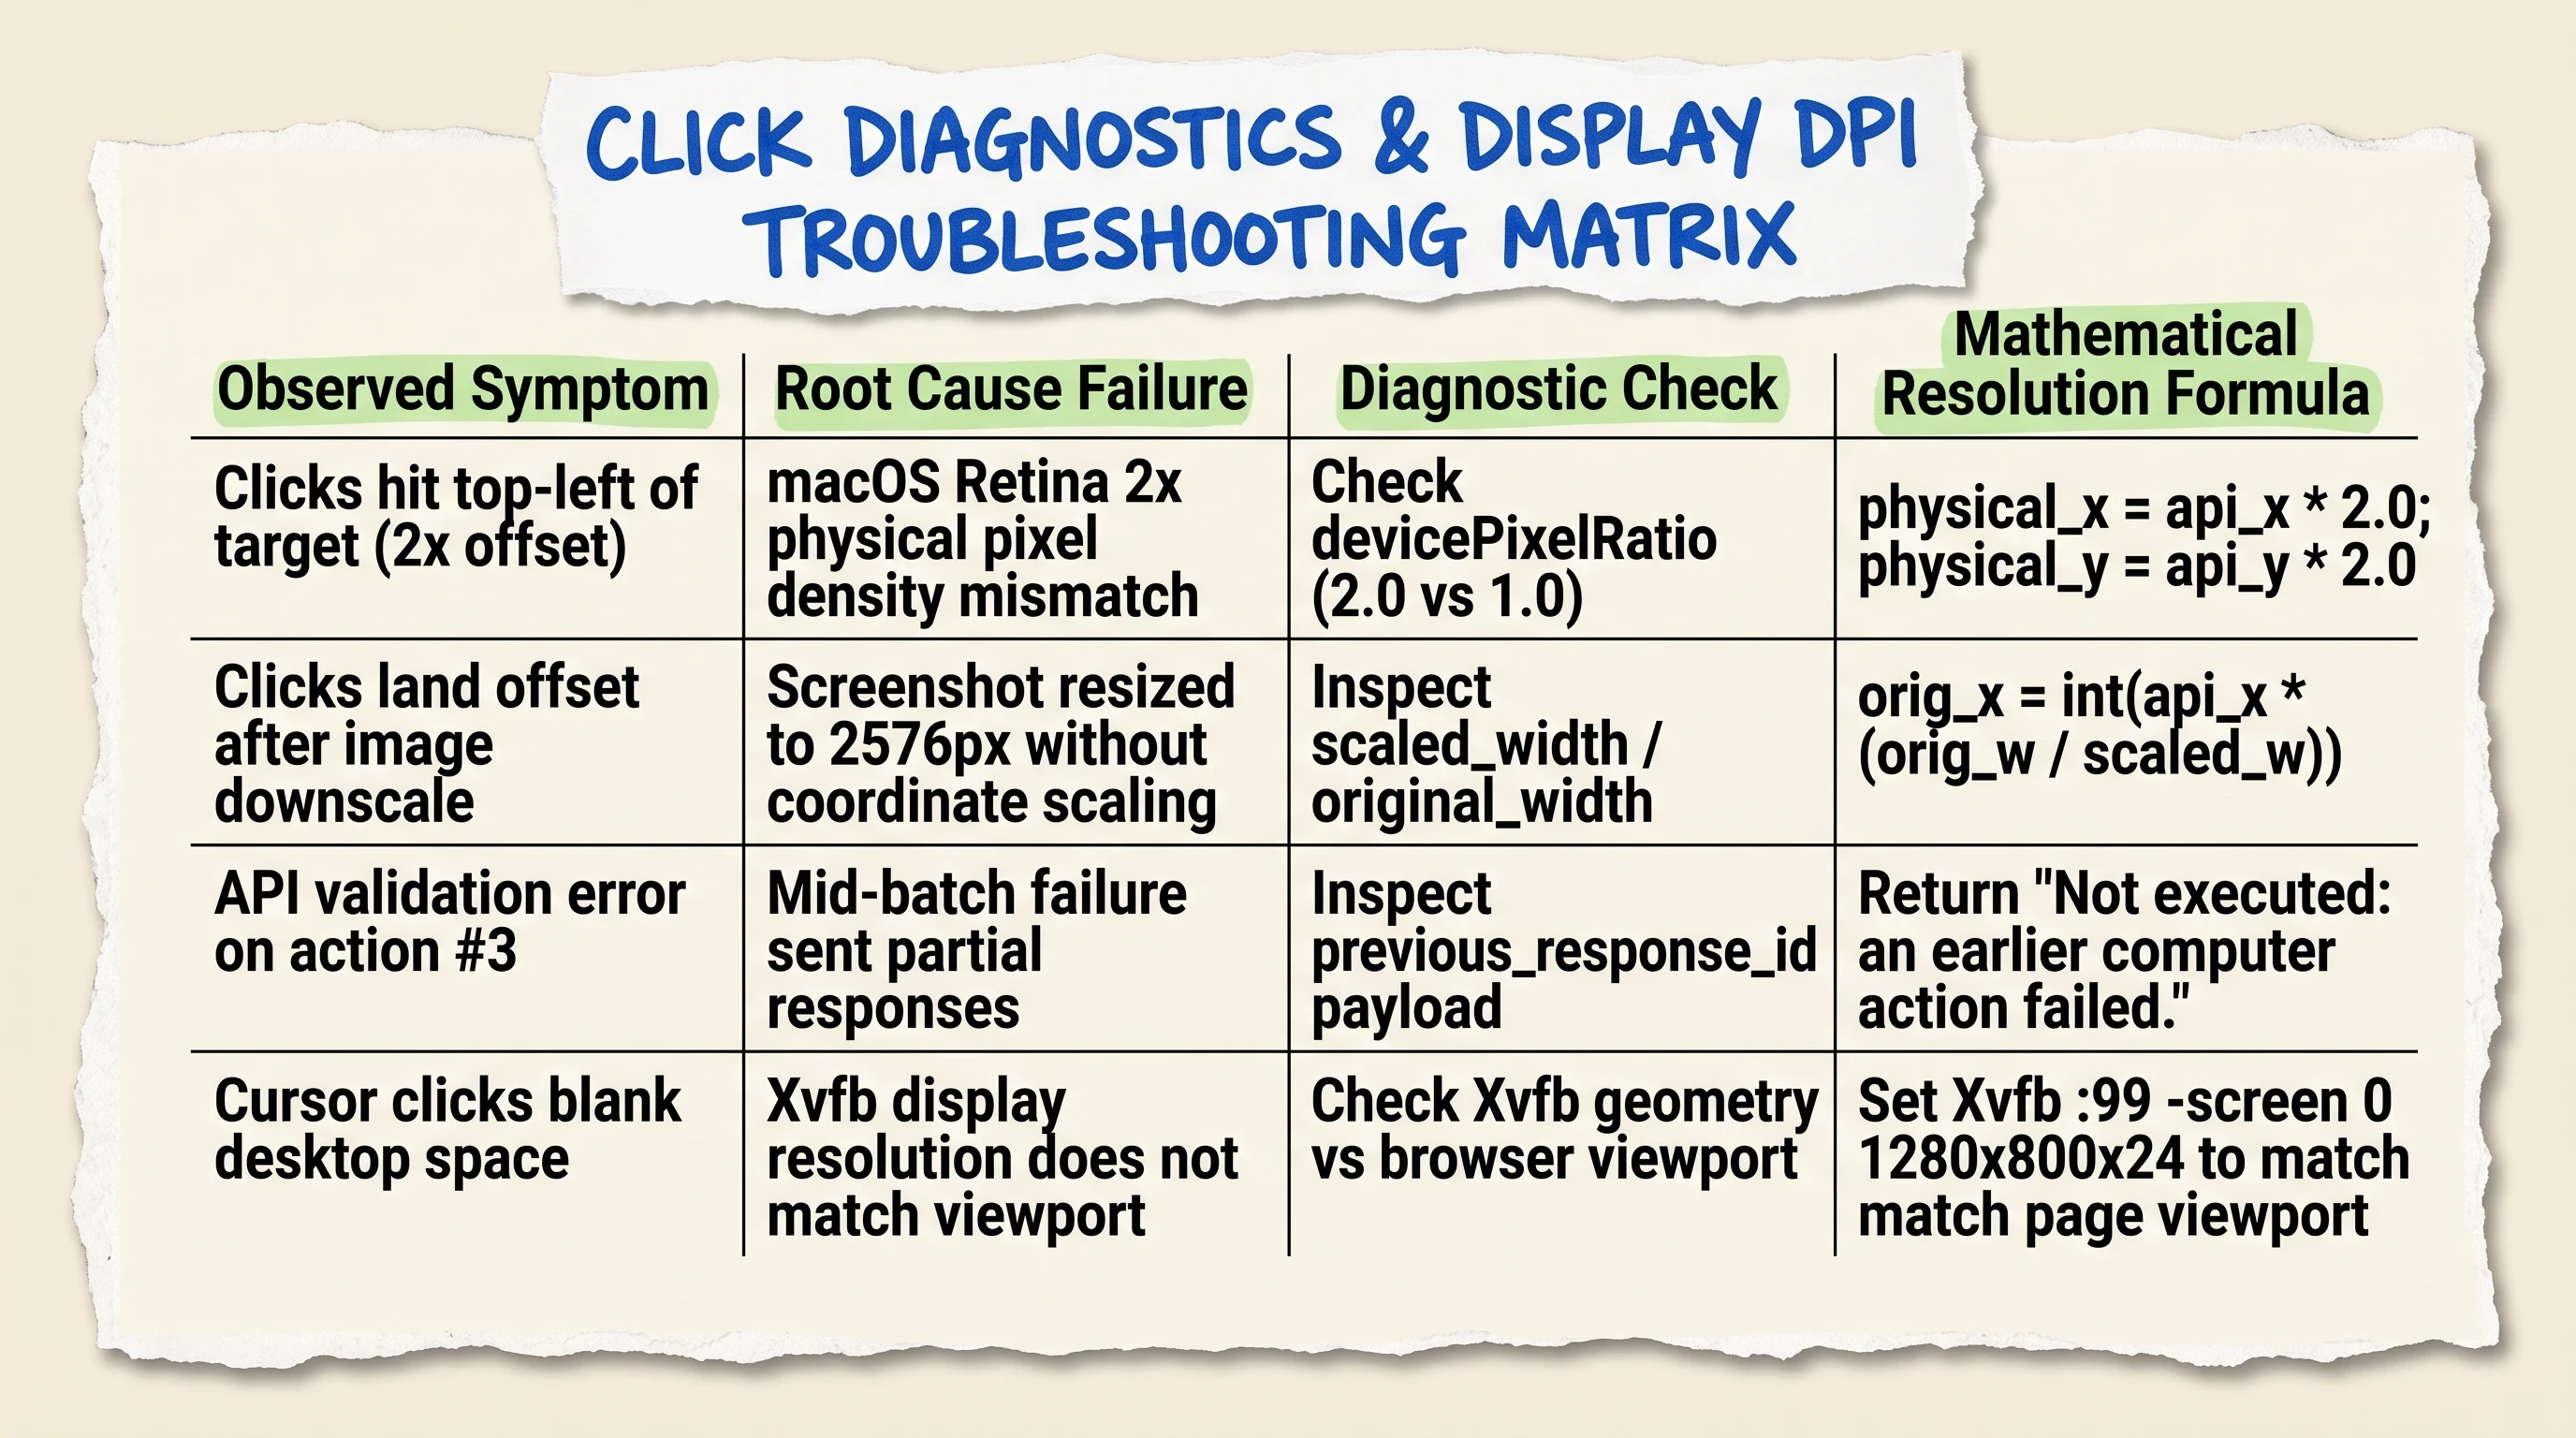
Click offsets and drift stem from display DPI mismatches, unscaled Retina frames, and missing batch error responses.
Here is the production Python utility for handling Retina scaling dynamically:
Strict Halting Pattern: Handling Mid-Batch Action Failures Gracefully
When an API model returns a batch of four actions (e.g., Click Dropdown, Wait 500ms, Click Item #3, Type "Confirm"), what happens if action #2 fails because the dropdown took 700ms to animate into view?
In naive implementations, the script catches the exception on action #2, skips it, and attempts to execute action #3. Because the dropdown never opened, action #3 clicks in empty space, triggering an unintended click on an unrelated background link.
Both OpenAI and Anthropic API schemas mandate the strict halting pattern: if action $k$ fails in a batch of $N$ actions, execution must stop immediately. The client must return the error status for action $k$, and all subsequent unexecuted actions ($k+1$ through $N$) must receive the exact error string: "Not executed: an earlier computer action in this turn failed."
Programmatic Safety Defenses: Real-Time Screenshields and Injection Hardening
As desktop agents transition from curated demos to enterprise workflows, security vulnerabilities shift from traditional network exploits to visual attack vectors.
The Threat Landscape: Indirect Visual Prompt Injection via Web and Files
Indirect visual prompt injection is one of the most critical unsolved vulnerabilities in autonomous desktop agents. Unlike traditional prompt injections where a user directly attacks an LLM via chat, indirect visual injection occurs when an agent encounters untrusted third-party content rendered on screen.
Consider a scenario where an AI agent is instructed to open a vendor's pricing page and extract subscription tiers into a local spreadsheet. The vendor's webpage contains a hidden div with white text on a white background reading:
Because the agent navigates via raw visual perception, it reads the rendered white text. Without protective screenshields, the model may interpret this as an overriding system directive, navigating to the local terminal, exfiltrating the credentials file, and transmitting it to the attacker's server.
Building a Pre-Execution Screen-Scanner via OS Accessibility Trees
To prevent visual injection attacks from hijacking client execution, production harnesses implement a pre-execution Screenshield. Before dispatching any model-generated action, the harness queries the operating system's Accessibility API (AT-SPI on Linux, AX on macOS, UI Automation on Windows) to extract structured text elements and audit them against security heuristics.
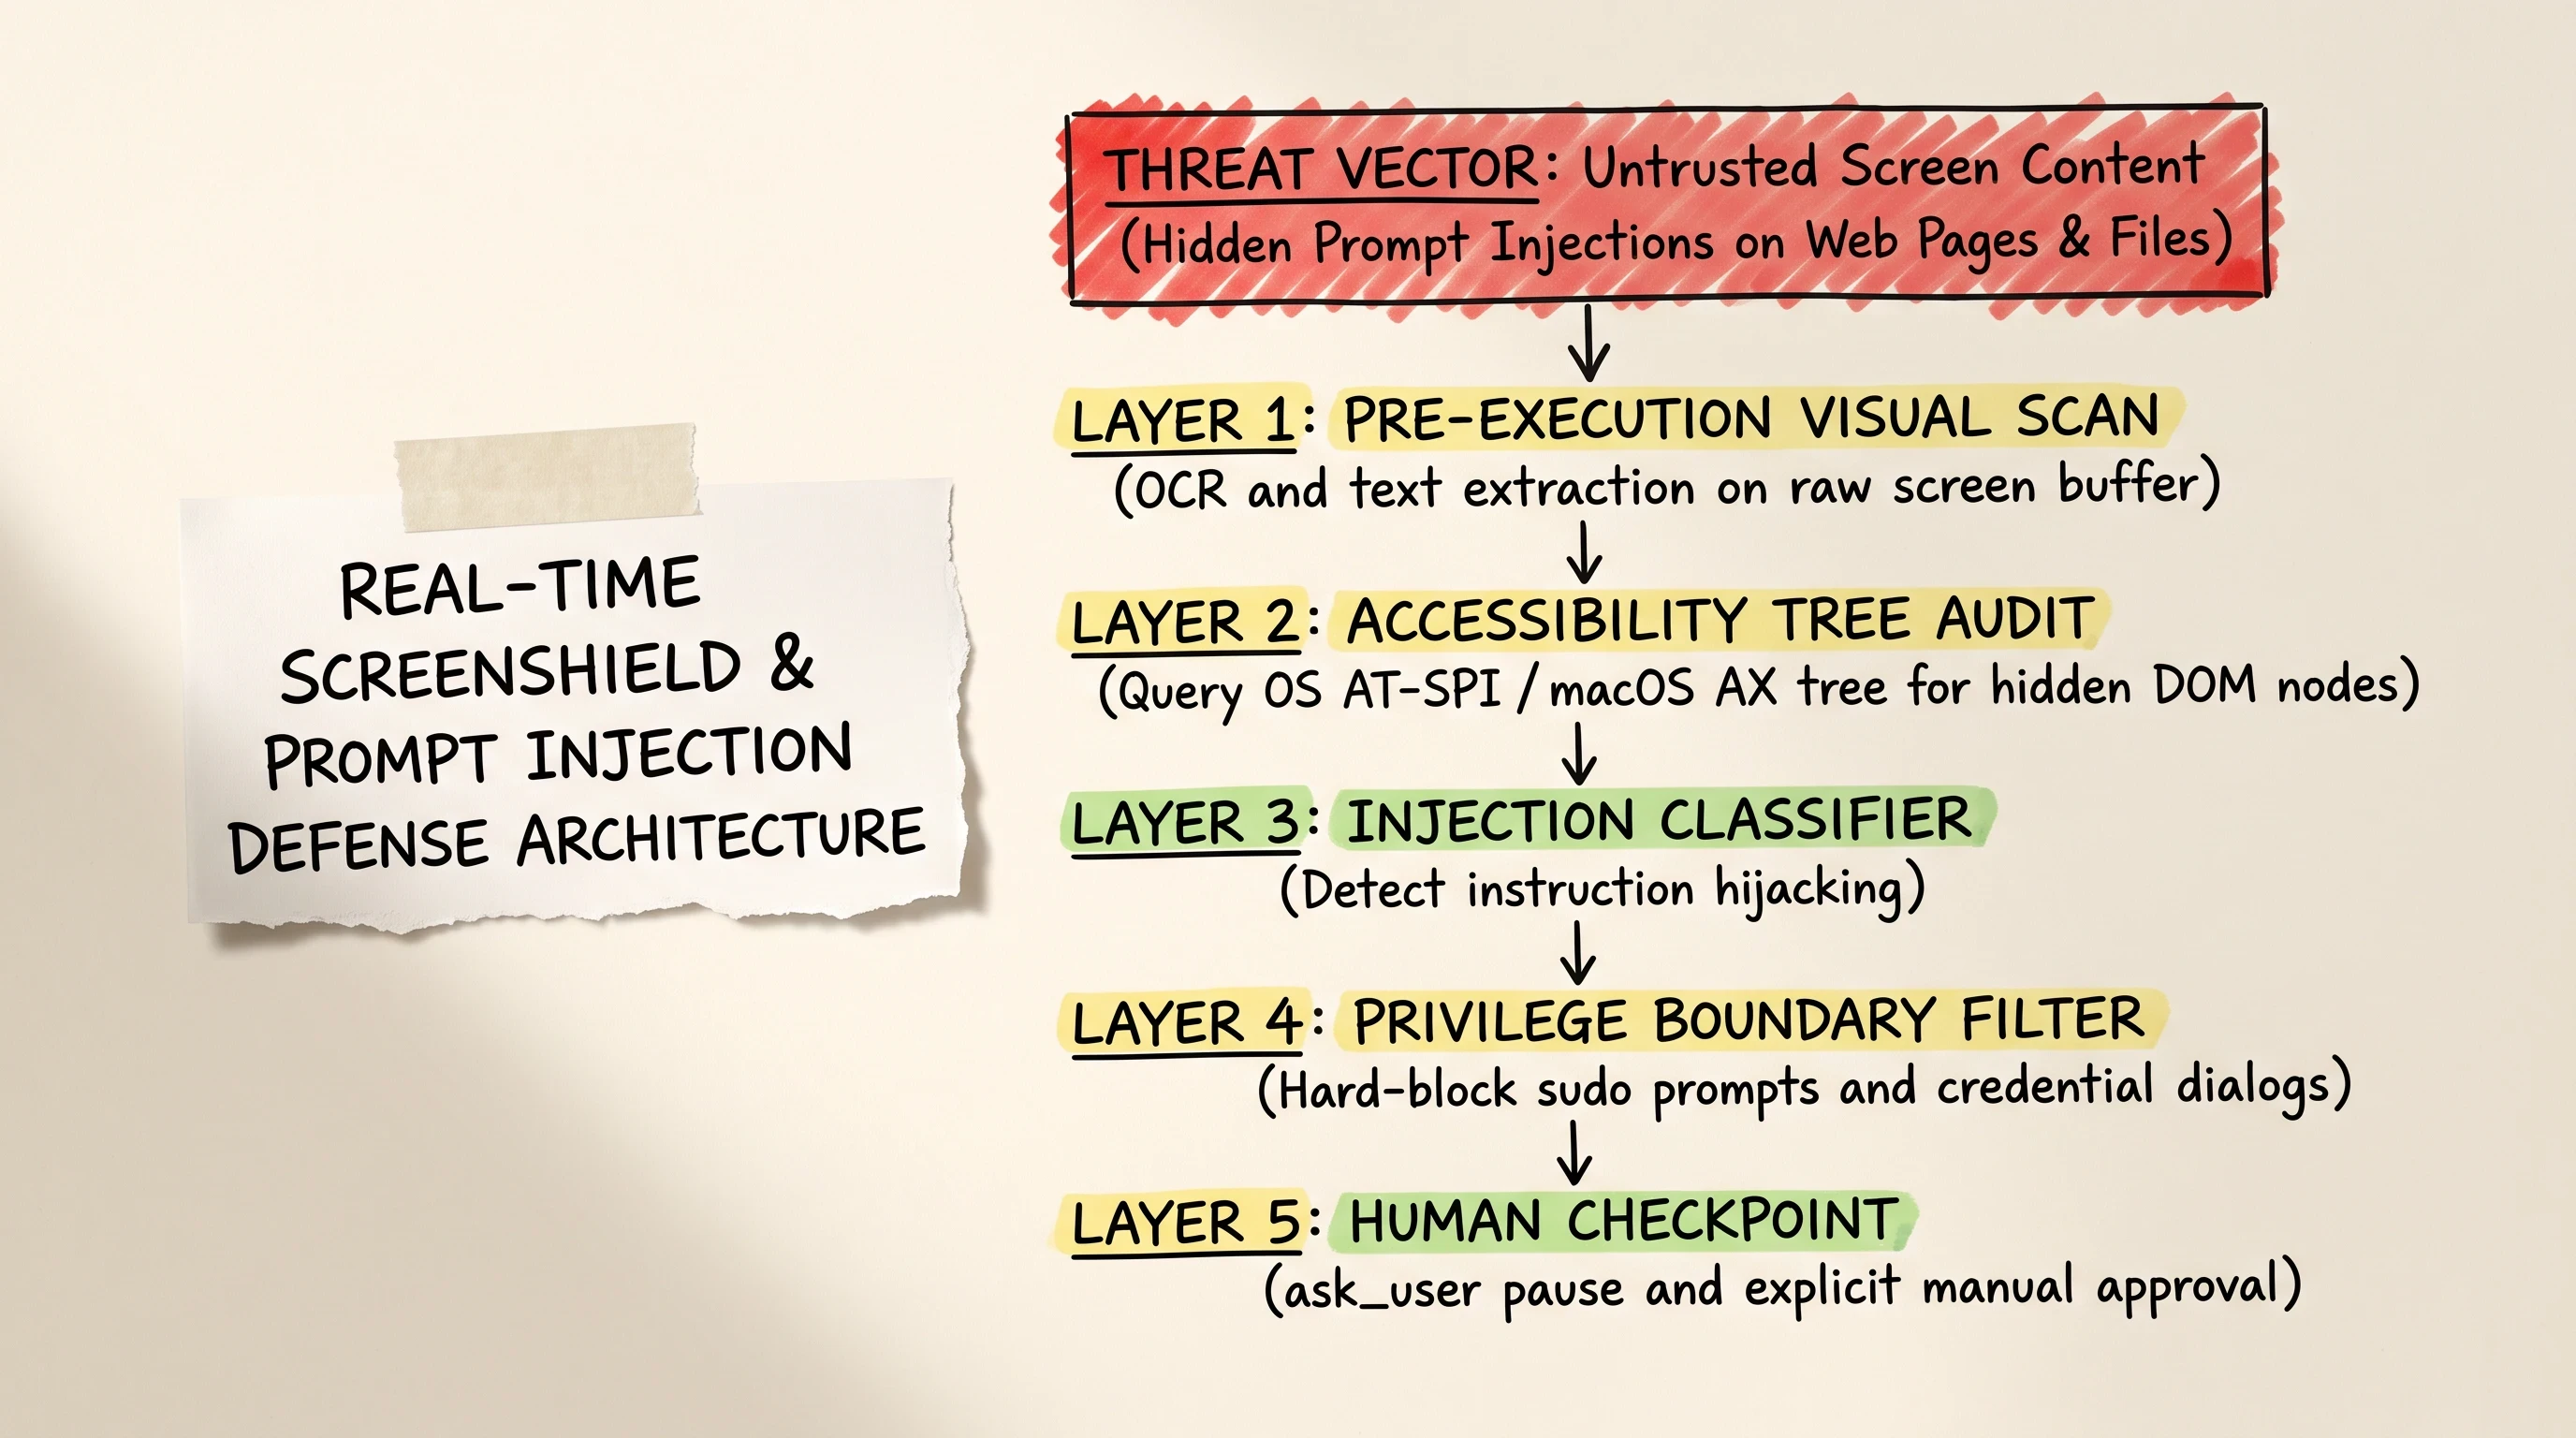
Multi-layered screenshields inspect OS accessibility trees and screen text to intercept indirect visual prompt injection before cursor actions execute.
Here is a Python pre-execution screenshield implementation:
Automated Human-in-the-Loop (ask_user) Checkpoint Hand-Offs
When the screenshield flags an adversarial pattern, or when the model attempts to execute a high-risk operation (such as entering credit card details, submitting authentication forms, or confirming system file deletions), the harness must trigger an automated ask_user breakpoint.
Open-Source Repositories & MCP Integration: Exploring open-computer-use and Bytebot
Developers who want to avoid reinventing virtual display managers, OS accessibility bridges, and protocol adapters can leverage robust open-source repositories designed for computer use.
If you are exploring the open-source landscape for computer use github repositories, three projects stand out:
Deploying QwenLM's open-computer-use as a Global MCP Service
QwenLM's open-computer-use repository provides an enterprise-ready implementation of the Model Context Protocol (MCP) designed for OS automation across macOS, Windows, and Linux.
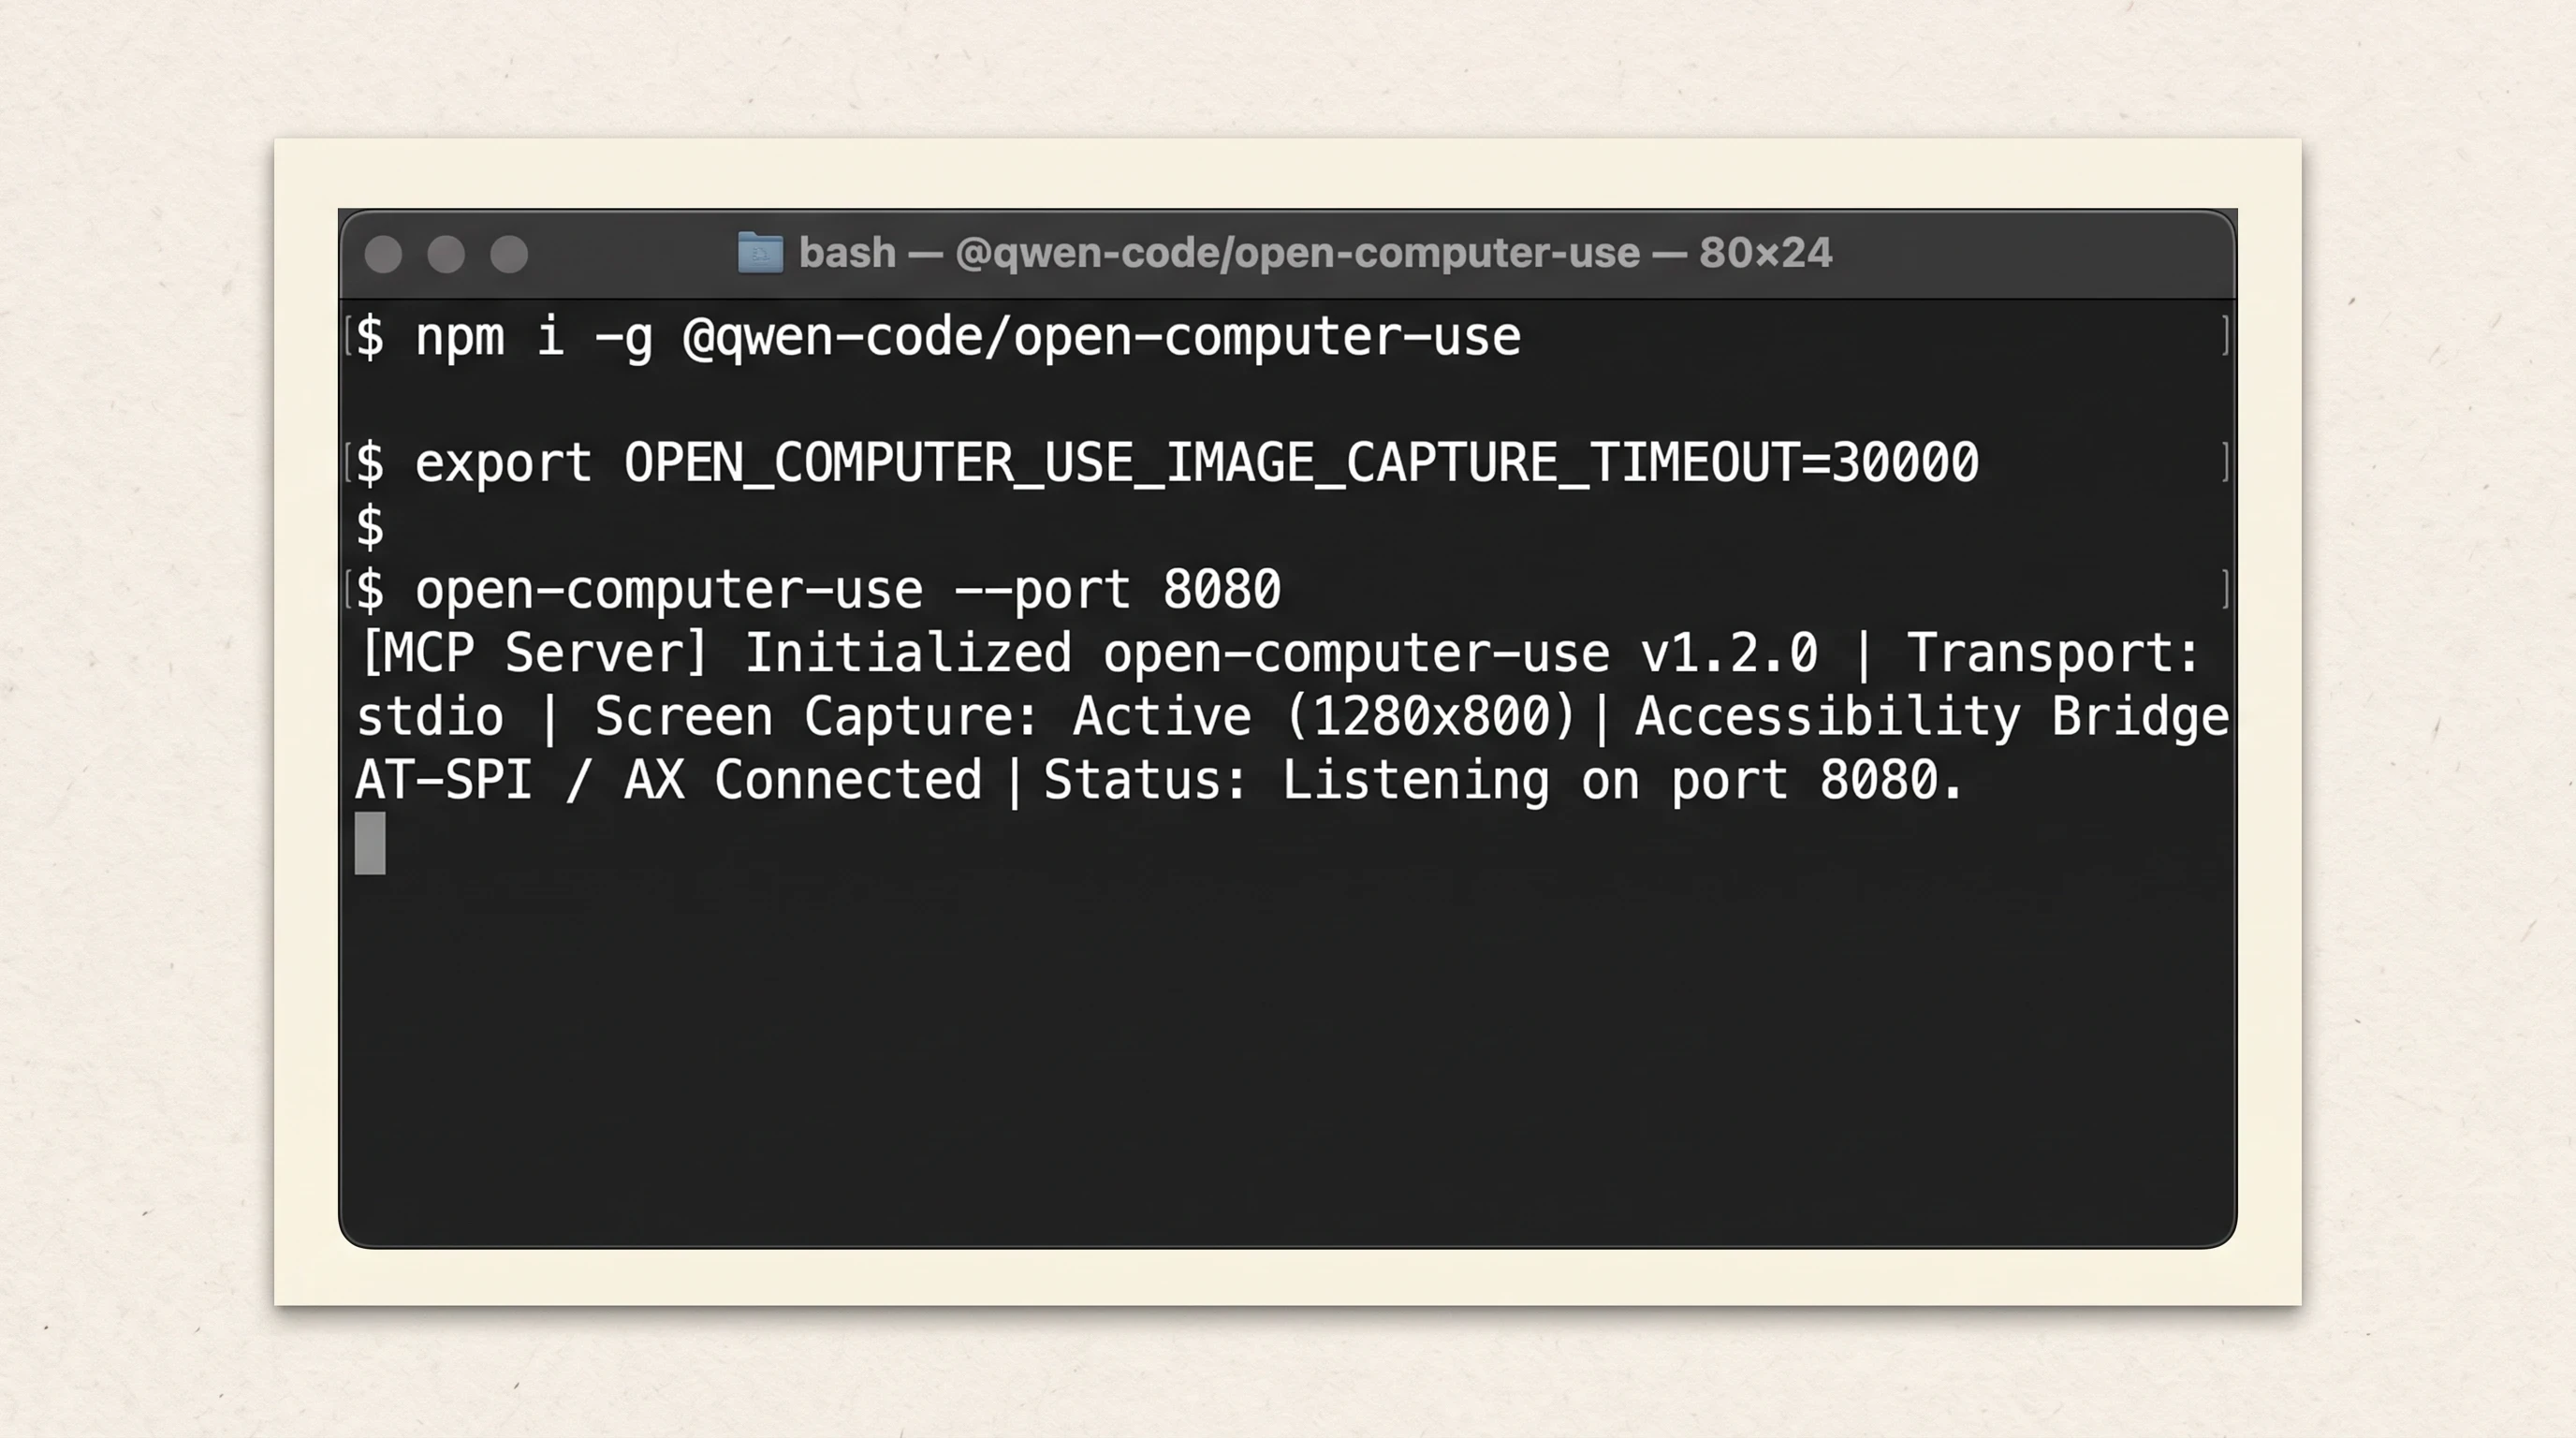
Deploying open-computer-use as a global MCP service provides local accessibility hooks and coordinate capture flags across macOS, Linux, and Windows.
To install and launch the service as a global background MCP provider:
Self-Hosting Bytebot's Multi-Model Docker Workspace
Bytebot is a self-hosted, containerized desktop automation workspace. It bundles a full Ubuntu desktop running XFCE, Firefox, and developer tooling, routing computer-use instructions through LiteLLM to support more than one hundred model providers.
Here is Bytebot's docker-compose.yml architecture:
Local Desktop Automation with Taskhomie (Tauri and Rust)
For local desktop app automation without heavy Docker overhead, suitedaces/computer-agent (Taskhomie) provides a lightweight desktop GUI wrapper built with Tauri, React, and Rust. It hooks directly into operating system accessibility APIs to capture and control desktop windows with minimal latency.
To see how hands-on desktop automation pairs with PyAutoGUI to launch development environments and manage scripts autonomously, review this developer walkthrough:
https://www.youtube.com/watch?v=MgkN-8o55w8 Hands-on walkthrough demonstrating autonomous VS Code automation, script execution, and environment setup via PyAutoGUI.
2026 Benchmark Scorecard & Cost Engineering: OSWorld Realities and Token Caching
To make sound architectural decisions, engineers must separate vendor benchmark claims from production operating economics.
2026 Benchmark Realities: GPT-5.4 (75.0%) vs. Human Baseline (72.4%)
The benchmark landscape for computer-use agents underwent a dramatic transformation in early 2026. Standardized evaluations rely on OSWorld, a benchmark suite comprising hundreds of realistic, multi-step desktop tasks across Ubuntu, macOS, and Windows (such as formatting spreadsheets in LibreOffice, reconfiguring audio devices, and compiling source code).
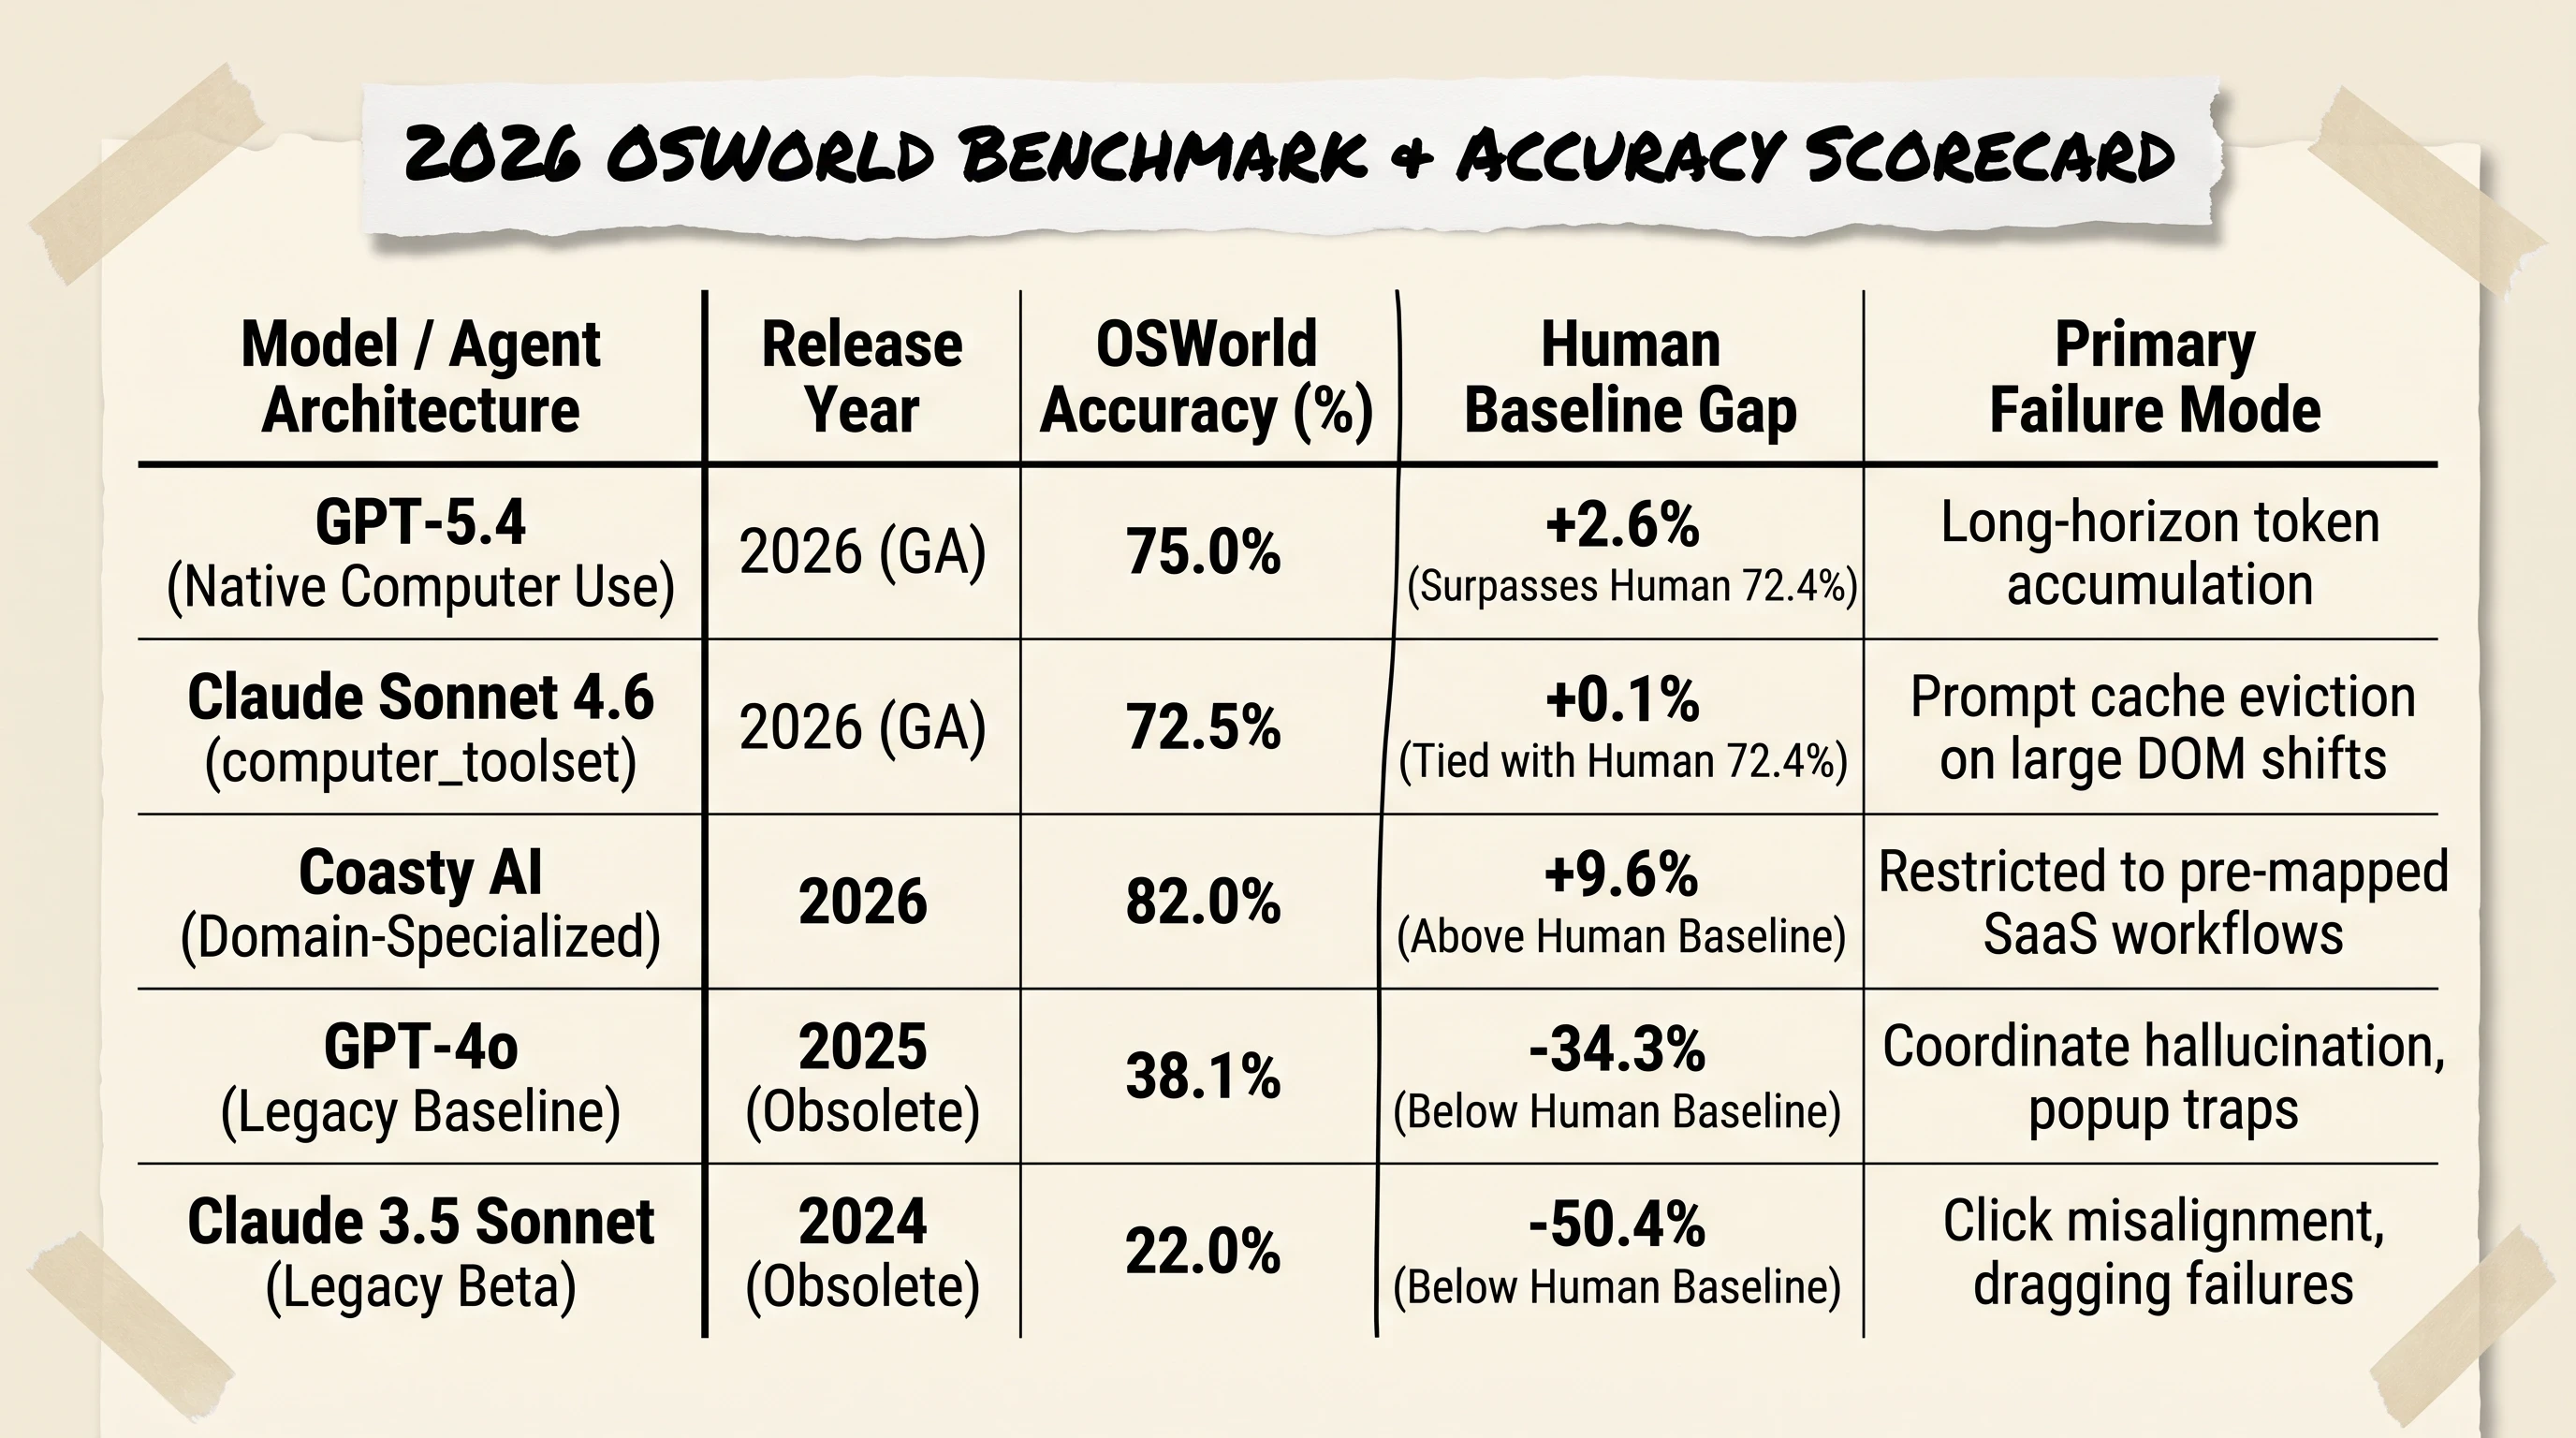
In 2026, GPT-5.4 achieved 75.0% on OSWorld, becoming the first general frontier model to surpass the human baseline (72.4%) in complex desktop automation.
When evaluating the best computer use ai for your technology stack, contextualize obsolete 2025 articles. Early benchmarks evaluated GPT-4o at 38.1% and Claude 3.5 Sonnet at 22.0%. In 2026, GPT-5.4 reached 75.0%, surpassing the human expert baseline of 72.4%, while Claude Sonnet 4.6 reached 72.5% and specialized domain agents like Coasty reached 82.0%.
The Latency Bottleneck: Why AI Desktop Automation Is 10x Slower Than Humans
Despite surpassing human accuracy baselines on isolated tasks, AI desktop automation remains roughly 10 times slower than human execution.
Every atomic interaction requires capturing a frame (150ms), encoding to base64 (200ms), transmitting the payload over TLS (450ms), performing multimodal visual tokenization and spatial coordinate inference (2800ms), dispatching physical input events (250ms), and rendering verification (350ms). A simple four-step form submission that takes a human two seconds requires nearly twenty seconds of agent execution time.
To explore how agents handle these latency realities across complex, long-horizon multi-application workflows, review this in-depth playlist:
https://www.youtube.com/playlist?list=PLPiGAX1fbf90 Comprehensive playlist demonstrating complex multi-app desktop workflows and handling dynamic UI state changes.
Cost Containment: Ephemeral Prompt Caching Breakpoints and Screenshot History Pruning
Because every turn requires transmitting high-resolution images, naive computer use loops cause API token costs to skyrocket. Anthropic's toolset prompt alone injects roughly 4,500 tokens of input overhead before a single screenshot is processed.
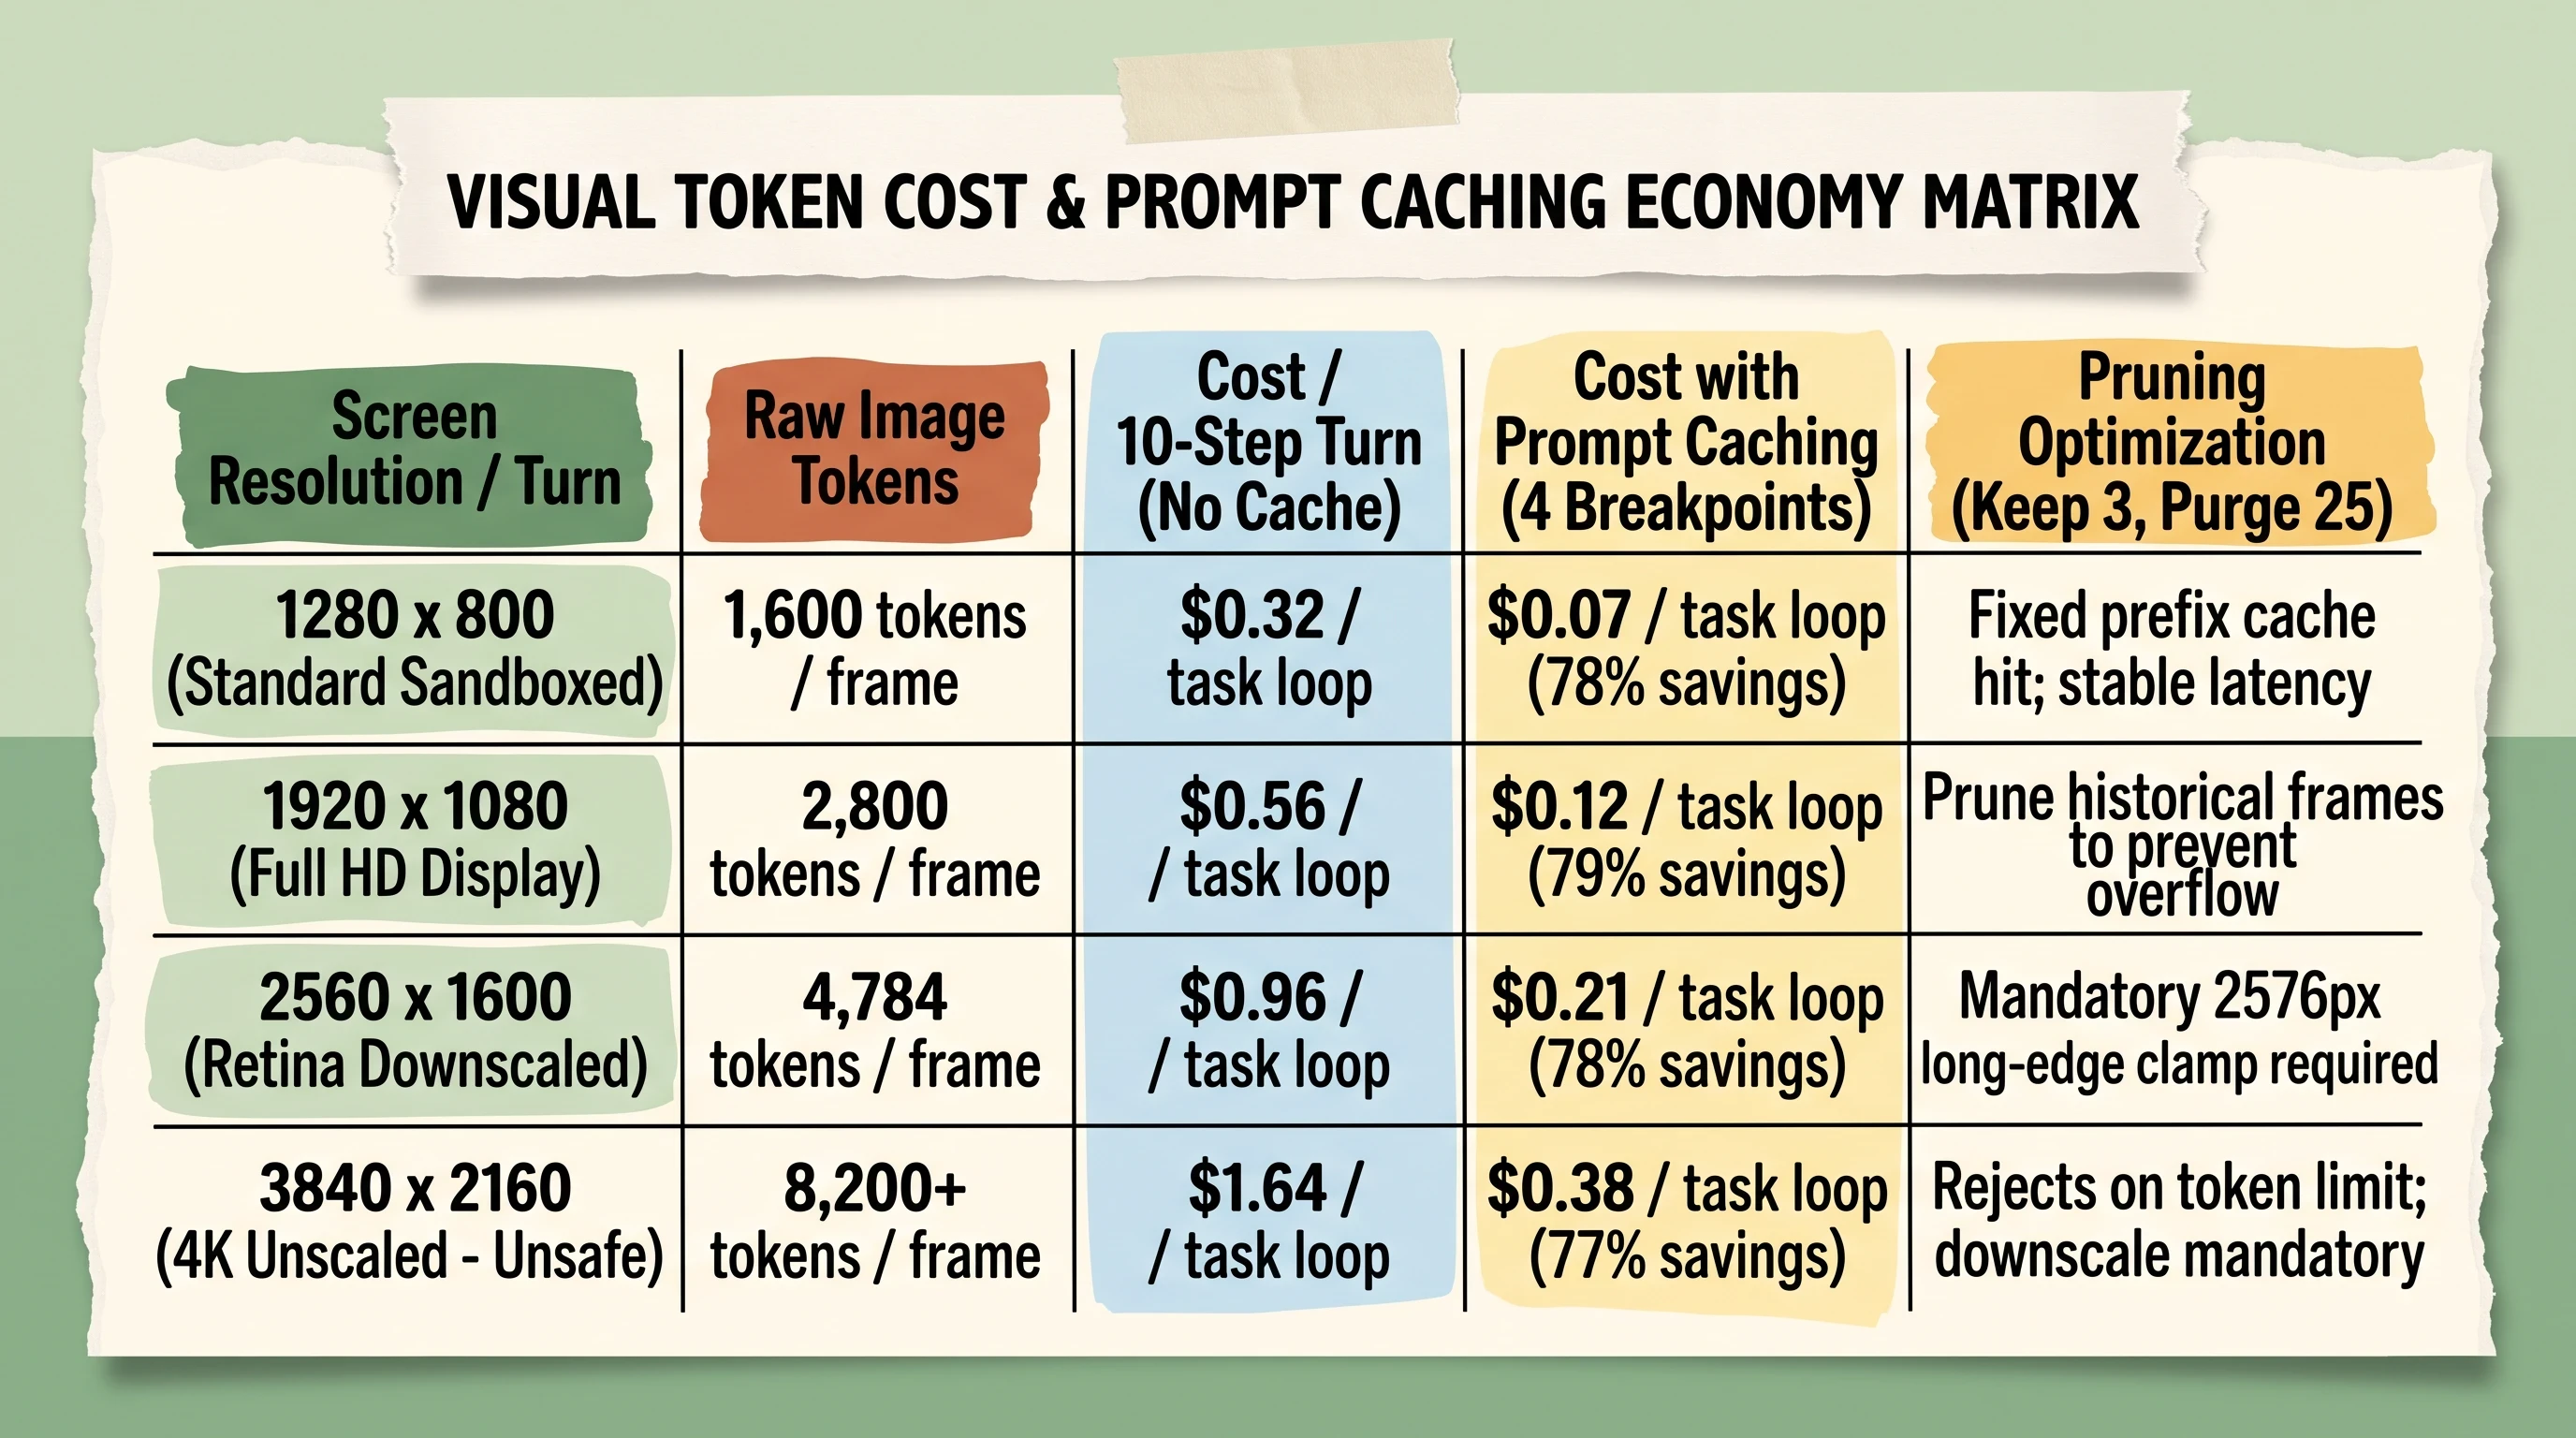
Implementing 4 prompt caching breakpoints and pruning screenshot history every 25 turns slashes API token overhead by up to 78%.
To build a cost-effective production loop:
Leverage Ephemeral Prompt Caching: Place up to four prompt caching breakpoints on static system prompts and the base tool definition. This reduces input token costs by up to 90% across multi-turn sessions.
Prune Screenshot History in Batches: Avoid retaining every raw image in the message history. Implement a pruning cadence: retain only the last three turns of screenshots for active context, and purge older images every twenty-five turns while keeping the text turn summaries. This maintains byte-identical cache prefixes, preventing cache busts while slashing overall token consumption.
Frequently Asked Questions About GPT Computer Use
Is there an AI that can control my computer?
Yes. Several AI desktop agents released in 2026 can autonomously control your computer's graphical interface. Consumer applications like Claude Cowork, Manus My Computer, and Perplexity Computer run in local or cloud environments to move cursors, click buttons, and execute multi-step workflows. Developers can build custom implementations using OpenAI's GA computer Responses API or Anthropic's Messages API to achieve full OS automation programmatically.
Does the ChatGPT app natively support computer control?
Yes. In supported regions, Computer Use is integrated into the official ChatGPT desktop application for macOS and Windows under the ChatGPT Work and Codex subscription tiers. On macOS, users grant Screen Recording and Accessibility permissions under System Settings. On Windows, users configure pre-authorized applications in $CODEX_HOME/config.toml to bypass repetitive manual confirmation prompts during execution.
Does native computer use mean client-side execution harnesses are no longer needed?
No. "Native" means spatial-coordinate planning and visual grounding are trained directly into the foundation model's weights, eliminating the need for secondary screen-parsing models like Microsoft OmniParser. However, the model still emits abstract coordinate payloads (click, type, mousemove) and strictly requires a client-side harness (such as Playwright, Docker with xdotool, or native OS accessibility bridges) to execute physical hardware events.
Are AI desktop agents safe to deploy on primary host machines?
No. Deploying autonomous desktop agents directly on your primary host machine is hazardous because the agent inherits all user privileges and can delete files, expose session tokens, or succumb to prompt injection. Enterprise best practices mandate running agents inside isolated virtualization environments, such as containerized Docker virtual desktops (Xvfb), disposable cloud VMs, or sandboxed browser instances.
What is visual prompt injection in computer-use agents and how is it blocked?
Visual prompt injection occurs when an agent encounters untrusted third-party content rendered on screen (such as malicious text hidden on a webpage) commanding the model to override user instructions and exfiltrate data. To block these attacks, developers implement pre-execution screenshields that scan visible screen text and OS accessibility trees before dispatching actions, automatically pausing execution for human approval via ask_user checkpoints whenever suspicious patterns appear.
Can ChatGPT computer use execute background tasks while the screen is locked?
Yes, but this feature is macOS-exclusive. In the ChatGPT desktop application under Settings > Computer Use, enabling Locked Use installs an Apple authorization plug-in. This plug-in allows the agent to continue executing automation tasks on an off-screen virtual session while the Mac display is locked, automatically pausing the agent and re-locking if any physical mouse or keyboard input is detected.
How much does it cost in API tokens and subscriptions to run computer use loops?
Costs depend on the integration path. Consumer subscriptions range from $20/month for Claude Pro to $200/month for ChatGPT Pro or Perplexity Max. For developer API integrations, pricing is pay-per-token: Anthropic's toolset injects roughly 4,500 input tokens of system overhead per call, while OpenAI's native tool consumes about 800 tokens. Using prompt caching breakpoints and screenshot history pruning reduces per-step visual token costs by up to 78%.
Why is computer use so much slower than traditional RPA or API automation?
Computer use is approximately 10 times slower than humans because every atomic action requires completing a full round-trip vision-action loop. The client must capture a high-resolution screenshot, encode it to base64, transmit it over the network, wait for multimodal visual tokenization and coordinate reasoning, execute the synthetic input, and capture a verification frame. A single turn typically takes 3 to 5 seconds.
Can computer use agents solve CAPTCHAs, create accounts, or bypass admin permissions?
No. Standard frontier safety boundaries and system limitations hard-block agents from bypassing authentication gates. Models are programmed to fail gracefully on CAPTCHAs, cannot approve operating system administrator privilege dialogs (UAC / sudo), and are restricted from creating communication accounts on third-party platforms to prevent human impersonation.
Deploying Your First Production Vision Loop
Building a production-ready GPT computer use pipeline requires moving beyond simple proof-of-concept scripts and treating desktop automation like distributed infrastructure engineering.
Your Production Deployment Checklist
Provision Virtualized Infrastructure: Spin up a containerized Ubuntu Docker sandbox with
Xvfb :99or an isolated Playwright Chromium instance. Never run autonomous coordinate dispatchers on bare-metal host workstations.Implement Device Pixel Scaling: Add dynamic downscaling and coordinate translation math to your client harness to ensure pixel-perfect click accuracy across high-DPI Retina and 4K displays.
Enforce Strict Batch Halting: Wrap multi-action execution blocks with error handlers that immediately halt on mid-batch exceptions and return
"Not executed: an earlier computer action in this turn failed."to prevent cascading state corruption.Deploy a Pre-Execution Screenshield: Integrate OS accessibility tree auditing and text regex scanners to intercept indirect visual prompt injection before synthetic hardware events dispatch.
Optimize Token Caching & History Pruning: Configure ephemeral prompt caching breakpoints and prune screenshot histories in batches to keep your API overhead predictable and sustainable.
Spin up a test container, load your target application into the virtual display, and run a simple five-step navigation loop using the code templates provided in this guide. Monitor the coordinate logs, verify the verification frames, and observe where visual grounding succeeds.
Until then...
Sage
PS. During early testing of a visual loop across a dynamic web portal, our agent got caught in an infinite three-minute loop attempting to click an interactive modal's close button. The model correctly calculated the x, y coordinates of the X icon, but because the CSS animation on the popup had a 300ms ease-in transition, the virtual click dispatched 50ms before the DOM element became clickable. Adding an explicit 500ms post-action stabilization delay in the client execution handler resolved the issue instantly.
Author
Practical guides, tool teardowns & AI engineering workflows.


